🕓 Timeframe: 4H | ⚠️ Bias: Bearish From Supply Zone
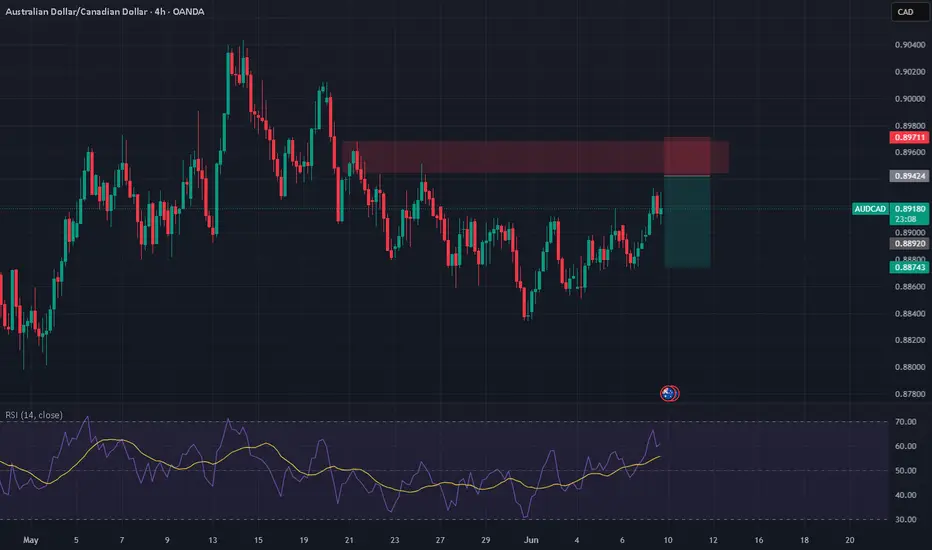
AUDCAD is rejecting the 0.8940–0.8960 supply zone, a key resistance that's been respected multiple times. With RSI turning over near overbought and CAD fundamentals improving, this looks like a clean short opportunity.
📊 Technical Confluence
🔴 Resistance Zone: 0.8940–0.8960 (historical supply zone)
📉 Bearish Structure Intact: Still in a broader HTF downtrend (lower highs)
⚠️ RSI Divergence: Slowing near 62, suggesting momentum exhaustion
🕯️ Price Action: Current candle showing indecision – early signs of rejection
🌍 Fundamental Confluence
🇦🇺 AUD Weakness:
RBA paused rates, inflation easing → Dovish
AUD overextended after sentiment shift (conditional score ↑ too fast)
AUD vulnerable if sentiment shifts risk-off
🇨🇦 CAD Strength:
BoC holding firm on rates, hawkish tone
Oil production recovering → CAD-positive
COT net long position + seasonal strength
🎯 Trade Plan
📍 Entry: 0.8940–0.8955 (on bearish confirmation: engulfing/pin bar)
🛑 Stop Loss: 0.8975 (above resistance zone)
🎯 Take Profit 1: 0.8870 (mid-range)
🎯 Take Profit 2: 0.8830 (into demand zone)
⏱️ Optional: Partial entry now, scale in at 0.8960 if tapped
🧠 “Don’t chase the move. Sell the retest when momentum fades and fundamentals align.”
交易結束:目標達成
🎯 Trade Recap – Target Reached on AUDCADExecuted a short position from the well-defined supply zone (0.8940–0.8960) after spotting clean rejection candles on the 4H.
🔻 Confluences for Entry:
Technical: Strong resistance + bearish engulfing
RSI: Rolling off near 60, confirming loss of bullish momentum
Fundamentals:
• AUD overstretched on weak macro backdrop
• CAD supported by oil and BoC’s hawkish tone
• Risk sentiment neutral, favoring CAD stability
📉 Result: Price followed through perfectly, respecting both structure and momentum. Target was hit with clean precision and no drawdown.
✅ Lesson: Patience at key levels pays. When technicals and fundamentals align, the trade often takes care of itself.
免責聲明
這些資訊和出版物並不意味著也不構成TradingView提供或認可的金融、投資、交易或其他類型的意見或建議。請在使用條款閱讀更多資訊。
免責聲明
這些資訊和出版物並不意味著也不構成TradingView提供或認可的金融、投資、交易或其他類型的意見或建議。請在使用條款閱讀更多資訊。