PROTECTED SOURCE SCRIPT
0x278's Swing-Failure-Pattern (SFP)
0x278's Swing-Failure-Pattern (SFP) ‑ Confirmed Short
Table of Contents
1. Introduction
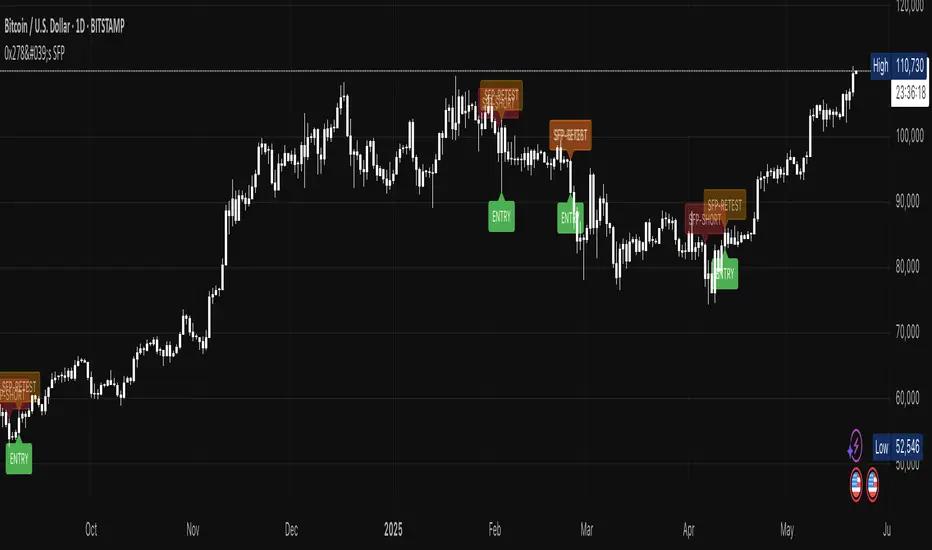
The Swing-Failure-Pattern (SFP) – Confirmed Short indicator spots and tracks bearish SFPs on any market and timeframe, with defaults tuned for Daily charts.
A bearish SFP occurs when price sweeps a prior swing high (liquidity grab) and then decisively rejects lower, signalling a possible trend reversal or sharp pullback.
This script automatically:
2. Core Concept – What Is an SFP?
The indicator encodes these four steps so you can spot high-quality bearish reversals without manual bar-by-bar analysis.
3. How the Indicator Works
Phase: Sweep & Rejection
Script Logic: high > lastSwingHigh and close < lastSwingHigh
Visual Cue: Red SFP-SHORT label above candle
Phase: Structure Break
Script Logic: Close < setupLow while pattern locked
Visual Cue: Zone (red line-box) plotted; SFP-SHORT label stays
Phase: Retest Tracking
Script Logic: Zone stays active for retestExpiry bars or until tapped
Visual Cue: Orange SFP-RETEST label when hit
Phase: Entry Signal
Script Logic: Price rejection within retest zone
Visual Cue: Green ENTRY label at optimal entry point
Phase: Expiry / Cleanup
Script Logic: Zone deleted after expiry
Visual Cue: Labels fade but remain visible for reference
All calculations reset after each completed/expired pattern ensuring fresh, uncluttered signals.
4. Visual Elements & Their Meaning
5. Input Parameters Explained
Pivot Detection
Retest Management
Retest Zone Sizing
Visual – Retest Zone
Visual – General
Labels
Advanced
Zone-Sizing Methods
6. Step-by-Step Trading Playbook
7. Example Workflow (Daily BTC-USDT)
8. Alerts & Automation
SFP Short confirmed
Fires When: Structure-break close below setupLow.
Suggested Action: Prepare/submit sell-limit order in the zone.
SFP Short retest
Fires When: Price enters the retest zone.
Suggested Action: Monitor for entry signals or prepare for manual entry.
SFP Short Entry Signal
Fires When: Optimal entry conditions detected within retest zone.
Suggested Action: Execute short trade with defined risk parameters.
Use TradingView's Webhook URL to forward alerts to a trade-execution bot (e.g., PineConnector) for automated order placement.
9. Tips, Tricks & Best Practices
10. FAQ
Q: Can I use this on lower timeframes?
A: Yes – reduce retestExpiry (e.g., 15 bars on 15-minute) and test ATR-based sizing.
Q: Does it work for longs?
A: This script focuses on bearish SFPs. Clone & invert conditions for longs.
Q: Why did a zone disappear?
A: Either it expired (retestExpiry) without a retest or the cleanup routine removed old visuals to stay within Pine limits (500 objects per type).
Q: What's the difference between the "SFP-RETEST" and "ENTRY" signals?
A: "SFP-RETEST" indicates price has entered the zone, while "ENTRY" signals an optimal entry opportunity based on price rejection within the zone.
Q: How do I customize the label appearance?
A: Use the "Label size" and "Use simple label style" settings to adjust all labels to your preferred visual style.
Happy trading & trade safe!
11. Advanced Configuration & Asset-Class Playbook
Why does the retest box feel "too high" and how do I actually get filled? Use the quick tweaks below or the power-user code snippet to shape the zone to your personality and instrument.
11.1 Why the default box is shallow
The Static 25 % / ATR-Hybrid logic keeps stops small. Around 50 % of Daily BTC SFPs never look back – that's the cost of tight risk. If you need higher fill-rates, deepen the zone (11.2).
11.2 Three slider moves – no coding required
Each turn pulls the lower edge of the box deeper while keeping the invalidation at the swing high.
11.3 One-liner for coders
To allow >60 % of the sweep range edit the source:
Old code:
minPct = 0.05
maxPct = 0.60
New code:
minPct = 0.05
maxPct = input.float(0.60, "Max retest % of sweep", step = 0.05, minval = 0.10, maxval = 0.95)
Then dial the cap up to ~0.80-0.90 from the settings panel.
11.4 If price never comes back…
11.5 Asset-Class Cheat-Sheet
Always forward-test on your own symbol & timeframe ✔️
Table of Contents
- Introduction
- Core Concept – What Is an SFP?
- How the Indicator Works
- Visual Elements & Their Meaning
- Input Parameters Explained
- Step-by-Step Trading Playbook
- Example Workflow (Daily BTC-USDT)
- Alerts & Automation
- Tips, Tricks & Best Practices
- FAQ
- Advanced Configuration & Asset-Class Playbook
1. Introduction
The Swing-Failure-Pattern (SFP) – Confirmed Short indicator spots and tracks bearish SFPs on any market and timeframe, with defaults tuned for Daily charts.
A bearish SFP occurs when price sweeps a prior swing high (liquidity grab) and then decisively rejects lower, signalling a possible trend reversal or sharp pullback.
This script automatically:
- Identifies the liquidity sweep & rejection (‐"SFP-SHORT" label)
- Confirms directional intent via a structure-breaking close below the setup low
- Paints a preferred sell-on-retest zone and tracks its validity
- Identifies optimal entry opportunities when price retests the zone
- Generates optional retest and entry alerts when trading conditions appear
- Self-cleans after a configurable number of bars – keeping your chart tidy
Default Timeframe: Daily
Default Market: Crypto / FX majors
Works On: All symbols + timeframes – simply adjust parameters.
2. Core Concept – What Is an SFP?
- Sweep (Liquidity Grab) – Price trades above a meaningful swing high, triggering stops & inducing breakout buyers.
- Rejection – The same bar (or the next) closes back below the swept high, invalidating the breakout.
- Structure Break – Bears confirm intent by closing below the "setup low" (the most recent pivot low before the sweep).
- Retest – Price retraces to the sweep zone. Traders seek entries inside the upper half of that zone with invalidation just above the swing high.
The indicator encodes these four steps so you can spot high-quality bearish reversals without manual bar-by-bar analysis.
3. How the Indicator Works
Phase: Sweep & Rejection
Script Logic: high > lastSwingHigh and close < lastSwingHigh
Visual Cue: Red SFP-SHORT label above candle
Phase: Structure Break
Script Logic: Close < setupLow while pattern locked
Visual Cue: Zone (red line-box) plotted; SFP-SHORT label stays
Phase: Retest Tracking
Script Logic: Zone stays active for retestExpiry bars or until tapped
Visual Cue: Orange SFP-RETEST label when hit
Phase: Entry Signal
Script Logic: Price rejection within retest zone
Visual Cue: Green ENTRY label at optimal entry point
Phase: Expiry / Cleanup
Script Logic: Zone deleted after expiry
Visual Cue: Labels fade but remain visible for reference
All calculations reset after each completed/expired pattern ensuring fresh, uncluttered signals.
4. Visual Elements & Their Meaning
- SFP-SHORT (red) – Bar that swept a prior high and closed below it.
- Red Box / Line – Preferred sell zone between the swing high (upper bound) and dynamic lower bound (see sizing methods). Extends right until filled/expired.
- SFP-RETEST (orange) – Bar that first tags the zone after confirmation.
- ENTRY (green) – Appears when a high-probability entry signal occurs within the retest zone.
- EXPIRED (gray) – Appears when the retest zone expires without being hit.
- Visual Persistence – Labels fade but remain visible after expiry for reference and historical analysis.
5. Input Parameters Explained
Pivot Detection
- Pivot left / right: Bars left/right of the pivot that must stay below/above it. Tip: Symmetrical values (3/3) work best for clean structure.
Retest Management
- Retest expiry (bars): Lifespan of a retest zone before it is considered stale. Default: 14 bars on Daily. Tip: Shorten for intraday, lengthen for swing trading.
Retest Zone Sizing
- Sizing method: Select Static %, ATR-based or Hybrid logic for the lower boundary. Tip: Hybrid balances tight stops with realistic fills.
- Static %: Fixed fraction of sweep range when Static/Hybrid is selected. Tip: Higher % deepens zone & widens stop.
- ATR period: Look-back length for ATR when volatility sizing is used. Tip: Increase to smooth choppy markets.
- ATR multiplier: Multiplier applied to ATR in ATR-based/Hybrid mode. Tip: Higher value widens zone during volatility.
Visual – Retest Zone
- Show retest zone box: Toggles drawing of the semi-transparent sell zone box. Tip: Disable for ultra-clean look.
- Retest box color: Fill colour of the box (alpha = transparency). Tip: Match your chart theme.
- Max retest boxes: How many historical boxes remain visible (0 = unlimited). Tip: Lower to boost performance.
- Only show active boxes: Automatically deletes a box once it's hit. Tip: Reduces clutter during back-testing.
Visual – General
- Minimal mode: Hides most visuals apart from critical labels. Tip: Ideal for screenshots.
- Show retest zone line: Draws a vertical line linking upper/lower boundaries. Tip: Acts as a quick depth guide.
- Show ENTRY labels: Plots 'ENTRY' on optimal candles. Tip: Turn off for manual confirmation.
Labels
- Label size: Overall size of all labels. Tip: tiny / small / normal.
- Use simple label style: Switches to pixel text style for labels. Tip: Faster rendering on low-spec machines.
Advanced
- minPct / maxPct (hard-coded): Internal floor/cap for Hybrid logic. Tip: Exposed in code for power-users only.
Zone-Sizing Methods
- Static – Lower bound = sweepRange × staticPct.
- ATR-based – Lower bound = ATR × multiplier, normalised to the sweepRange.
- Hybrid – Uses the greater of Static and ATR-based (capped by an internal safety ceiling).
6. Step-by-Step Trading Playbook
- Identify Context – Prefer setups against extended moves into obvious highs (e.g., daily swing highs, prior week high, round numbers).
- Wait for SFP Confirmation – The indicator will label an SFP-SHORT only after the candle closes. Do not front-run.
- Structure-Break Close – A close below setupLow turns the zone live. This is your go signal – prepare sell orders.
- Place Orders in the ZoneEntry: Limit order anywhere between retestLower and the swing high.
Stop: 1-2 ticks/pips above the swing high.
- Risk ManagementSize position so risk per trade ≤ account risk % (common: 0.5-1%).
If no retest before retestExpiry bars → cancel order.
- TargetsConservative: First liquidity pocket / FVG below.
Aggressive: 2-3× risk or next HTF support.
- Trail or Partial – Consider trailing stop once 1R is achieved or partial profit at 1R.
7. Example Workflow (Daily BTC-USDT)
- BTC trades to a fresh one-month high at $31 050 sweeping prior highs.
- Candle closes at $30 420 – below the swept high – SFP-SHORT label appears.
- Two days later, candle closes below setupLow at $29 880 – confirmation & zone plotted (upper = $31 050, lower ≈ $30 550).
- Five days later price retests the zone hitting $30 750 – SFP-RETEST alert fires, trade filled.
- Stop placed @ $31 120 (70$ risk). 1R target = $29 680 reached four days later.
8. Alerts & Automation
SFP Short confirmed
Fires When: Structure-break close below setupLow.
Suggested Action: Prepare/submit sell-limit order in the zone.
SFP Short retest
Fires When: Price enters the retest zone.
Suggested Action: Monitor for entry signals or prepare for manual entry.
SFP Short Entry Signal
Fires When: Optimal entry conditions detected within retest zone.
Suggested Action: Execute short trade with defined risk parameters.
Use TradingView's Webhook URL to forward alerts to a trade-execution bot (e.g., PineConnector) for automated order placement.
9. Tips, Tricks & Best Practices
- Combine with HTF Bias – Only take bearish SFPs in bearish weekly trend.
- Watch Volume – High volume on the sweep bar adds conviction.
- Time Window – SFPs during NY session FX / US session crypto tend to be stronger.
- Cluster Zones – Multiple overlapping SFP zones increase probability; treat the cluster as one larger supply.
- Avoid News – Skip SFPs forming minutes before high-impact macro news.
10. FAQ
Q: Can I use this on lower timeframes?
A: Yes – reduce retestExpiry (e.g., 15 bars on 15-minute) and test ATR-based sizing.
Q: Does it work for longs?
A: This script focuses on bearish SFPs. Clone & invert conditions for longs.
Q: Why did a zone disappear?
A: Either it expired (retestExpiry) without a retest or the cleanup routine removed old visuals to stay within Pine limits (500 objects per type).
Q: What's the difference between the "SFP-RETEST" and "ENTRY" signals?
A: "SFP-RETEST" indicates price has entered the zone, while "ENTRY" signals an optimal entry opportunity based on price rejection within the zone.
Q: How do I customize the label appearance?
A: Use the "Label size" and "Use simple label style" settings to adjust all labels to your preferred visual style.
Happy trading & trade safe!
11. Advanced Configuration & Asset-Class Playbook
Why does the retest box feel "too high" and how do I actually get filled? Use the quick tweaks below or the power-user code snippet to shape the zone to your personality and instrument.
11.1 Why the default box is shallow
The Static 25 % / ATR-Hybrid logic keeps stops small. Around 50 % of Daily BTC SFPs never look back – that's the cost of tight risk. If you need higher fill-rates, deepen the zone (11.2).
11.2 Three slider moves – no coding required
- Retest zone sizing method – switch Static → Hybrid or ATR-based
- Static % – raise from 0.25 → 0.45-0.60
- ATR multiplier – raise from 1.0 → 1.5-2.0
Each turn pulls the lower edge of the box deeper while keeping the invalidation at the swing high.
11.3 One-liner for coders
To allow >60 % of the sweep range edit the source:
Old code:
minPct = 0.05
maxPct = 0.60
New code:
minPct = 0.05
maxPct = input.float(0.60, "Max retest % of sweep", step = 0.05, minval = 0.10, maxval = 0.95)
Then dial the cap up to ~0.80-0.90 from the settings panel.
11.4 If price never comes back…
- No-retest partial – take 25-40 % size on the confirmation candle, stop above the high.
- Lower-TF confirmation – drop to 4 h / 1 h and hunt an internal SFP or bearish FVG inside the sweep.
- ATR trail – if price dumps immediately, trail the stop above each new lower-high.
11.5 Asset-Class Cheat-Sheet
- Crypto – Daily: Static %: 0.20-0.35, ATR mult: 1.0, Retest Expiry: 12-20. Notes: High volatility; sweeps expand fast.
- FX Majors – 4 h/D: Static %: 0.25-0.40, ATR mult: 1.2, Retest Expiry: 15-25. Notes: ATR handles session compression.
- Index Futures – 1 h: Static %: 0.30-0.50, ATR mult: 1.5, Retest Expiry: 10-20. Notes: Hybrid recommended; gaps tighten sweeps.
- US Equities – 30 m: Static %: 0.35-0.55, ATR mult: 1.5-2.0, Retest Expiry: 10-14. Notes: Consider no-retest entry on earnings spikes.
Always forward-test on your own symbol & timeframe ✔️
受保護腳本
此腳本以閉源形式發佈。 不過,您可以自由使用,沒有任何限制 — 點擊此處了解更多。
免責聲明
這些資訊和出版物並非旨在提供,也不構成TradingView提供或認可的任何形式的財務、投資、交易或其他類型的建議或推薦。請閱讀使用條款以了解更多資訊。
免責聲明
這些資訊和出版物並非旨在提供,也不構成TradingView提供或認可的任何形式的財務、投資、交易或其他類型的建議或推薦。請閱讀使用條款以了解更多資訊。