INVITE-ONLY SCRIPT
Hilbert micro trends Main
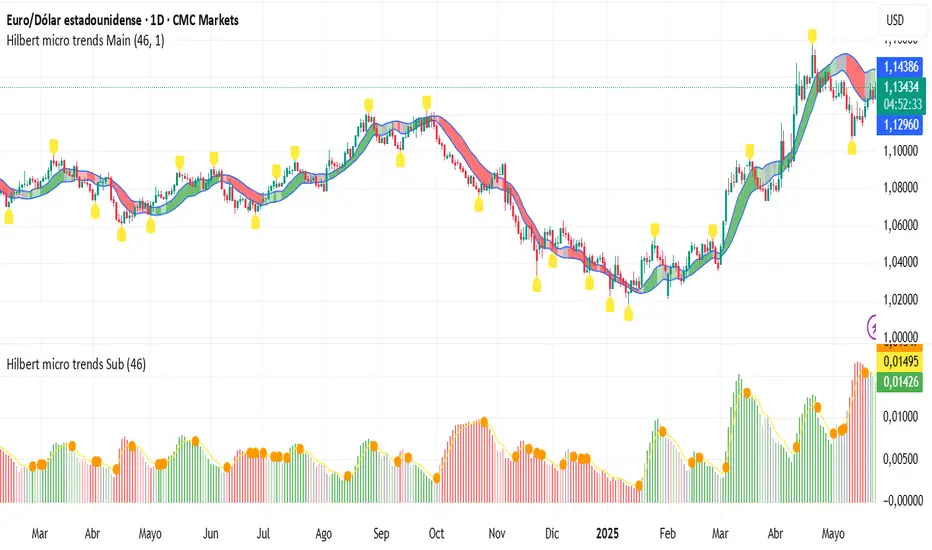
The HILBERT MICRO TRENDS indicator uses advanced Digital Signal Processing techniques to uncover hidden characteristics in price series, providing a statistical edge across all types of assets. This indicator specializes in detecting short- and medium-term micro trends, which can appear isolated, embedded within larger trends, or even during broad-ranging price phases.
It operates with a single parameter, simplifying configuration and greatly reducing the risk of overfitting. HILBERT MICRO TRENDS applies modern low-pass and high-pass filtering techniques to smooth price data and remove noise efficiently across multiple levels. The mathematical formulas generate four recursively smoothed series, each more refined than the last in a subtle and precise way, avoiding abrupt changes. These smoothed series outperform traditional moving averages in every aspect: they have less lag (detecting trend shifts faster), generate fewer false signals, and stay closer to price action. This gives them an edge over standard indicators and algorithms based on conventional moving averages such as the simple, exponential, Kalman, or Hull MA.
Visual Structure
The indicator displays in two parts: one on the main chart and one on a sub-chart. On the main chart, the four smoothed series create a shaded area, with the upper and lower bounds representing the maximum and minimum of the series. If a series is rising (positive derivative), it signals bullish momentum; if falling, bearish. Since each series has a different smoothing level, they represent different time perspectives, and the indicator considers all four simultaneously. If all series are bullish, the area turns solid green. If three are bullish and one bearish, it's pale green. Two bullish, two bearish: gray. One bullish and three bearish: pale red. All bearish: solid red. A confirmed micro trend is present only when all four are aligned, i.e., when the area is pure green or red.
The sub-chart displays a histogram version of the same shaded area as an oscillator. An additional smoothed line tracks when the width of this shaded area expands or contracts.
How to Use and Interpret
As stated, the goal is to detect micro trends in price. The first rule is to open long positions only when the area is solid green, and shorts only when it’s solid red. Transitions from pale green to solid green can signal the start of a bullish micro trend, and similarly, from pale red to solid red for bearish trends. The width of the shaded area indicates the strength of the movement (best seen in the histogram). A wider area suggests stronger momentum, which is related to volatility only when a micro trend is active.
Use the orange line in the histogram to determine whether the micro trend is gaining or losing strength. A decreasing width suggests the trend might be ending, signaling an exit opportunity. However, since the orange line lags behind, it’s better used as confirmation rather than a trigger. For quicker signals, changes to pure red or green are more effective.
Price Relationship
Pay attention to the price's relative position to the shaded area. If the price stays within or fluctuates inside the area, it's usually a sign of a ranging market with no clear trend—avoid trading in such conditions. However, if the price breaks out and moves away from the area, it's a strong sign a micro trend has begun. When the price returns to the shaded area, the trend might be ending.
The indicator also marks pivot points from the last pure green or red zone. While not directly used to enter trades, these serve as useful price action reference points for combining with other strategies or tools.
Parameter Settings
The indicator includes a single but crucial parameter that controls smoothing intensity. A low value makes the indicator faster; a higher value slows it down. Success depends on choosing the right setting for the market environment. For long, clear trends, use higher values (80–100), as late entries are acceptable and premature exits are avoided. For shorter, mean-reverting trends, lower values (~40) are better to avoid lag. The default setting is 60, which suits most markets, but users are encouraged to adjust it to current conditions.
Always identify the current market phase and backtest how past micro trends have behaved on the instrument being traded. This ensures the indicator is tuned to the asset’s behavior and can deliver optimal results.
僅限邀請腳本
僅作者批准的使用者才能訪問此腳本。您需要申請並獲得使用許可,通常需在付款後才能取得。更多詳情,請依照作者以下的指示操作,或直接聯絡Cardaniers。
TradingView不建議在未完全信任作者並了解其運作方式的情況下購買或使用腳本。您也可以在我們的社群腳本中找到免費的開源替代方案。
作者的說明
If you'd like to request access to the indicator, feel free to ask me—I'll gladly explain how you can do it quickly and easily.
免責聲明
這些資訊和出版物並非旨在提供,也不構成TradingView提供或認可的任何形式的財務、投資、交易或其他類型的建議或推薦。請閱讀使用條款以了解更多資訊。