HOG Liquidity ZonesHOG Liquidity Zones (Swings & Sweeps)
📊 Overview
A precision tool for visualizing key liquidity zones formed by swing highs and lows. It tracks tap counts, volume strength, and identifies directional sweep targets, giving traders a visual edge in spotting high-probability reaction zones.
⚙️ How It Works
• Identifies swing highs/lows using pivot logic
• Plots colored zones based on wicks or full ranges
• Tracks volume or count of price taps to validate zones
• Optional debounce and body-only tap filters
• Zones invalidate when fully broken by candle closes
• Imbalance zones highlight key displacement gaps
• “NEXT” marker shows likely sweep direction
🎯 Inputs
• Pivot Lookback Length
• Tap Debounce & Body-Only Filters
• Filter Type (Tap Count or Volume)
• Invalidate on Close Toggle
• Imbalance Zone Display
• Custom Label Size & Text Size
✅ Benefits
• Clearly shows where liquidity pools have formed
• Adapts to both structure and trap-based strategies
• Tap tracking helps gauge zone strength
• Useful for identifying magnets, rejections, and sweeps
• Clean, non-intrusive visuals
📈 Use Cases
• Target stop hunts or liquidity sweeps
• Confirm high-traffic areas before entries
• Combine with trend overlays or breakout tools
• Trade toward the next “NEXT” target zone
⚠️ Notes
• Zones remain active until invalidated or swept
• Tap logic can be customized for conservative or aggressive bias
• Imbalance boxes are optional and highlight displacement candles
• This tool is for visual context — not a signal engine
指標和策略

[Smith] VWAP Deviation + VWAP Deviation +
Short Description:
Advanced VWAP indicator with deviation bands, smart signal filtering, and session-based performance tracking. Features log-space scaling, RSI confirmation, volume filters, and market regime detection.
Full Description:
The VWAP Deviation + is a comprehensive trading indicator that combines Volume Weighted Average Price (VWAP) analysis with advanced signal filtering to identify high-probability trade opportunities. This indicator goes beyond basic VWAP by incorporating multiple confirmation layers and intelligent market analysis.
🎯 Key Features
Core VWAP Analysis:
- Custom volume-weighted mean calculation with deviation bands (2σ and 3σ)
- Optional log-space scaling for proportional price movements
- Real-time VWAP line with customizable visibility
Smart Signal Detection:
- RSI confirmation for all trade signals
- Volume filter requiring above-average trading activity
- Market regime detection (trending vs ranging markets)
- Optional RSI divergence analysis
Advanced Filtering:
- Multi-condition signal validation
- Session-based performance tracking (Asian, London, NY)
- Real-time win rate calculation
- Strong vs regular signal classification
Visual Features:
- Clean, professional interface with customizable colors
- Optional signal shapes and annotations
- Performance statistics table
- Filled deviation bands for easy visualization
📊 How It Works
The indicator identifies trade opportunities when:
1. Price touches VWAP deviation bands (2σ or 3σ)
2. RSI confirms oversold/overbought conditions
3. Volume exceeds the specified threshold
4. Market regime conditions are favorable
Signal Types:
- LONG : Price at lower bands + RSI oversold + volume confirmation
- SHORT : Price at upper bands + RSI overbought + volume confirmation
- STRONG : Same conditions but at 3σ bands for higher conviction trades
⚙️ Customization Options
Core Settings:
- VWAP length and source selection
- Adjustable deviation multipliers
- Log-space scaling toggle
Signal Filters:
- RSI length and threshold levels
- Volume filter with customizable multiplier
- Market type filtering options
Advanced Features:
- Session statistics tracking
- RSI divergence detection
- Market regime analysis
Visual Controls:
- Show/hide individual components
- Custom color schemes
- Signal display toggles
🔔 Alert System
Built-in alerts for:
- Long and short trade opportunities
- Strong signal confirmations
- RSI divergence signals
💡 Best Practices
- Use higher timeframes (15m+) for more reliable signals
- Combine with additional confirmation indicators
- Pay attention to session statistics for timing optimization
- Monitor market regime indicators for context
This indicator is suitable for day traders, swing traders, and anyone looking to improve their VWAP-based trading strategies with advanced filtering and market analysis.

Zimpact Custom ColorsZimpact Custom Colors – Buy/Sell Signals with Personalized Styling
Description:
This script is an enhanced version of the Zimpact indicator, designed to deliver clear Buy and Sell signals with the added flexibility of customizable line and background colors. The indicator combines two variants of the Hull Moving Average (HMA and a modified HMA) to detect trend changes and provide visually intuitive trading cues.
Key Features:
Dynamic line coloring: Lines automatically change color depending on trend direction (up/down).
Customizable colors: Users can set their own line colors and background transparency.
Clear Buy/Sell signals: Label markers highlight crossover points for potential entries.
Built-in alerts: Receive alerts when Buy or Sell signals are triggered.
How the Indicator Works:
Two HMAs are calculated: a standard and a modified version.
A Buy signal appears when the modified HMA crosses above the standard HMA.
A Sell signal appears when the modified HMA crosses below the standard HMA.
Line and background colors adapt dynamically to trend direction.
All visual elements can be adjusted via user input settings.
Adjustable Inputs:
Price source (hl2, close, etc.)
Period and shift for HMA calculations
Toggle Buy/Sell labels on or off
Colors for bullish and bearish trends
Background fill transparency (0% to 100%)
Who It's For:
This indicator is ideal for swing and intraday traders seeking a visually simple yet informative tool for trend detection and trade entries.
Note: This is not financial advice. Always use additional tools and perform your own analysis before entering a trade.

Grothendieck-Teichmüller Geometric SynthesisDskyz's Grothendieck-Teichmüller Geometric Synthesis (GTGS)
THEORETICAL FOUNDATION: A SYMPHONY OF GEOMETRIES
The 🎓 GTGS is built upon a revolutionary premise: that market dynamics can be modeled as geometric and topological structures. While not a literal academic implementation—such a task would demand computational power far beyond current trading platforms—it leverages core ideas from advanced mathematical theories as powerful analogies and frameworks for its algorithms. Each component translates an abstract concept into a practical market calculation, distinguishing GTGS by identifying deeper structural patterns rather than relying on standard statistical measures.
1. Grothendieck-Teichmüller Theory: Deforming Market Structure
The Theory : Studies symmetries and deformations of geometric objects, focusing on the "absolute" structure of mathematical spaces.
Indicator Analogy : The calculate_grothendieck_field function models price action as a "deformation" from its immediate state. Using the nth root of price ratios (math.pow(price_ratio, 1.0/prime)), it measures market "shape" stretching or compression, revealing underlying tensions and potential shifts.
2. Topos Theory & Sheaf Cohomology: From Local to Global Patterns
The Theory : A framework for assembling local properties into a global picture, with cohomology measuring "obstructions" to consistency.
Indicator Analogy : The calculate_topos_coherence function uses sine waves (math.sin) to represent local price "sections." Summing these yields a "cohomology" value, quantifying price action consistency. High values indicate coherent trends; low values signal conflict and uncertainty.
3. Tropical Geometry: Simplifying Complexity
The Theory : Transforms complex multiplicative problems into simpler, additive, piecewise-linear ones using min(a, b) for addition and a + b for multiplication.
Indicator Analogy : The calculate_tropical_metric function applies tropical_add(a, b) => math.min(a, b) to identify the "lowest energy" state among recent price points, pinpointing critical support levels non-linearly.
4. Motivic Cohomology & Non-Commutative Geometry
The Theory : Studies deep arithmetic and quantum-like properties of geometric spaces.
Indicator Analogy : The motivic_rank and spectral_triple functions compute weighted sums of historical prices to capture market "arithmetic complexity" and "spectral signature." Higher values reflect structured, harmonic price movements.
5. Perfectoid Spaces & Homotopy Type Theory
The Theory : Abstract fields dealing with p-adic numbers and logical foundations of mathematics.
Indicator Analogy : The perfectoid_conv and type_coherence functions analyze price convergence and path identity, assessing the "fractal dust" of price differences and price path cohesion, adding fractal and logical analysis.
The Combination is Key : No single theory dominates. GTGS ’s Unified Field synthesizes all seven perspectives into a comprehensive score, ensuring signals reflect deep structural alignment across mathematical domains.
🎛️ INPUTS: CONFIGURING THE GEOMETRIC ENGINE
The GTGS offers a suite of customizable inputs, allowing traders to tailor its behavior to specific timeframes, market sectors, and trading styles. Below is a detailed breakdown of key input groups, their functionality, and optimization strategies, leveraging provided tooltips for precision.
Grothendieck-Teichmüller Theory Inputs
🧬 Deformation Depth (Absolute Galois) :
What It Is : Controls the depth of Galois group deformations analyzed in market structure.
How It Works : Measures price action deformations under automorphisms of the absolute Galois group, capturing market symmetries.
Optimization :
Higher Values (15-20) : Captures deeper symmetries, ideal for major trends in swing trading (4H-1D).
Lower Values (3-8) : Responsive to local deformations, suited for scalping (1-5min).
Timeframes :
Scalping (1-5min) : 3-6 for quick local shifts.
Day Trading (15min-1H) : 8-12 for balanced analysis.
Swing Trading (4H-1D) : 12-20 for deep structural trends.
Sectors :
Stocks : Use 8-12 for stable trends.
Crypto : 3-8 for volatile, short-term moves.
Forex : 12-15 for smooth, cyclical patterns.
Pro Tip : Increase in trending markets to filter noise; decrease in choppy markets for sensitivity.
🗼 Teichmüller Tower Height :
What It Is : Determines the height of the Teichmüller modular tower for hierarchical pattern detection.
How It Works : Builds modular levels to identify nested market patterns.
Optimization :
Higher Values (6-8) : Detects complex fractals, ideal for swing trading.
Lower Values (2-4) : Focuses on primary patterns, faster for scalping.
Timeframes :
Scalping : 2-3 for speed.
Day Trading : 4-5 for balanced patterns.
Swing Trading : 5-8 for deep fractals.
Sectors :
Indices : 5-8 for robust, long-term patterns.
Crypto : 2-4 for rapid shifts.
Commodities : 4-6 for cyclical trends.
Pro Tip : Higher towers reveal hidden fractals but may slow computation; adjust based on hardware.
🔢 Galois Prime Base :
What It Is : Sets the prime base for Galois field computations.
How It Works : Defines the field extension characteristic for market analysis.
Optimization :
Prime Characteristics :
2 : Binary markets (up/down).
3 : Ternary states (bull/bear/neutral).
5 : Pentagonal symmetry (Elliott waves).
7 : Heptagonal cycles (weekly patterns).
11,13,17,19 : Higher-order patterns.
Timeframes :
Scalping/Day Trading : 2 or 3 for simplicity.
Swing Trading : 5 or 7 for wave or cycle detection.
Sectors :
Forex : 5 for Elliott wave alignment.
Stocks : 7 for weekly cycle consistency.
Crypto : 3 for volatile state shifts.
Pro Tip : Use 7 for most markets; 5 for Elliott wave traders.
Topos Theory & Sheaf Cohomology Inputs
🏛️ Temporal Site Size :
What It Is : Defines the number of time points in the topological site.
How It Works : Sets the local neighborhood for sheaf computations, affecting cohomology smoothness.
Optimization :
Higher Values (30-50) : Smoother cohomology, better for trends in swing trading.
Lower Values (5-15) : Responsive, ideal for reversals in scalping.
Timeframes :
Scalping : 5-10 for quick responses.
Day Trading : 15-25 for balanced analysis.
Swing Trading : 25-50 for smooth trends.
Sectors :
Stocks : 25-35 for stable trends.
Crypto : 5-15 for volatility.
Forex : 20-30 for smooth cycles.
Pro Tip : Match site size to your average holding period in bars for optimal coherence.
📐 Sheaf Cohomology Degree :
What It Is : Sets the maximum degree of cohomology groups computed.
How It Works : Higher degrees capture complex topological obstructions.
Optimization :
Degree Meanings :
1 : Simple obstructions (basic support/resistance).
2 : Cohomological pairs (double tops/bottoms).
3 : Triple intersections (complex patterns).
4-5 : Higher-order structures (rare events).
Timeframes :
Scalping/Day Trading : 1-2 for simplicity.
Swing Trading : 3 for complex patterns.
Sectors :
Indices : 2-3 for robust patterns.
Crypto : 1-2 for rapid shifts.
Commodities : 3-4 for cyclical events.
Pro Tip : Degree 3 is optimal for most trading; higher degrees for research or rare event detection.
🌐 Grothendieck Topology :
What It Is : Chooses the Grothendieck topology for the site.
How It Works : Affects how local data integrates into global patterns.
Optimization :
Topology Characteristics :
Étale : Finest topology, captures local-global principles.
Nisnevich : A1-invariant, good for trends.
Zariski : Coarse but robust, filters noise.
Fpqc : Faithfully flat, highly sensitive.
Sectors :
Stocks : Zariski for stability.
Crypto : Étale for sensitivity.
Forex : Nisnevich for smooth trends.
Indices : Zariski for robustness.
Timeframes :
Scalping : Étale for precision.
Swing Trading : Nisnevich or Zariski for reliability.
Pro Tip : Start with Étale for precision; switch to Zariski in noisy markets.
Unified Field Configuration Inputs
⚛️ Field Coupling Constant :
What It Is : Sets the interaction strength between geometric components.
How It Works : Controls signal amplification in the unified field equation.
Optimization :
Higher Values (0.5-1.0) : Strong coupling, amplified signals for ranging markets.
Lower Values (0.001-0.1) : Subtle signals for trending markets.
Timeframes :
Scalping : 0.5-0.8 for quick, strong signals.
Swing Trading : 0.1-0.3 for trend confirmation.
Sectors :
Crypto : 0.5-1.0 for volatility.
Stocks : 0.1-0.3 for stability.
Forex : 0.3-0.5 for balance.
Pro Tip : Default 0.137 (fine structure constant) is a balanced starting point; adjust up in choppy markets.
📐 Geometric Weighting Scheme :
What It Is : Determines the framework for combining geometric components.
How It Works : Adjusts emphasis on different mathematical structures.
Optimization :
Scheme Characteristics :
Canonical : Equal weighting, balanced.
Derived : Emphasizes higher-order structures.
Motivic : Prioritizes arithmetic properties.
Spectral : Focuses on frequency domain.
Sectors :
Stocks : Canonical for balance.
Crypto : Spectral for volatility.
Forex : Derived for structured moves.
Indices : Motivic for arithmetic cycles.
Timeframes :
Day Trading : Canonical or Derived for flexibility.
Swing Trading : Motivic for long-term cycles.
Pro Tip : Start with Canonical; experiment with Spectral in volatile markets.
Dashboard and Visual Configuration Inputs
📋 Show Enhanced Dashboard, 📏 Size, 📍 Position :
What They Are : Control dashboard visibility, size, and placement.
How They Work : Display key metrics like Unified Field , Resonance , and Signal Quality .
Optimization :
Scalping : Small size, Bottom Right for minimal chart obstruction.
Swing Trading : Large size, Top Right for detailed analysis.
Sectors : Universal across markets; adjust size based on screen setup.
Pro Tip : Use Large for analysis, Small for live trading.
📐 Show Motivic Cohomology Bands, 🌊 Morphism Flow, 🔮 Future Projection, 🔷 Holographic Mesh, ⚛️ Spectral Flow :
What They Are : Toggle visual elements representing mathematical calculations.
How They Work : Provide intuitive representations of market dynamics.
Optimization :
Timeframes :
Scalping : Enable Morphism Flow and Spectral Flow for momentum.
Swing Trading : Enable all for comprehensive analysis.
Sectors :
Crypto : Emphasize Morphism Flow and Future Projection for volatility.
Stocks : Focus on Cohomology Bands for stable trends.
Pro Tip : Disable non-essential visuals in fast markets to reduce clutter.
🌫️ Field Transparency, 🔄 Web Recursion Depth, 🎨 Mesh Color Scheme :
What They Are : Adjust visual clarity, complexity, and color.
How They Work : Enhance interpretability of visual elements.
Optimization :
Transparency : 30-50 for balanced visibility; lower for analysis.
Recursion Depth : 6-8 for balanced detail; lower for older hardware.
Color Scheme :
Purple/Blue : Analytical focus.
Green/Orange : Trading momentum.
Pro Tip : Use Neon Purple for deep analysis; Neon Green for active trading.
⏱️ Minimum Bars Between Signals :
What It Is : Minimum number of bars required between consecutive signals.
How It Works : Prevents signal clustering by enforcing a cooldown period.
Optimization :
Higher Values (10-20) : Fewer signals, avoids whipsaws, suited for swing trading.
Lower Values (0-5) : More responsive, allows quick reversals, ideal for scalping.
Timeframes :
Scalping : 0-2 bars for rapid signals.
Day Trading : 3-5 bars for balance.
Swing Trading : 5-10 bars for stability.
Sectors :
Crypto : 0-3 for volatility.
Stocks : 5-10 for trend clarity.
Forex : 3-7 for cyclical moves.
Pro Tip : Increase in choppy markets to filter noise.
Hardcoded Parameters
Tropical, Motivic, Spectral, Perfectoid, Homotopy Inputs : Fixed to optimize performance but influence calculations (e.g., tropical_degree=4 for support levels, perfectoid_prime=5 for convergence).
Optimization : Experiment with codebase modifications if advanced customization is needed, but defaults are robust across markets.
🎨 ADVANCED VISUAL SYSTEM: TRADING IN A GEOMETRIC UNIVERSE
The GTTMTSF ’s visuals are direct representations of its mathematics, designed for intuitive and precise trading decisions.
Motivic Cohomology Bands :
What They Are : Dynamic bands ( H⁰ , H¹ , H² ) representing cohomological support/resistance.
Color & Meaning : Colors reflect energy levels ( H⁰ tightest, H² widest). Breaks into H¹ signal momentum; H² touches suggest reversals.
How to Trade : Use for stop-loss/profit-taking. Band bounces with Dashboard confirmation are high-probability setups.
Morphism Flow (Webbing) :
What It Is : White particle streams visualizing market momentum.
Interpretation : Dense flows indicate strong trends; sparse flows signal consolidation.
How to Trade : Follow dominant flow direction; new flows post-consolidation signal trend starts.
Future Projection Web (Fractal Grid) :
What It Is : Fibonacci-period fractal projections of support/resistance.
Color & Meaning : Three-layer lines (white shadow, glow, colored quantum) with labels showing price, topological class, anomaly strength (φ), resonance (ρ), and obstruction ( H¹ ). ⚡ marks extreme anomalies.
How to Trade : Target ⚡/● levels for entries/exits. High-anomaly levels with weakening Unified Field are reversal setups.
Holographic Mesh & Spectral Flow :
What They Are : Visuals of harmonic interference and spectral energy.
How to Trade : Bright mesh nodes or strong Spectral Flow warn of building pressure before price movement.
📊 THE GEOMETRIC DASHBOARD: YOUR MISSION CONTROL
The Dashboard translates complex mathematics into actionable intelligence.
Unified Field & Signals :
FIELD : Master value (-10 to +10), synthesizing all geometric components. Extreme readings (>5 or <-5) signal structural limits, often preceding reversals or continuations.
RESONANCE : Measures harmony between geometric field and price-volume momentum. Positive amplifies bullish moves; negative amplifies bearish moves.
SIGNAL QUALITY : Confidence meter rating alignment. Trade only STRONG or EXCEPTIONAL signals for high-probability setups.
Geometric Components :
What They Are : Breakdown of seven mathematical engines.
How to Use : Watch for convergence. A strong Unified Field is reliable when components (e.g., Grothendieck , Topos , Motivic ) align. Divergence warns of trend weakening.
Signal Performance :
What It Is : Tracks indicator signal performance.
How to Use : Assesses real-time performance to build confidence and understand system behavior.
🚀 DEVELOPMENT & UNIQUENESS: BEYOND CONVENTIONAL ANALYSIS
The GTTMTSF was developed to analyze markets as evolving geometric objects, not statistical time-series.
Why This Is Unlike Anything Else :
Theoretical Depth : Uses geometry and topology, identifying patterns invisible to statistical tools.
Holistic Synthesis : Integrates seven deep mathematical frameworks into a cohesive Unified Field .
Creative Implementation : Translates PhD-level mathematics into functional Pine Script , blending theory and practice.
Immersive Visualization : Transforms charts into dynamic geometric landscapes for intuitive market understanding.
The GTTMTSF is more than an indicator; it’s a new lens for viewing markets, for traders seeking deeper insight into hidden order within chaos.
" Where there is matter, there is geometry. " - Johannes Kepler
— Dskyz , Trade with insight. Trade with anticipation.

Adaptive Quadratic Kernel EnvelopeThis study draws a fair-value curve from a quadratic-weighted (Nadaraya-Watson) regression. Alpha sets how sharply weights decay inside the look-back window, so you trade lag against smoothness with one slider. Band half-width is ATRslow times a bounded fast/slow ATR ratio, giving an instant response to regime shifts without overshooting on spikes. Work in log space when an instrument grows exponentially, equal percentage moves then map to equal vertical steps. NearBase and FarBase define a progression of adaptive thresholds, useful for sizing exits or calibrating mean-reversion logic. Non-repaint mode keeps one-bar delay for clean back-tests, predictive mode shows the zero-lag curve for live decisions.
Key points
- Quadratic weights cut phase error versus Gaussian or SMA-based envelopes.
- Dual-ATR scaling updates width on the next bar, no residual lag.
- Log option preserves envelope symmetry across multi-decade data.
- Alpha provides direct control of curvature versus noise.
- Built-in alerts trigger on the first adaptive threshold, ready for automation.
Typical uses
Trend bias from the slope of the curve.
Entry timing when price pierces an inner threshold and momentum stalls.
Breakout confirmation when closes hold beyond outer thresholds while volatility expands.
Stops and targets anchored to chosen thresholds, automatically matching current noise.

📦 Refined Supply & Demand Zones (RBR, DBD, DBR, RBD)📦 Refined Supply & Demand Zones (RBR, DBD, DBR, RBD)
This script automatically detects and visualizes institutional supply and demand zones based on four key price action patterns:
🟢 RBR (Rally-Base-Rally) — Demand
🟢 DBR (Drop-Base-Rally) — Demand
🔴 DBD (Drop-Base-Drop) — Supply
🔴 RBD (Rally-Base-Drop) — Supply
Zones are plotted as transparent rectangles with color-coded logic:
Green for demand zones
Red for supply zones
⚙️ Features:
Adjustable base candle count, wick tolerance, and lookback range
Optimized for performance with loop limiting and throttled cleanup
Designed for scalping, day trading, or swing setups
Runs on any timeframe or market
Built for traders who want to visualize high-probability reaction areas based on clean, rule-based structure — no repainting, no guesswork.

MOM Buy/Sell + MACD Histogram Signal TableThis gives you a bullish and bearish buy signal based on macd crossing 0 level and macd crossing signal line...and it gives sell signal the first time after a buy signal price closes across the 13 ema. It also gives a table on what the macd histogram is doing on multiple time frames so you know where the momentum is.

OBAdvanced Order Block & Liquidity Mapping Tool
This open-source script is designed to help traders identify market structure and key liquidity areas using a combination of fractal-based order block detection and dynamic/static liquidity mapping.
Features Overview:
- Detects bullish and bearish order blocks using 3-bar and 5-bar fractal patterns
- Automatic removal of invalidated order blocks when price bodies fully break above/below OB highs/lows
- Fair Value Gap (FVG) validation option to increase signal quality
- Time-based label system for session or bar analysis
- Highly customizable visuals: line styles, label positions, widths, colors, and time offsets
🛠️ Custom Enhancements:
This version introduces a key improvement: order blocks are automatically removed once they are considered invalid, specifically when the body of a future candle breaks through the high or low of the original OB — not just the wick. This enhances the clarity and reliability of the displayed levels by dynamically filtering out broken zones.
🧠 Based on Open Source Work:
This script includes adapted logic from the open-source Orderblocks script by Nephew_Sam_.
The original detection mechanism has been extended with new invalidation logic and improved visual rendering.
Recommended Usage:
Best suited for intraday or swing-trading strategies based on market structure and smart money concepts (SMC). Works well on 5m to 4h timeframes. Inputs are adjustable to suit varying volatility and session preferences.
⚠️ Disclaimer:
This tool is intended for educational and analytical purposes only. It is not financial advice, and no performance or profitability is guaranteed.
// Portions of the order block logic are adapted from the open-source "Orderblocks" script by Nephew_Sam_.
// Original:
// This version adds custom invalidation logic based on body breaches and enhanced cleanup behavior.

BOS mark-out (by Lumiere)Advanced BOS Detection with Strict Swing Confirmation
This indicator implements BOS detection with several unique features:
🔹 Dual-Candle Swing Validation - Unlike most BOS indicators that use single candle swings, this uses a two-candle confirmation for swing highs/lows, analyzing both the candle wicks and body transitions.
🔹 Directional Lock System - Implements a state machine that prevents duplicate signals until an opposite-direction BOS occurs, reducing noise.
🔹 Precision Wick Analysis - Compares wicks between the reversal candle and confirmation candle to identify the true swing point.
🔹 Real-Time Update & Live Market Adaptation – The indicator continuously monitors price action and instantly updates BOS signals as new candles form, ensuring you never miss a BOS.
How It Differs From Other BOS Indicators:
Most public BOS indicators use simple HH/HL or LH/LL detection.
Many don't implement the directional locking mechanism.
Few use the two-candle wick comparison approach.
Wick-Based Precision uses the extreme wicks of two candles (not just the body).
Strict Confirmation requires a close beyond the swing point (no "wick breaks" counted).
Usage Examples:
🟦 Bullish BOS:
A green candle closes, followed by a red candle. This will be the new high, and if the next candle closes above the highest wick of those two, it will be a BOS (only if we had a bearish BOS before)
🟥 Bearish BOS:
A red candle closes, followed by a green candle. This will be the new low, and if the next candle closes below the lowest wick of those two, it will be a BOS (only if we had a Bullish BOS before)

PriceLevels GBGoldbach Price Levels – Identify Algorithmic Key Zones
This open-source indicator is designed to help traders identify potential algorithmic key zones by highlighting price levels ending with specific numbers such as 03, 11, 29, 35, 65, and 71. These levels may act as inflection points or hesitation areas based on observed behavioral patterns in price movement.
What It Does:
📌 Scans and plots horizontal price levels where the price ends with one of the selected number combinations
🎯 Toggle on/off visibility for each number ending
🎨 Customize color and thickness for each level
🏷️ Shows price labels at the end of each line
🌗 Label styles (color/transparency) are adjustable for both dark and light chart themes
🧠 Why Use It:
This tool is ideal for discretionary traders who study market structure through static price anchors. It provides a visual reference for recurring numerical levels that may be used in algorithmic trading models or serve as psychological price zones.
⚠️ Disclaimer:
This script is open-source and intended for educational and analytical purposes only. No trading signals or performance guarantees are provided. Please use your own judgment when applying this tool in a trading context.
OTE Premium v2 [SYNC & TRADE]🇬🇧 Description (for TradingView)
OTE Premium v2 is a powerful tool designed to accurately identify Optimal Trade Entry (OTE) zones based on user-defined impulses within custom date ranges. It’s ideal for traders who rely on Fibonacci-based analysis, market structure, and impulse wave mapping.
🔹 Supports up to 5 independent impulses, each with fully customizable settings (date ranges, levels, extensions).
🔹 Displays OTE 70%, OTE 30%, 88% retracement level, and Fibonacci extensions (1.62, 2.00, 2.62, 3.62).
🔹 Visualizes fractals based on user-defined candle count.
🔹 Comes with alerts for OTE zone entries and 88% level crossings.
🔹 OTE zones can auto-disable after specific interactions (customizable behavior).
🔹 Zones can be anchored using either candle bodies or wicks.
This indicator is suitable for both intraday and swing traders, offering high flexibility and precision visualization of key entry and target levels.
🇷🇺 Описание (для TradingView)
OTE Premium v2 — это мощный инструмент, предназначенный для точной идентификации зон оптимального входа (OTE — Optimal Trade Entry) на основе пользовательских импульсов, заданных по диапазонам дат. Индикатор особенно полезен трейдерам, использующим анализ Фибоначчи, структуру рынка и модели импульсов.
🔹 Поддерживает до 5 независимых импульсов, каждый с индивидуальными настройками (даты, уровни, расширения).
🔹 Показывает зоны OTE 70%, OTE 30%, 88% уровень и расширения Фибоначчи (1.62, 2.00, 2.62, 3.62).
🔹 Визуализирует фракталы на основе заданного количества свечей.
🔹 Предусмотрены алерты на вход в зоны OTE и пробой уровня 88%.
🔹 Зоны OTE могут деактивироваться автоматически при касании, в зависимости от настроек.
🔹 Все зоны могут быть построены либо по телам свечей, либо по экстремумам.
Этот индикатор подходит как для интрадей трейдинга, так и для свинг-трейдеров, предоставляя высокую гибкость и точную визуализацию ключевых уровней входа и целей.

RSI of RSI Deviation (RoRD)RSI of RSI Deviation (RoRD) - Advanced Momentum Acceleration Analysis
What is RSI of RSI Deviation (RoRD)?
RSI of RSI Deviation (RoRD) is a insightful momentum indicator that transcends traditional oscillator analysis by measuring the acceleration of momentum through sophisticated mathematical layering. By calculating RSI on RSI itself (RSI²) and applying advanced statistical deviation analysis with T3 smoothing, RoRD reveals hidden market dynamics that single-layer indicators miss entirely.
This isn't just another RSI variant—it's a complete reimagining of how we measure and visualize momentum dynamics. Where traditional RSI shows momentum, RoRD shows momentum's rate of change . Where others show static overbought/oversold levels, RoRD reveals statistically significant deviations unique to each market's character.
Theoretical Foundation - The Mathematics of Momentum Acceleration
1. RSI² (RSI of RSI) - The Core Innovation
Traditional RSI measures price momentum. RoRD goes deeper:
Primary RSI (RSI₁) : Standard RSI calculation on price
Secondary RSI (RSI²) : RSI calculated on RSI₁ values
This creates a "momentum of momentum" indicator that leads price action
Mathematical Expression:
RSI₁ = 100 - (100 / (1 + RS₁))
RSI² = 100 - (100 / (1 + RS₂))
Where RS₂ = Average Gain of RSI₁ / Average Loss of RSI₁
2. T3 Smoothing - Lag-Free Response
The T3 Moving Average, developed by Tim Tillson, provides:
Superior smoothing with minimal lag
Adaptive response through volume factor (vFactor)
Noise reduction while preserving signal integrity
T3 Formula:
T3 = c1×e6 + c2×e5 + c3×e4 + c4×e3
Where e1...e6 are cascaded EMAs and c1...c4 are volume-factor-based coefficients
3. Statistical Z-Score Deviation
RoRD employs dual-layer Z-score normalization :
Initial Z-Score : (RSI² - SMA) / StDev
Final Z-Score : Z-score of the Z-score for refined extremity detection
This identifies statistically rare events relative to recent market behavior
4. Multi-Timeframe Confluence
Compares current timeframe Z-score with higher timeframe (HTF)
Provides directional confirmation across time horizons
Filters false signals through timeframe alignment
Why RoRD is Different & More Sophisticated
Beyond Traditional Indicators:
Acceleration vs. Velocity : While RSI measures momentum (velocity), RoRD measures momentum's rate of change (acceleration)
Adaptive Thresholds : Z-score analysis adapts to market conditions rather than using fixed 70/30 levels
Statistical Significance : Signals are based on mathematical rarity, not arbitrary levels
Leading Indicator : RSI² often turns before price, providing earlier signals
Reduced Whipsaws : T3 smoothing eliminates noise while maintaining responsiveness
Unique Signal Generation:
Quantum Orbs : Multi-layered visual signals for statistically extreme events
Divergence Detection : Automated identification of price/momentum divergences
Regime Backgrounds : Visual market state classification (Bullish/Bearish/Neutral)
Particle Effects : Dynamic visualization of momentum energy
Visual Design & Interpretation Guide
Color Coding System:
Yellow (#e1ff00) : Neutral/balanced momentum state
Red (#ff0000) : Overbought/extreme bullish acceleration
Green (#2fff00) : Oversold/extreme bearish acceleration
Orange : Z-score visualization
Blue : HTF Z-score comparison
Main Visual Elements:
RSI² Line with Glow Effect
Multi-layer glow creates depth and emphasis
Color dynamically shifts based on momentum state
Line thickness indicates signal strength
Quantum Signal Orbs
Green Orbs Below : Statistically rare oversold conditions
Red Orbs Above : Statistically rare overbought conditions
Multiple layers indicate signal strength
Only appear at Z-score extremes for high-conviction signals
Divergence Markers
Green Circles : Bullish divergence detected
Red Circles : Bearish divergence detected
Plotted at pivot points for precision
Background Regimes
Green Background : Bullish momentum regime
Grey Background : Bearish momentum regime
Blue Background : Neutral/transitioning regime
Particle Effects
Density indicates momentum energy
Color matches current RSI² state
Provides dynamic market "feel"
Dashboard Metrics - Deep Dive
RSI² ANALYSIS Section:
RSI² Value (0-100)
Current smoothed RSI of RSI reading
>70 : Strong bullish acceleration
<30 : Strong bearish acceleration
~50 : Neutral momentum state
RSI¹ Value
Traditional RSI for reference
Compare with RSI² for acceleration/deceleration insights
Z-Score Status
🔥 EXTREME HIGH : Z > threshold, statistically rare bullish
❄️ EXTREME LOW : Z < threshold, statistically rare bearish
📈 HIGH/📉 LOW : Elevated but not extreme
➡️ NEUTRAL : Normal statistical range
MOMENTUM Section:
Velocity Indicator
▲▲▲ : Strong positive acceleration
▼▼▼ : Strong negative acceleration
Shows rate of change in RSI²
Strength Bar
██████░░░░ : Visual power gauge
Filled bars indicate momentum strength
Based on deviation from center line
SIGNALS Section:
Divergence Status
🟢 BULLISH DIV : Price making lows, RSI² making highs
🔴 BEARISH DIV : Price making highs, RSI² making lows
⚪ NO DIVERGENCE : No divergence detected
HTF Comparison
🔥 HTF EXTREME : Higher timeframe confirms extremity
📊 HTF NORMAL : Higher timeframe is neutral
Critical for multi-timeframe confirmation
Trading Application & Strategy
Signal Hierarchy (Highest to Lowest Priority):
Quantum Orb + HTF Alignment + Divergence
Highest conviction reversal signal
Z-score extreme + timeframe confluence + divergence
Quantum Orb + HTF Alignment
Strong reversal signal
Wait for price confirmation
Divergence + Regime Change
Medium-term reversal signal
Monitor for orb confirmation
Threshold Crosses
Traditional overbought/oversold
Use as alert, not entry
Entry Strategies:
For Reversals:
Wait for Quantum Orb signal
Confirm with HTF Z-score direction
Enter on price structure break
Stop beyond recent extreme
For Continuations:
Trade with regime background color
Use RSI² pullbacks to center line
Avoid signals against HTF trend
For Scalping:
Focus on Z-score extremes
Quick entries on orb signals
Exit at center line cross
Risk Management:
Reduce position size when signals conflict with HTF
Avoid trades during regime transitions (blue background)
Tighten stops after divergence completion
Scale out at statistical mean reversion
Development & Uniqueness
RoRD represents months of research into momentum dynamics and statistical analysis. Unlike indicators that simply combine existing tools, RoRD introduces several genuine innovations :
True RSI² Implementation : Not a smoothed RSI, but actual RSI calculated on RSI values
Dual Z-Score Normalization : Unique approach to finding statistical extremes
T3 Integration : First RSI² implementation with T3 smoothing for optimal lag reduction
Quantum Orb Visualization : Revolutionary signal display method
Dynamic Regime Detection : Automatic market state classification
Statistical Adaptability : Thresholds adapt to market volatility
This indicator was built from first principles, with each component carefully selected for its mathematical properties and practical trading utility. The result is a professional-grade tool that provides insights unavailable through traditional momentum analysis.
Best Practices & Tips
Start with default settings - they're optimized for most markets
Always check HTF alignment before taking signals
Use divergences as early warning , orbs as confirmation
Respect regime backgrounds - trade with them, not against
Combine with price action - RoRD shows when, price shows where
Adjust Z-score thresholds based on market volatility
Monitor dashboard metrics for complete market context
Conclusion
RoRD isn't just another indicator—it's a complete momentum analysis system that reveals market dynamics invisible to traditional tools. By combining momentum acceleration, statistical analysis, and multi-timeframe confluence with intuitive visualization, RoRD provides traders with a sophisticated edge in any market condition.
Whether you're scalping rapid reversals or positioning for major trend changes, RoRD's unique approach to momentum analysis will transform how you see and trade market dynamics.
See momentum's future. Trade with statistical edge.
Trade with insight. Trade with anticipation.
— Dskyz, for DAFE Trading Systems

Dynamic Laguerre Filter Bands | OttoThis indicator combines trend-following and volatility analysis by enhancing the traditional Laguerre filter with a dynamic, volatility-adjusted band system. Instead of using fixed thresholds, the bands adapt in real-time to changing market conditions by applying smoothed standard deviation calculations. This design keeps the indicator responsive to significant price movements while effectively filtering out short-term market noise, resulting in more accurate trend identification and breakout signals.
Core Concept
The indicator is built around the following key components:
Laguerre Filter:
The Laguerre filter is designed to smooth out price data by reducing market noise while still being quick enough to detect real changes in price direction. Its goal is to create a clear, smooth trend line that helps traders/investors focus on the overall market trend without getting distracted by small, random price swings.
It uses a parameter called gamma to control how it balances smoothness and responsiveness:
A lower gamma gives more weight to recent price data, making the filter react faster to new price changes. This means the trend line is more sensitive but may also be less smooth and more prone to small fluctuations.
A higher gamma gives more weight to past price data, making the filter smoother and less sensitive to quick changes. This helps reduce noise and produces a steadier trend line, but it also introduces more lag, meaning the filter reacts slower to new price moves.
By adjusting gamma, the Laguerre filter lets you choose the balance between following price changes quickly and having a stable, noise-free trend signal.
Standard Deviation:
shows how much price varies from the mean. In this indicator, it’s used to measure market volatility.
Volatility Bands: The upper and lower bands are based on an EMA-smoothed standard deviation of price. The EMA reduces sudden jumps in volatility, creating smoother and more stable bands that still respond to changing market conditions. These bands are plotted around the Laguerre filter line, expanding and contracting in a controlled way to stay aligned with real market movement while avoiding short-term noise.
Signal Logic:
A long signal is triggered when the close price crosses above the upper band.
A short signal occurs when the close price falls below the lower band.
⚙️ Inputs
Source: Price source used in calculations
Gamma: Adjusts how much the Laguerre filter responds to price changes. Lower gamma values make the filter react more to recent prices, while higher values give more influence to older data, making the line smoother but slower to respond.
Volatility Length: Period used to calculate standard deviation
Volatility Smoothing Length: EMA smoothing length for standard deviation
Multiplier: Scales the width of the bands based on volatility
📈 Visual Output
Laguerre Filter Line: Plots the laguerre filter line, colored dynamically based on signal direction (green for bullish, purple for bearish)
Upper & Lower Bands: Volatility-based bands that adjust with market conditions. (green for bullish, purple for bearish)
Glow Effect: Optional glow layer to enhance visibility of the laguerre filter trend line (green for bullish, purple for bearish)
Bar Coloring: Candlesticks and bar colors reflect the active signal state for fast visual interpretation (green for bullish, purple for bearish)
How to Use
Apply the indicator to your chart and monitor for signal events:
Long Signal: When price closes above the upper band
Short Signal: When price closes below the lower band
🔔 Alerts
This indicator supports optional alert conditions you can enable for:
Long Signal: Close price crossing above the upper band
Short Signal: Close price crossing below the lower band
⚠️ Disclaimer:
This indicator is intended for educational and informational purposes only. Trading/investing involves risk, and past performance does not guarantee future results. Always test and evaluate indicators/strategies before applying them in live markets. Use at your own risk.

Ichimoku AdvancedGreetings. I present to you an improved version of the indicator from LuxAlgo - Ichimoku Theories.
I am grateful to them for the work they have done, since I myself have no experience in programming on Pine Script.
I have supplemented their indicator with such functions as:
Multi-timeframe Tenkan and Kijun lines - you will always know where on the lower timeframe there is a stronger resistance/support.
Ichimoku line formation areas - they can be used as a visualization of the number of bars that appear in the near lines, and for forecasting when the growth of the lines is caused by the fading of candles. They can also be used as measures for setting stop orders.
3-line pattern detector - Marker showing when the price is above/below the lines Tenkan ----> Kijun ----> Senkou A.
Please note that the calculation takes into account the CLOSING price of the candle.
3 Chikou Span lines - for those who use the 3 Chikou Span strategy -9, -26, -52 from the current bar ----> forward.
Points of the expected next direction of the Tenkan, Kijun, Senkou A and B lines and Senkou A and B with 0 offset.
Senkou A and B lines with 0 offset - for visualization of possible resistance/support
Calculation of the angle of inclination of the Ichimoku lines - for better perception of the trend strength. A 90° scale is used for measurement, where 0 is the horizontal position of the line
Measuring the distance from the current price to the Tenkan and Kijun lines - for better interpretation of the next possible price movements
Table - all key points for opening a position are displayed in the table. But please CONSIDER THE CONTENT and THE THEORY OF CYCLES AND WAVES by Goichi Hosoda.
May the take profit be with you!

Math by Thomas - SMC Structure Toolkit – OB + FVG + CHoCH/BoS📌 Description:
A complete Smart Money Concepts (SMC) market structure toolkit designed to help traders identify high-probability institutional activity using fractals, order blocks, fair value gaps, and structure shifts.
This tool combines several key SMC components to provide clear, actionable insights for both trend continuation and reversals.
🛠 Key Features:
✅ Order Blocks (OBs): Detected using fractal swing highs/lows, optional high volume & displacement candle filters
✅ Midline OB Visuals: Optional dashed lines drawn through the midpoint of each OB
✅ Fair Value Gaps (FVGs): Auto-detected based on classic gap criteria
✅ CHoCH & BoS Labeling: Real-time swing structure labeling with trend tracking
✅ Premium/Discount Zones: Highlighted zones for optimal entries in trending environments
✅ User Toggles: Turn OBs, FVGs, or midlines on/off for a cleaner chart
📈 How to Use:
Apply the indicator to your chart (best on 15m, 1h, or higher)
Enable/disable features in the settings panel:
Order Blocks: Use with displacement & high volume filters for cleaner setups
FVGs: Spot imbalances between price and liquidity
Structure Labels: Follow BoS/CHoCH signals to track trend changes
Look for:
CHoCH ➝ potential trend reversal
BoS ➝ trend continuation confirmation
OBs within discount/premium zones ➝ high-RR trade setups
Combine with your existing SMC or supply/demand approach
🧪 Best Timeframes:
Recommended: 15m, 1h, 4h, Daily
Works on any timeframe but more reliable with higher volume context
✍️ Notes:
Built using fractal logic and volume filters for cleaner signals
Designed to complement SMC strategies, not replace analysis

ATR % Line from Day LowHow can you make sure that you're not buying a stock that is too extended?
By limiting your buys to within a certain percentage of either the low-of-the-day (LoD) if you're going long, or to the high-of-the-day (HoD) if you're shorting a stock. This script will help you do just that.
Limiting stock purchases to within a certain percentage of the Average True Range (ATR) from the day's low or high is a risk management technique that offers several key benefits:
Risk Control and Position Sizing
By using ATR as a boundary, you're essentially creating a volatility-adjusted buffer. Since ATR measures recent price volatility, this approach prevents you from buying into stocks that have already moved significantly beyond their normal trading range. This helps avoid entering positions when the stock might be overextended and due for a pullback.
Improved Entry Timing
This strategy encourages patience and discipline. Rather than chasing a stock that's already run up substantially from its low, you wait for better entry points. For example, if you set a limit of 50% of ATR from the day's low, you're only buying when the stock hasn't moved more than half its typical daily range from the bottom.
Volatility Awareness
ATR naturally adjusts for each stock's individual volatility characteristics. A high-volatility stock might have an ATR of $2, while a low-volatility stock might have an ATR of $0.50. This approach scales your entry criteria appropriately for each security rather than using arbitrary dollar amounts.
Reduced Emotional Trading
Having a systematic rule removes the temptation to chase momentum or buy at poor technical levels. It forces you to wait for the stock to come back to more reasonable levels relative to its recent trading behavior.
Better Risk-Reward Ratios
By entering closer to the day's low (within your ATR percentage), you're typically getting a better risk-reward setup. Your stop loss (often placed below the day's low) will be tighter, while your potential upside remains intact.
This approach works particularly well for swing traders and those looking to enter positions on pullbacks or during consolidation periods rather than breakout scenarios.
To save valuable real estate on your chart, there's also an option that can give you a compact version of this indicator which will show only the "Current Day's Low/High" and "Target Price". "Target Price" being the price at which your max buy limit is based on the % ATR you choose in settings.

TASC 2025.07 Laguerre Filters█ OVERVIEW
This script implements the Laguerre filter and oscillator described by John F. Ehlers in the article "A Tool For Trend Trading, Laguerre Filters" from the July 2025 edition of TASC's Traders' Tips . The new Laguerre filter utilizes the UltimateSmoother filter in place of an exponential moving average (EMA) in its calculation, offering improved responsiveness and reduced lag.
█ CONCEPTS
As Ehlers explains in his article, the Laguerre filter is a form of transversal filter . A transversal filter calculates an output signal using a tapped delay line . It creates multiple delayed versions of an input signal, applies weight to each delay, and then calculates their sum to generate the filtered result.
The Laguerre filter's structure relies on Laguerre polynomials — solutions to a differential equation solved by Edmond Laguerre in the 1800s. When Ehlers analyzed the formula for these polynomials on discrete systems (e.g., financial time series), he found that the first term's expression corresponds to an EMA response, and all subsequent terms correspond to an all-pass response. In contrast to other filter types, an all-pass filter produces phase shift (i.e., delay) in an input signal's components without affecting its amplitude.
Ehlers observed that these characteristics of Laguerre polynomials make them suitable for use in a transversal filter structure, and thus the Laguerre filter was born. However, he notes that EMAs are not great filters in general. As such, to improve on the Laguerre filter's design, Ehlers modified it by replacing the EMA term with his UltimateSmoother filter. The resulting Laguerre filter has significantly reduced lag, achieving a tighter response to market fluctuations while maintaining smoothness. Ehlers suggests that traders can analyze crossings between the UltimateSmoother and this Laguerre filter, or those between two Laguerre filters of different order, for helpful buy and sell signals.
In addition to the Laguerre filter, Ehlers derived a smooth, low-lag oscillator based on the difference between the first and second terms in the modified filter structure, scaled by the root mean square (RMS). The resulting oscillator provides an alternative filtered representation of market data, which can help traders identify swing and mean-reversion signals.
█ USAGE
This indicator calculates both the Laguerre filter and the Laguerre oscillator described in Ehlers' article. It displays the Laguerre filter on the main chart pane and the oscillator in a separate pane.
Users can control the behavior of the filter and oscillator with the inputs in the "Settings/Inputs" tab:
The "Period" input defines the critical period of the UltimateSmoother used in the Laguerre filter and oscillator calculations. Its default value is 30.
The "Gamma" input determines the weighting behavior of the Laguerre filter and oscillator. It accepts a positive value between 0 and 1. Use a lower value for quicker responsiveness to market changes, and a higher value for trends. The default value is 0.5.
The "RMS length" input determines the length of the RMS calculation for oscillator normalization. The default value is 100 bars.

UT Bot + Supertrend ComboYour script is a **combined trading indicator** for TradingView that integrates the **UT Bot** and **Supertrend** strategies to generate buy and sell signals for financial markets. Here's a detailed breakdown of its functionality:
---
### **1. Purpose**
The script aims to:
* **Detect buy and sell signals** using the UT Bot and Supertrend strategies.
* **Provide visual indicators** on the chart for easier decision-making.
* **Highlight trends** and issue alerts when significant conditions are met.
---
### **2. Components**
#### **UT Bot**
* **Key Features**:
* Based on the ATR (Average True Range) for calculating dynamic stop-loss levels.
* Option to use **Heikin Ashi candles** for smoother signals.
* Produces buy and sell signals when the price crosses above or below a trailing stop level.
* **Inputs**:
* `ut_key_value`: Sensitivity of the trailing stop (multiplier of the ATR).
* `ut_atr_period`: The period for calculating the ATR.
* `ut_use_heikin_ashi`: A toggle to use Heikin Ashi candles instead of standard candles.
* **Logic**:
* Tracks price movements using ATR and dynamically adjusts stop levels.
* Generates:
* A **buy signal** when the price crosses above the trailing stop.
* A **sell signal** when the price crosses below the trailing stop.
#### **Supertrend**
* **Key Features**:
* Tracks the trend direction based on price and ATR.
* Highlights trends with color shading (green for uptrend, red for downtrend).
* Optional buy and sell signal plotting based on trend reversals.
* **Inputs**:
* `st_atr_period`: The period for ATR calculation.
* `st_multiplier`: Multiplier to determine the distance of the stop levels.
* `st_show_signals`: Toggle to show buy/sell signals.
* `st_highlighting`: Toggle for background trend highlighting.
* **Logic**:
* Tracks upward and downward trends.
* Generates:
* A **buy signal** when the trend shifts to bullish.
* A **sell signal** when the trend shifts to bearish.
---
### **3. Visual Features**
* **Buy and Sell Labels**:
* `UT Buy` and `UT Sell`: Show buy/sell signals based on UT Bot logic.
* `ST Buy` and `ST Sell`: Show buy/sell signals based on Supertrend logic.
* **Background Highlighting**:
* **Green shading** for uptrends in Supertrend.
* **Red shading** for downtrends in Supertrend.
---
### **4. Alerts**
Custom alerts for automation or notifications:
* **UT Bot Alerts**:
* Triggered when a buy or sell signal occurs.
* **Supertrend Alerts**:
* Triggered on trend reversals.
---
### **5. Flexibility**
* Adjust sensitivity and performance through inputs.
* Combine UT Bot and Supertrend for **confirmation-based trading strategies**.
* Enable/disable highlighting or signals for customization.
---
### **Use Cases**
* Ideal for traders looking for automated trend-following signals.
* Works well in **volatile markets** due to ATR's adaptability.
* Can be used to confirm trades by aligning signals from both strategies.
---
Let me know if you need additional modifications or further clarification!

🚀PriceAction & SmartMoney ∞ Galaxy [VNFlow]Contact and discussion to use advanced tools to support your trading strategy
Email: hasobin@outlook.com
Phone: 0373885338
See you,

Holy Grail (100% Win Rate)tldr:
1. Here you go folks – no repaint, no dodgy stuff, and 100% win rate
2. DO NOT TRADE THIS
________________________________________
Key points:
• Assets to trade: SPY, NASDAQ, DAX, FTSE, Bitcoin
• Time Frame: 1D or higher
________________________________________
What does the script do?
The script buys a certain amount of the asset every time we're in a pullback, and sells when we make a new All-Time High (ATH). More specifically, it waits for the first green candle after the lowest point of the pullback, and then adds to the position. We assume that when we see a green candle, the pullback is over. If we go even lower – we wait for another green candle. The script sells on the first red candle after an ATH.
The pullback is identified using a simple moving average (MA) – if we're below the MA, we're in a pullback.
You can set the MA length in the settings. I considered adding different types of MAs, but decided against it as it wouldn't change much in terms of the general idea.
You can also set the percentage of your account to invest on the very first candle – this is an initial pre-filling of the position, so you have something to sell if the price goes straight up after you start trading. If you think we’re in a bear market and the only way is up, you might want to set a higher number. On the other hand, if you believe we’re near the top of a bull market, set a lower one.
You can set the percentage of the position to sell on each red candle after ATH under Settings → Input → Exit % . Similarly, you can set the percentage to buy on each green candle after a pullback low under Settings → Properties → Order Size . Since bull markets tend to last longer than bear market pullbacks, you’ll typically want Exit % to be larger than Order Size — though this may vary depending on your initial pre-fill.
________________________________________
Why these assets?
These are assets that are expected to go up over the long run. I call them “number go up” assets. Meaning: no matter where they are now, at some point in the future they’ll make a new ATH. That’s why this might not work on individual stocks like Nvidia or Tesla — there’s no guarantee they won’t go bust tomorrow. We all remember big companies from the past (Enron, Lehman Brothers, etc.) that collapsed unexpectedly.
With SPY, you're betting on the American economy. And the American economy will go up at least because of inflation. If you believe inflation will continue, then you believe we’ll eventually see a new ATH in SPY. It may take years — like from 2007 to 2013 — but it happened. And there was a bull run after that.
And if you think the American economy will never grow again — well, if that’s true, we’ll all have much bigger problems than trading scripts.
________________________________________
Why this time frame?
Because, as mentioned, it may take a long time to reach a new ATH. You can use a shorter time frame, but that requires a higher TradingView subscription plan to view multi-year data.
Also, if you choose a shorter time frame, you should reduce the Order Size and Exit % accordingly, because the script will jump in on every new green candle after a pullback. On a 1-minute chart, that could mean 100x more entries compared to daily. Conversely, if you go to a higher time frame, increase the sizes — otherwise, too much of your capital will just sit unused.
________________________________________
So if everything is so great and it has a real 100% win rate – why not trade it?
If you turn on the “buy & hold equity” curve, you’ll see that the profit from all closed trades (with a 100% win rate) is smaller than if you had simply bought the asset and held it for years.
Real-world slippage and fees will reduce your actual profits even more.
If you’re unlucky and start trading at the very top of a bull market, it might take 10 years before even a single trade is closed.
Some assets that seem like they can only go up long-term... might not. Take Bitcoin. Many believe it can only go up in the long term, but it could still die — just like anything else. The only reason I included it is because many people treat it as a “number go up” asset. And I know some will try to trade it. You've been warned. But I don’t want to start holy wars in the holy grail description (pun intended), so let’s move on.
________________________________________
What if, after all this, you do decide to trade this strategy?
Why would you? Maybe not for profit, but just to impress your friends with a 100% win rate. Or maybe you skipped the entire explanation above and just want to jump in because it sounds like a sure win.
Whatever your reason, first you should research the asset’s historical max time (in years) between ATHs. That’s how long you might need to keep a trade open. My other script – Cycles Analysis – might help with this.
Second, experiment with the input parameters. There aren't many, so it should be easy to find what works best for your asset. You can also enable “Show stats table” in settings – it’ll help you see how many entries/exits the script makes, which will help you find the right Order Size to Exit % ratio.
Yes, this might lead to over-optimization — but hey, if we’re at this stage, who cares, right?
That said, I did find some rare cases where specific parameter setups caused performance to dip below 100% due to a mandatory close at the wrong time.
Also, since trades can last for years, don’t use this with futures — you'd have to keep rolling them over. Use ETFs or similar long-holdable assets.
________________________________________
The final word
In short, this is a glorified “Buy the Dip” strategy. It only works long-term on a very limited set of assets, and in most cases performs worse than just buying and holding for the same period.
I created this script as a teaching tool — to show new traders that win rate isn’t everything. Even if the win rate is 100%. Trust me: it’s extremely hard to beat the market (especially without leverage), and this script is just more proof of that.

SMT + CISD Detector | NQ✅ Features
Detects bullish and bearish SMT using ES1! vs NQ.
Scans multiple timeframes: 1m, 5m, 15m, 1H.
Displays SMT & CISD checklist in a live dashboard table on your chart.
Clean, no clutter — no plots or shapes, just detection logic + checklist.
Designed specifically for trading NQ.

Enhanced S/D Boring‑Explosive [v6]How to Use the Indicator
Boring Candle:
Yellow diamond below bar. Marks consolidation near S/D lines—watch for a breakout.
Explosive Candle:
Orange bar color and triangle above. Signals a potential move—entry on close (directional, filtered by MA).
Supply/Demand Zones:
Red (resistance/supply) and Lime (support/demand) dotted lines.
Look for signals near these levels.
Multi-TF Panel:
Label at top shows higher time frame status (Explosive/Boring/Neutral). Use for confluence.
Trading Logic Example:
Entry:
Buy: After a boring candle above EMA and near demand, next bar closes above boring high and EMA (explosive).
Sell: Opposite.
Stop-loss:
Below/above the boring candle wick or nearest S/D zone.
Take Profit:
Fixed RR, or at next S/D level.

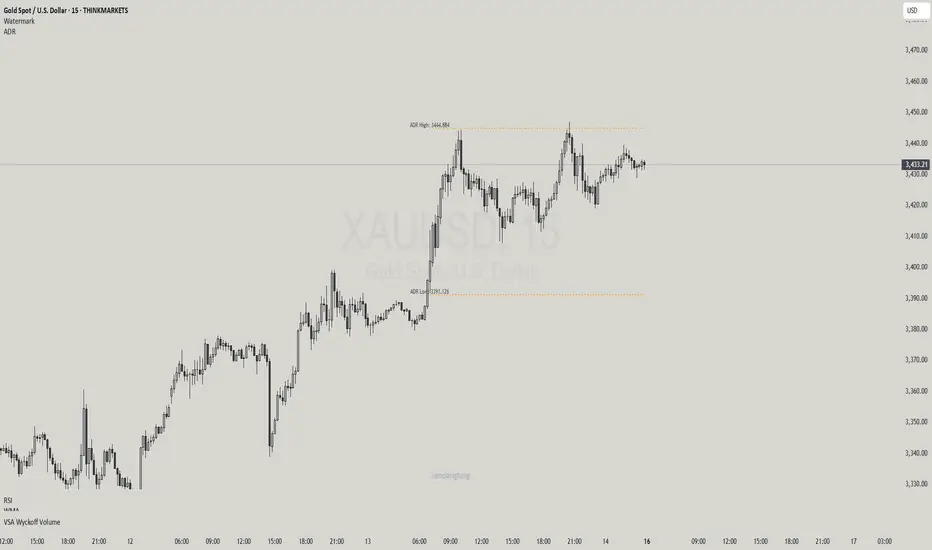
Haven Average Daily RangeOverview
This indicator is an enhanced version of the traditional ADR tool that adapts to intraday price movements. Unlike static ADR levels, this indicator dynamically adjusts its range boundaries based on real-time price action while maintaining the original ADR calculation framework.
Key Features
ADR calculation based on multiple periods (5, 10, and 20 days)
ADR levels displayed with automatic style changes upon range reach
Customizable display settings (color, line style)
Price labels for better visualization
The indicator helps traders assess the instrument's volatility, identify potential reversal zones, and plan daily trading targets.
Suitable for all timeframes up to D1 and any trading instrument.
How It Works
Session Start (UTC+0): Calculates ADR based on historical data and sets initial High/Low levels
Dynamic Phase: Monitors price action and adjusts the opposite boundary (ADR Low or High) when new extremes are reached.
When price creates new Day high price above the opening price, the ADR Low level moves upward proportionally.
When price creates new Day low price below the opening price, the ADR High level moves downward proportionally.
Completion Phase: Stops adjustments and highlights breach when price reaches either boundary
Trading Application
Entry and Exit Signals
The ADR boundaries serve as key decision points for trade execution. When price approaches the upper ADR boundary, it often signals a potential selling zone, particularly when confluence exists with other overbought indicators such as RSI divergence or resistance levels. Conversely, price reaching the lower ADR boundary frequently indicates potential buying opportunities, especially when supported by oversold conditions or support confluences.
Trend Continuation Assessment
One of the most valuable applications is gauging the probability of continued directional movement. When the current session's price action has not yet reached either ADR boundary, statistical probability favors trend continuation in the established direction. This information helps traders stay with profitable positions longer rather than exiting prematurely.
Reversal and Consolidation Zones
The visual color change to orange when ADR boundaries are reached provides immediate feedback that the normal daily range has been exhausted. At this point, the probability of trend reversal or sideways consolidation increases significantly. This signal helps traders prepare for potential position adjustments or new counter-trend opportunities.