Open Interest Rank-BuschiEnglish:
One part of the "Commitment of Traders-Report" is the Open Interest which is shown in this indicator (source: Quandl database).
Unlike my also published indicator "Open Interest-Buschi", the values here are not absolute but in a ranking system from 0 to 100 with individual time frames-
The following futures are included:
30-year Bonds (ZB)
10-year Notes ( ZN )
Soybeans (ZS)
Soybean Meal (ZM)
Soybean Oil (ZL)
Corn ( ZC )
Soft Red Winter Wheat (ZW)
Hard Red Winter Wheat (KE)
Lean Hogs (HE)
Live Cattle ( LE )
Gold ( GC )
Silver (SI)
Copper (HG)
Crude Oil ( CL )
Heating Oil (HO)
RBOB Gasoline ( RB )
Natural Gas ( NG )
Australian Dollar (A6)
British Pound (B6)
Canadian Dollar (D6)
Euro (E6)
Japanese Yen (J6)
Swiss Franc (S6)
Sugar ( SB )
Coffee (KC)
Cocoa ( CC )
Cotton ( CT )
S&P 500 E-Mini (ES)
Russell 2000 E-Mini (RTY)
Dow Jones Industrial Mini (YM)
Nasdaq 100 E-Mini (NQ)
Platin (PL)
Palladium (PA)
Aluminium (AUP)
Steel ( HRC )
Ethanol (AEZ)
Brent Crude Oil (J26)
Rice (ZR)
Oat (ZO)
Milk (DL)
Orange Juice (JO)
Lumber (LS)
Feeder Cattle (GF)
S&P 500 ( SP )
Dow Jones Industrial Average Index (DJIA)
New Zealand Dollar (N6)
Deutsch:
Ein Bestandteil des "Commitment of Traders-Report" ist das Open Interest, das in diesem Indikator dargestellt wird (Quelle: Quandl Datenbank).
Anders als in meinem ebenfalls veröffentlichten Indikator "Open Interest-Buschi" werden hier nicht die absoluten Werte dargestellt, sondern in einem Ranking-System von 0 bis 100 mit individuellen Zeitrahmen.
Folgende Futures sind enthalten:
30-jährige US-Staatsanleihen (ZB)
10-jährige US-Staatsanleihen ( ZN )
Sojabohnen(ZS)
Sojabohnen-Mehl (ZM)
Sojabohnen-Öl (ZL)
Mais( ZC )
Soft Red Winter-Weizen (ZW)
Hard Red Winter-Weizen (KE)
Magerschweine (HE)
Lebendrinder ( LE )
Gold ( GC )
Silber (SI)
Kupfer(HG)
Rohöl ( CL )
Heizöl (HO)
Benzin ( RB )
Erdgas ( NG )
Australischer Dollar (A6)
Britisches Pfund (B6)
Kanadischer Dollar (D6)
Euro (E6)
Japanischer Yen (J6)
Schweizer Franken (S6)
Zucker ( SB )
Kaffee (KC)
Kakao ( CC )
Baumwolle ( CT )
S&P 500 E-Mini (ES)
Russell 2000 E-Mini (RTY)
Dow Jones Industrial Mini (YM)
Nasdaq 100 E-Mini (NQ)
Platin (PL)
Palladium (PA)
Aluminium (AUP)
Stahl ( HRC )
Ethanol (AEZ)
Brent Rohöl (J26)
Reis (ZR)
Hafer (ZO)
Milch (DL)
Orangensaft (JO)
Holz (LS)
Mastrinder (GF)
S&P 500 ( SP )
Dow Jones Industrial Average Index (DJIA)
Neuseeland Dollar (N6)
在腳本中搜尋"摩根纳斯达克100基金风险大吗"

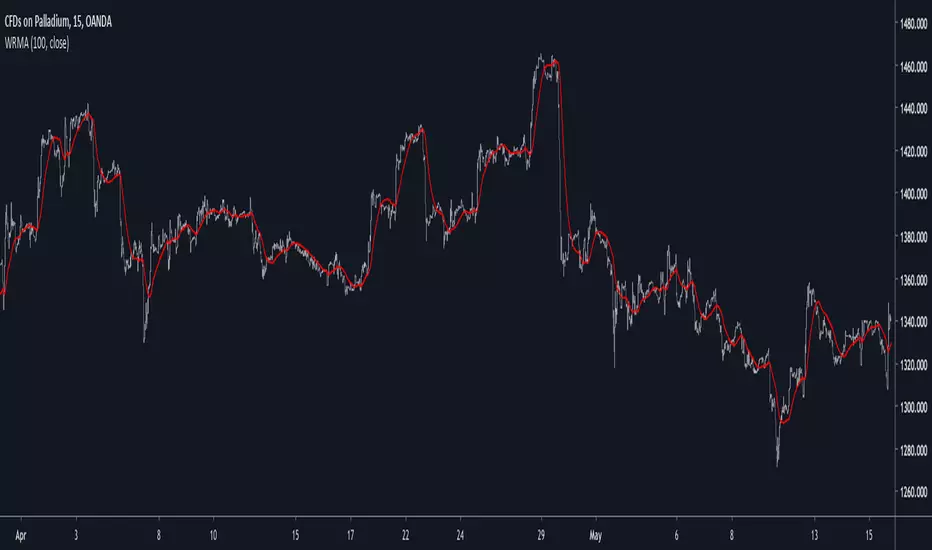
Well Rounded Moving AverageIntroduction
There are tons of filters, way to many, and some of them are redundant in the sense they produce the same results as others. The task to find an optimal filter is still a big challenge among technical analysis and engineering, a good filter is the Kalman filter who is one of the more precise filters out there. The optimal filter theorem state that : The optimal estimator has the form of a linear observer , this in short mean that an optimal filter must use measurements of the inputs and outputs, and this is what does the Kalman filter. I have tried myself to Kalman filters with more or less success as well as understanding optimality by studying Linear–quadratic–Gaussian control, i failed to get a complete understanding of those subjects but today i present a moving average filter (WRMA) constructed with all the knowledge i have in control theory and who aim to provide a very well response to market price, this mean low lag for fast decision timing and low overshoots for better precision.
Construction
An good filter must use information about its output, this is what exponential smoothing is about, simple exponential smoothing (EMA) is close to a simple moving average and can be defined as :
output = output(1) + α(input - output(1))
where α (alpha) is a smoothing constant, typically equal to 2/(Period+1) for the EMA.
This approach can be further developed by introducing more smoothing constants and output control (See double/triple exponential smoothing - alpha-beta filter) .
The moving average i propose will use only one smoothing constant, and is described as follow :
a = nz(a ) + alpha*nz(A )
b = nz(b ) + alpha*nz(B )
y = ema(a + b,p1)
A = src - y
B = src - ema(y,p2)
The filter is divided into two components a and b (more terms can add more control/effects if chosen well) , a adjust itself to the output error and is responsive while b is independent of the output and is mainly smoother, adding those components together create an output y , A is the output error and B is the error of an exponential moving average.
Comparison
There are a lot of low-lag filters out there, but the overshoots they induce in order to reduce lag is not a great effect. The first comparison is with a least square moving average, a moving average who fit a line in a price window of period length .
Lsma in blue and WRMA in red with both length = 100 . The lsma is a bit smoother but induce terrible overshoots
ZLMA in blue and WRMA in red with both length = 100 . The lag difference between each moving average is really low while VWRMA is way more precise.
Hull MA in blue and WRMA in red with both length = 100 . The Hull MA have similar overshoots than the LSMA.
Reduced overshoots moving average (ROMA) in blue and WRMA in red with both length = 100 . ROMA is an indicator i have made to reduce the overshoots of a LSMA, but at the end WRMA still reduce way more the overshoots while being smoother and having similar lag.
I have added a smoother version, just activate the extra smooth option in the indicator settings window. Here the result with length = 200 :
This result is a little bit similar to a 2 order Butterworth filter. Our filter have more overshoots which in this case could be useful to reduce the error with edges since other low pass filters tend to smooth their amplitude thus reducing edge estimation precision.
Conclusions
I have presented a well rounded filter in term of smoothness/stability and reactivity. Try to add more terms to have different results, you could maybe end up with interesting results, if its the case share them with the community :)
As for control theory i have seen neural networks integrated to Kalman flters which leaded to great accuracy, AI is everywhere and promise to be a game a changer in real time data smoothing. So i asked myself if it was possible for a neural networks to develop pinescript indicators, if yes then i could be replaced by AI ? Brrr how frightening.
Thanks for reading :)
Quadruple Kaufman Adaptive Moving AverageFour Kaufman Adaptive Moving Averages in one script. Useful for identifying trends and setting points to add to positions / exit trades. KAMA's are great for keeping you in trending markets and avoiding sideways chops and ranges. Try them out by tweaking the fast/slow ma's and lengths to get the right set for your charts that removes the thinking about whether to be long or short and when to add to positions.
A suggested trading strategy is to tweak the ma's (often you'll want larger values) until they span the price action well on past trends. Then each time price action closes and crosses one of your KAMA lines is an opportunity to add to your position. Once all lines are cleared and you've loaded up your position, hopefully your average price of entry falls short of the highest KAMA line's value. Once this happens you don't need to get out the trade until such time as a price close crosses again that largest KAMA line. For eager profit takers, close positions once any KAMA line is crossed once you're successfully loaded up on a direction.
I use this script with a renko chart and values -> 26 length 6 fast ma 100 slow ma, 26 8 100, 26 10 100, 26 12 100 and it's good to see these moving averages, unlike regular moving averages, bend around choppy action that come when trends pause, keeping me successfully in winning trades. Give it a try.

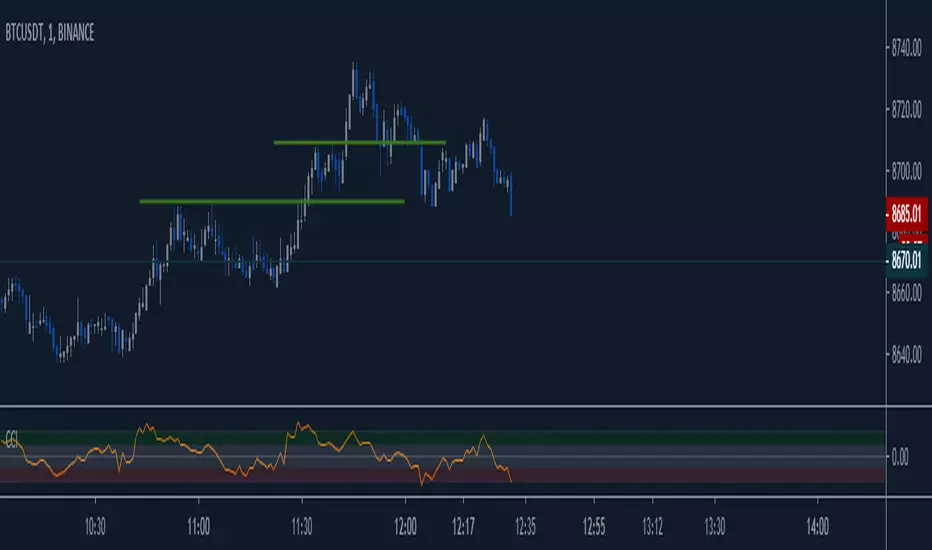
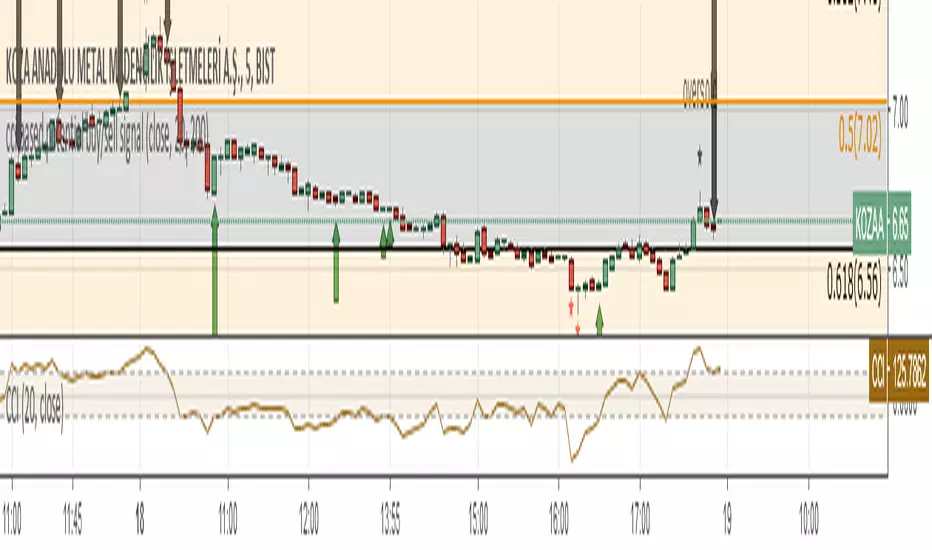
cci based potential buy/sell signal
Commodity Channel Index Potential Buy Signal
Commodity Channel Index (CCI) is below oversold line (-200).
CCI then crosses above -100 line
Commodity Channel Index Potential Sell Signal
Commodity Channel Index (CCI) is above overbought line (+200).
CCI then crosses below +100 line.
Türkçe Açıklama;
CCI Potansiyel Al Sinyali
CCI indikatörünün -200 altında bulunduğu bölgeler aşırı satış bölgeleri,
Sonrasında aşağıdan gelerek -100 çizgisinin üzerine çıktığı yada çıkmak üzere olduğu noktalar al sinyali
CCI Potansiyel Satl Sinyali
CCI indikatörünün +200 üzerinde bulunduğu bölgeler aşırı alım bölgeleri,
Sonrasında yukarıdan inerek +100 çizgisinin altına indiği yada inmek üzere olduğu noktalar sat sinyali
Not: Tek başına kullanılması son derece hatalı sonuçlar verebilir. Sadece olabilirlik potansiyeli taşımaktadır.
Aroon Single Line This indicator converts double lined Aroon indicator into a single line oscillator.
It is simply obtained by subtracting Aroon down from Aroon Up.
*If Oscillator points 100 value, it means there is a Strong Uptrend.
*If Oscillator points values between 100 and 40, it means there is an uptrend.
*If Oscillator points values between 20 and -20, it means no trend, it is sideways.But, when it is sideways; generally, oscillator makes FLAT LINES
between 20 and -20 values. 0 value is pointed out when the trend is downward as well, which means aroon up=aroon down.
*If Oscillator points values between -40 and -100, it means there is a downtrend.
*If Oscillator points -100 value, it means there is a Strong downtrend.
(20, 40) and (-20, -40) intervals are not mentioned, because; generally these are transition values and hard to comment, it will be more certain to
wait till values are between or at the reference values given.

CCI 0Trend Strategy (by Marcoweb) v1.0Hi guys,
I am trying to create a strategy that consists in the crossover/under of the 0 line of the Commodity Channel Index . Every time the price crosses over the 0 line in the CCI the strategy has to long getting short on the cross under and viceversa.
I have published here another script strategy (consists in a crossover/under of the Overbought/Oversold levels of the CCI) that works so I could have the opportunity to share with you the main idea that as per now is mistaken:
//@version=2
strategy(title="CCI 0Trend Strategy (by Marcoweb) v1.0", shorttitle="CCI_0T_Stra_v1.0", overlay=true)
///////////// CCI
length = input(20, minval=1)
src = input(close, title="Source")
ma = sma(src, length)
cci = (src - ma) / (0.015 * dev(src, length))
plot(cci, color=black)
band1 = hline(100, color=blue, linestyle=solid)
band0 = hline(-100, color=red, linestyle=solid)
bandl = hline(0, color=orange, linestyle=solid)
fill(band1, band0, color=olive)
p1 = plot(band0, color=red,title="-100")
p2 = plot(band1, color=blue,title="100")
p3 = plot(bandl, color=orange,title="0")
///////////// CCI 0Trend Strategy (by Marcoweb) v1.0 Strategy
if (not na(cci))
if (crossover(cci, bandl)
strategy.entry("CCI_L", strategy.long, stop=bandl, oca_type=strategy.oca.cancel, comment="CCI_L")
else
strategy.cancel(id="CCI_L")
if (crossunder(cci, bandl)
strategy.entry("CCI_S", strategy.short, stop=bandl, oca_type=strategy.oca.cancel, comment="CCI_S")
else
strategy.cancel(id="CCI_S")
//plot(strategy.equity, title="equity", color=red, linewidth=2, style=areabr)
With this coding I get the error : line 24 (if (crossover(cci, bandl): mismatched input '|E|' expecting RPAR
Hope you like the idea ;)

How to automate this strategy for free using a chrome extension.Hey everyone,
Recently we developed a chrome extension for automating TradingView strategies using the alerts they provide. Initially we were charging a monthly fee for the extension, but we have now decided to make it FREE for everyone. So to display the power of automating strategies via TradingView, we figured we would also provide a profitable strategy along with the custom alert script and commands for the alerts so you can easily cut and paste to begin trading for profit while you sleep.
Step 1:
You are going to need to download the Chrome Extension called AutoView. You can get the extension for free by following this link: bit.ly ( I had to shorten the link as it contains Google and TV automatically converts it to a symbol)
Step 2: Go to your chrome extension page, and under the new extension you'll see a "settings" button. In the setting you will have to connect and give permission to the exchange 1broker allowing the extension to place your orders automatically when triggered by an alert.
Step 3: Setup the strategy and custom script for the alerts in TradingView. The attached script is the strategy, you can play with the settings yourself to try and get better numbers/performance if you please.
This following script is for the custom alerts:
//@version=2
study("4All-Alert", shorttitle="Alerts")
src = close
len = input(4, minval=1, title="Length")
up = rma(max(change(src), 0), len)
down = rma(-min(change(src), 0), len)
rsi = down == 0 ? 100 : up == 0 ? 0 : 100 - (100 / (1 + up / down))
rsin = input(5)
sn = 100 - rsin
ln = 0 + rsin
short = crossover(rsi, sn) ? 1 : 0
long = crossunder(rsi, ln) ? 1 : 0
plot(long, "Long", color=green)
plot(short, "Short", color=red)
Now that you have the extension installed, the custom strategy and alert scripts in place, you simply need to create the alerts.
To get the alerts to communicate with the extension properly, there is a specific syntax that you will need to put in the message of the alert. You can find more details about the syntax here : gist.github.com
For this specific strategy, I use the Alerts script, long/short greater than 0.9 on close.
In the message for a long place this as your message:
Long
c=order b=short
c=position b=short l=200 t=market
b=long q=0.01 l=200 t=market tp=13 sl=25
and for the short...
Short
c=order b=long
c=position b=long l=200 t=market
b=short q=0.01 l=200 t=market tp=13 sl=25
If you'll notice in my above messages, compared to the strategy my tp and sl (take profit and stop loss) vary by a few pips. This is to cover the market opens and spread on 1broker. You can change the tp and sl in the strategy to the above and see that the overall profit will not vary much at all.
I hope this all makes sense and it is enough to not only make some people money, but to show the power of coming up with your own strategy and automating it using TradingView alerts and the free Chrome Extension AutoView.
ps. I highly recommend upgrading your TradingView account so you have access to back testing and multiple alerts.
There is really no reason you won't cover the cost and then some on a monthly basis using the tools provided.
Best of luck and happy trading.
Note: The extension currently allows for automation on 2 exchanges; 1broker and Okcoin. If you do not have accounts there, we'd appreciate you signing up using our referral links.
www.okcoin.com
1broker.com

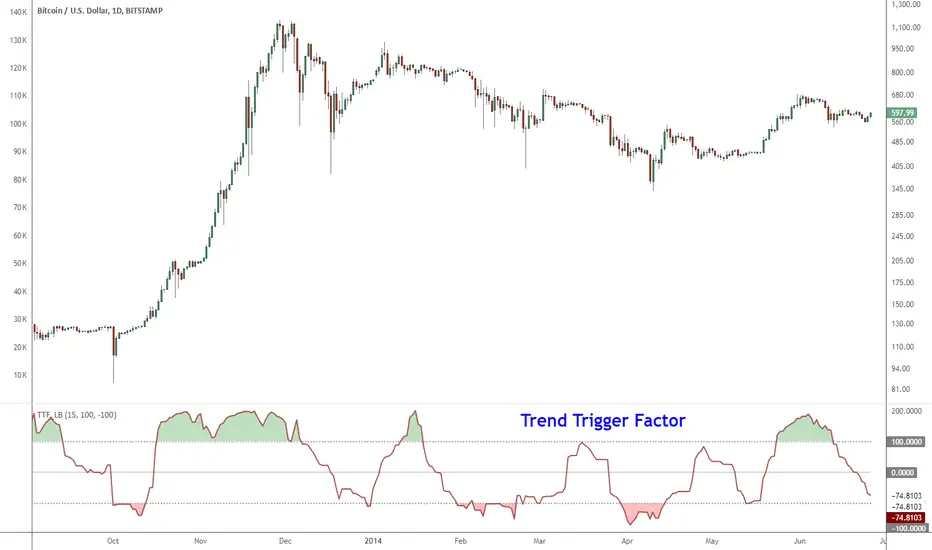
Indicator: Trend Trigger FactorIntroduced by M.H.Pee, Trend Trigger Factor is designed to keep the trader trading with the trend.
System rules according to the developer:
* If the 15-day TTF is above 100 (indicating an uptrend), you will want to be in long positions.
* If the 15-day TTF is below -100, you will want to be short.
* If it is between -100 and 100, you should remain with the current position.
More info:
Original Article by Mr.Pee: drive.google.com
Mongoose Compass v2 — Regime & Position SizingWhat it does
Mongoose Compass v2 is a regime‐detection dashboard and optional price-chart ribbon. It combines four market “pillars” into a 0–4 score and a suggested equity beta/position size. It is scale-independent and works on any host symbol.
Pillars (green = expansion supportive):
RS IWM/SPY – small-cap relative strength vs large caps
Credit HYG/LQD – high-yield vs investment-grade credit
Growth Cu/Au – copper vs gold (cyclical demand vs safety)
Participation – uses the first available of:
Breadth (% > 200-DMA) if you provide a symbol, else
Cboe S&P 500 Dispersion (DSPX), else
RSP/SPY equal-weight proxy
Score (0–4):
≥ 3 = Expansion
2 = Neutral
≤ 1 = Contraction
A panel shows each pillar’s normalized value (0–100), bias, total score, and a suggested size (default mapping: 0/30/60/90/100% for scores 0–4). The companion “Ribbon” script paints the price chart background by regime and displays the suggested size.
How to use
Timeframes
Weekly for regime calls (recommended anchor).
Daily for execution within the active regime (adds, trims, hedges).
Playbook
Expansion (score ≥ 3): increase risk/beta; favor cyclicals, small caps, EM; reduce hedges.
Neutral (score = 2): keep moderate beta; use relative value (e.g., quality/mega vs small caps) until RS or Cu/Au turns.
Contraction (score ≤ 1): de-risk; rotate to defensives/quality, gold/long duration; add hedges.
Alerts (included):
Expansion Regime (score ≥ 3) – risk-on trigger
Contraction Regime (score ≤ 1) – risk-off trigger
Methodology
Prices are pulled with request.security on the chosen timeframe.
Pillars are built from ratios then smoothed with an SMA (Smoothing Length, default 20).
For display/comparison, series are normalized to 0–100 within a rolling window (Normalization Length, default 60).
Bias rules:
RS / Credit / Growth: fast SMA( len ) vs slow SMA( len*2 ) of each ratio
Breadth: normalized value > 60
DSPX: normalized value < 40 (lower dispersion supports index coherence)
RSP/SPY proxy: fast > slow trend test
Score is the count of green pillars (0–4).
Suggested size is a deterministic mapping from score (editable in settings).
Notes:
Host chart scaling (log vs linear) does not affect calculations.
If a breadth series is unavailable, the script automatically falls back to DSPX, then to RSP/SPY.
Settings
Sources
Default inputs use liquid ETFs (BATS/AMEX). You may switch Copper/Gold to futures (e.g., COMEX_DL:HG1!, COMEX_DL:GC1!) if your data plan supports them.
Optional Breadth: paste a percent-above-MA series if you have one.
DSPX: uses CBOE:DSPX when breadth is blank.
If neither breadth nor DSPX resolve, the script uses RSP/SPY as a participation proxy.
Calculation
Smoothing Length (20) – higher = steadier regime, fewer flips; lower = faster reaction.
Normalization Length (60) – window for the 0–100 scaling; increase to reduce pinning at extremes.
Regime Timeframe (Ribbon only) – lock the ribbon to Weekly while viewing Daily charts.
Visual
Show/hide dashboard table, choose table position, dark/light theme, ribbon opacity.
Recommended usage
Anchor decisions on Weekly Compass; use Daily for timing.
For small-cap rotation, apply on IWM/RTY; for broad beta, use SPY/ES. Output is identical regardless of host symbol because inputs are fetched internally.
Limitations & disclaimer
This is a systematic information tool, not investment advice.
Signals can whipsaw in fast markets; confirm with your risk framework.
Data availability varies by plan (especially futures and DSPX). When a source is unavailable the scripted fallbacks apply automatically.

Chart Commando Premium V10// This source code is subject to the terms of the Mozilla Public License 2.0 at mozilla.org
// © chartcommandos
//@version=5
indicator('Sentiment Combo Oscillator', shorttitle='SENTIMENT IN')
info = input(true,title="Chartcommando.com/contact-us👨+918208247170")
BB = input(title='Commando BB', defval=false)
rsiPeriod = input.int(13, minval=1, title='RSI Period')
bandLength = input.int(34, minval=1, title='MBL Line')
lengthtrades = input.int(7, minval=1, title='Signal Line')
lengthrsi = input.int(2, minval=0, title='Sentiment Line')
src = close
r = ta.rsi(src, rsiPeriod)
ma = ta.sma(r, bandLength)
offs = 1.6185 * ta.stdev(r, bandLength)
up = ma + offs
dn = ma - offs
mid = (up + dn) / 2
fast = ta.sma(r, lengthtrades)
tdi = ta.sma(r, lengthrsi)
osc = tdi
Level1 = hline(80, title="Strong Bull Zone", color=#787B86, linestyle=hline.style_dotted)
Level2 = hline(60, title="Strong Bull Zone", color=#787B86, linestyle=hline.style_dotted)
Level3 = hline(40, title="Strong Bear Zone", color=#F23645, linestyle=hline.style_dotted)
Level4 = hline(20, title="strong Bear Zone", color=#F23645, linestyle=hline.style_dotted)
fill(Level1, Level4, title="RSI Shadow", color=color.rgb(33, 150, 243, 90))
midl = plot(mid, title="MBL Line", color=color.new(#FFee58, 50), linewidth=3)
plot(fast, title="Signal Line", color=color.new(#f23645, 0), linewidth=2)
plot(tdi, title="RSI Line", color=color.new(#2962ff, 0), linewidth=2)
p1 = plot(BB ? up : na, 'BB Upper Line ', color=color.new(#2196FF, 100))
p2 = plot(BB ? dn : na, 'BB Lower Line', color=color.new(#2196FF, 100))
fill(p1, p2, title = "BB Shadow", color=color.rgb(33, 150, 243, 85))
Div = input(true,title="The Below Section Is The Divergence")
lbR = input(title="Div Back Right", defval=5)
lbL = input(title="Div Back Left", defval=5)
rangeUpper = input(title="Div Max Back Range", defval=60)
rangeLower = input(title="Div Min Back Range", defval=5)
plotBull = input(title="Bull & Bear Divergence", defval=true)
plotHiddenBull = input(title="Hidden Bull & Bear Divergence", defval=false)
bearColor = color.red
bullColor = color.green
hiddenBullColor = color.new(color.green, 80)
hiddenBearColor = color.new(color.red, 80)
textColor = color.white
noneColor = color.new(color.white, 100)
plFound = na(ta.pivotlow(osc, lbL, lbR)) ? false : true
phFound = na(ta.pivothigh(osc, lbL, lbR)) ? false : true
_inRange(cond) =>
bars = ta.barssince(cond == true)
rangeLower <= bars and bars <= rangeUpper
oscHL = osc > ta.valuewhen(plFound, osc , 1) and _inRange(plFound )
priceLL = low < ta.valuewhen(plFound, low , 1)
bullCond = plotBull and priceLL and oscHL and plFound
plot(
plFound ? osc : na,
offset=-lbR,
title="Regular Bullish",
linewidth=2,
color=(bullCond ? bullColor : noneColor)
)
plotshape(
bullCond ? osc : na,
offset=-lbR,
title="Regular Bullish",
text=" Bull ",
style=shape.labelup,
location=location.absolute,
color=bullColor,
textcolor=textColor
)
oscLL = osc < ta.valuewhen(plFound, osc , 1) and _inRange(plFound )
priceHL = low > ta.valuewhen(plFound, low , 1)
hiddenBullCond = plotHiddenBull and priceHL and oscLL and plFound
plot(
plFound ? osc : na,
offset=-lbR,
title="Hidden Bullish",
linewidth=2,
color=(hiddenBullCond ? hiddenBullColor : noneColor)
)
plotshape(
hiddenBullCond ? osc : na,
offset=-lbR,
title="Hidden Bullish",
text=" H Bull ",
style=shape.labelup,
location=location.absolute,
color=bullColor,
textcolor=textColor
)
oscLH = osc < ta.valuewhen(phFound, osc , 1) and _inRange(phFound )
priceHH = high > ta.valuewhen(phFound, high , 1)
bearCond = plotBull and priceHH and oscLH and phFound
plot(
phFound ? osc : na,
offset=-lbR,
title="Regular Bearish",
linewidth=2,
color=(bearCond ? bearColor : noneColor)
)
plotshape(
bearCond ? osc : na,
offset=-lbR,
title="Regular Bearish",
text=" Bear ",
style=shape.labeldown,
location=location.absolute,
color=bearColor,
textcolor=textColor
)
oscHH = osc > ta.valuewhen(phFound, osc , 1) and _inRange(phFound )
priceLH = high < ta.valuewhen(phFound, high , 1)
hiddenBearCond = plotHiddenBull and priceLH and oscHH and phFound
plot(
phFound ? osc : na,
offset=-lbR,
title="Hidden Bearish",
linewidth=2,
color=(hiddenBearCond ? hiddenBearColor : noneColor)
)
plotshape(
hiddenBearCond ? osc : na,
offset=-lbR,
title="Hidden Bearish",
text=" H Bear ",
style=shape.labeldown,
location=location.absolute,
color=bearColor,
textcolor=textColor
)

Market Sentiment Trend Gauge [LevelUp]Market Sentiment Trend Gauge simplifies technical analysis by mathematically combining momentum, trend direction, volatility position, and comparison against a market benchmark, into a single trend score from -100 to +100. Displayed in a separate pane below your chart, it resolves conflicting signals from RSI, moving averages, Bollinger Bands, and market correlations, providing clear insights into trend direction, strength, and relative performance.
THE PROBLEM MARKET SENTIMENT TREND GAUGE (MSTG) SOLVES
Traditional indicators often produce conflicting signals, such as RSI showing overbought while prices rise or moving averages indicating an uptrend despite market underperformance. MSTG creates a weighted composite score to answer: "What's the overall bias for this asset?"
KEY COMPONENTS AND WEIGHTINGS
The trend score combines
▪ Momentum (25%): Normalized 14-period RSI, capped at ±100.
▪ Trend Direction (35%): 10/21-period EMA relationships,
▪ Volatility Position (20%): Price position, 20-period Bollinger Bands, capped at ±100.
▪ Market Comparison (20%): Daily performance vs. SPY benchmark, capped at ±100.
Final score = Weighted sum, smoothed with 5-period EMA.
INTERPRETING THE MSTG CHART
Trend Score Ranges and Colors
▪ Bright Green (>+30): Strong bullish; ideal for long entries.
▪ Light Green (+10 to +30): Weak bullish; cautiously favorable.
▪ Gray (-10 to +10): Neutral; avoid directional trades.
▪ Light Red (-10 to -30): Weak bearish; exercise caution.
▪ Bright Red (<-30): Strong bearish; high-risk for longs, consider shorts.
Reference Lines
▪ Zero Line (Gray): Separates bullish/bearish; crossovers signal trend changes.
▪ ±30 Lines (Dotted, Green/Red): Thresholds for strong trends.
▪ ±60 Lines (Dashed, Green/Red): Extreme strength zones (not overbought/oversold); manage risk (tighten stops, partial profits) but trends may persist.
Background Colors
▪ Green Tint (>+20): Bullish environment; favorable for longs.
▪ Red Tint (<-20): Bearish environment; caution for longs.
▪ Light Gray Tint (-20 to +20): Neutral/range-bound; wait for signals.
Extreme Readings vs. Traditional Signals
MSTG ±60 indicates maximum alignment of all factors, not reversals (unlike RSI >70/<30). Use for risk management, not automatic exits. Strong trends can sustain extremes; breakdowns occur below +30 or above -30.
INFORMATION TABLE INTERPRETATION
Trend Score Symbols
▲▲ >+30 strong bullish
▲ +10 to +30
● -10 to +10 neutral
▼ -30 to -10
▼▼ <-30 strong bearish
Colors: Green (positive), White (neutral), Red (negative).
Momentum Score
+40 to +100 strong bullish
0 to +40 moderate bullish
-40 to 0 moderate bearish
-100 to -40 strong bearish
Market vs. Stock
▪ Green: Stock outperforming market
▪ Red: Stock underperforming market
Example Interpretations:
-0.45% / +1.23% (Green): Market down, stock up = Strong relative strength
+2.10% / +1.50% (Red): Both rising, but stock lagging = Relative weakness
-1.20% / -0.80% (Green): Both falling, but stock declining less = Defensive strength
UNDERSTANDING EXTREME READINGS VS TRADITIONAL OVERBOUGHT/OVERSOLD
⚠️ Critical distinctions
Traditional Overbought/Oversold Signals:
▪ Single indicator (like RSI >70 or <30) showing momentum excess
▪ Often suggests immediate reversal or pullback expected
▪ Based on "price moved too far, too fast" concept
MSTG Extreme Readings (±60):
▪ Composite alignment of 4 different factors (momentum, trend, volatility, relative strength)
▪ Indicates maximum strength in current direction
▪ NOT a reversal signal - means "all systems extremely bullish/bearish"
Key Differences:
▪ RSI >70: "Price got ahead of itself, expect pullback"
▪ MSTG >+60: "Everything is extremely bullish right now"
▪ Strong trends can maintain extreme MSTG readings during major moves
▪ Breakdowns happen when MSTG falls below +30, not at +60
Proper Usage of Extreme Readings:
▪ Risk Management: Tighten stops, take partial profits
▪ Position Sizing: Reduce new position sizes at extremes
▪ Trend Continuation: Watch for sustained extreme readings in strong markets
▪ Exit Signals: Look for breakdown below +30, not reversal from +60
TRADING WITH MSTG
Quick Assessment
1. Check trend symbol for direction.
2. Confirm momentum strength.
3. Note relative performance color.
Examples:
▲▲ 55.2 (Green), Momentum +28.4, Outperforming: Strong buy setup.
▼ -18.6 (Red), Momentum -43.2, Underperforming: Defensive positioning.
Entry Conditions
▪ Long: stock outperforming market
- Score >+30 (bright green)
- Sustained green background
- ▲▲ symbol,
▪ Short: stock underperforming market
- Score <-30 (bright red)
- Sustained red background
- ▼▼ symbol
Avoid Trading When:
▪ Gray zone (-10 to +10).
▪ Rapid color changes or frequent zero-line crosses (choppy market).
▪ Gray background (range-bound).
Risk Management:
▪ Stop Loss: Exit on zero-line crossover against position.
▪ Take Profit: Partial at ±60 for risk control.
▪ Position Sizing: Larger when signals align; smaller in extremes or mixed conditions.
KEY ADVANTAGES
▪ Unified View: Weighted composite reduces noise and conflicts.
▪ Visual Clarity: 5-color system with gradients for rapid recognition.
▪ Market Context: Relative strength vs. SPY identifies leaders/laggards.
▪ Flexibility: Works across timeframes (1-min to weekly); customizable table.
▪ Noise Reduction: EMA smoothing minimizes false signals.
EXAMPLES
Strong Bull: Trend Score 71.9, Momentum Score 76.9
Neutral: Trend Score 0.1, Momentum Score -9.2
Strong Bear: Trend Score -51.7, Momentum Score -51.5
PERFORMANCE AND LIMITATIONS
Strengths: Trend identification, noise reduction, relative performance versus market.
Limitations: Lags at turning points, less effective in extreme volatility or non-trending markets.
Recommendations: View on multiple timeframes, combine with price action and fundamentals.

Score100—10×10Popular Modules(RSI/MACD/BB/ADX/ATR/Vol/MFI/Trend)Weather Score 100 — 10×10 Popular Modules (RSI / MACD / BB / ADX / ATR / Volume / MFI / Trend)
What it is
A compact, robust /100 composite built from 10 widely-used indicators. Each module is scored 0–10, then summed and normalized by the number of enabled modules. Use it to gauge market “weather” at a glance, trigger GO / NO-GO alerts, and inspect the components in a mini table.
Highlights
10 modules → 0–10 each → /100 total (auto-normalizes to enabled modules)
GO / NO-GO alerts (defaults: GO ≥ 80%, NO-GO ≤ 20%) + optional bar coloring
Badge summarizing all subscores and the composite with emoji (🌧 → 🌈)
Mini table showing each module’s score and quick notes
Robust everywhere: custom ADX and MFI (no library dependency), volume-missing symbols handled (falls back to ATR(1) for volume pulse; MFI returns neutral 50)
The 10 modules (scored 0–10)
EMA Trend: Price vs EMA(50/200), EMA cross, and both slopes.
RSI: Level mapped 40→60 ↦ 0→10 (tweakable).
Stochastic %K: Level mapped 20→80 ↦ 0→10.
MACD Histogram (Z-score): −1→+1 ↦ 0→10 (self-scales across markets).
Bollinger %B: Position inside the band (0→1 ↦ 0→10).
Bollinger Width Percentile: Current width vs lookback min/max.
ADX Strength (custom Wilder): 15→35 sweet spot ↦ 0→10.
Volume Pulse: Volume ratio vs SMA; if volume is na, uses ATR(1) proxy.
ATR Percentile: Current ATR vs lookback min/max.
MFI (custom): Level mapped 40→60 ↦ 0→10; neutral 50 if no volume.
How the score works
Each enabled module contributes 0–10.
The script sums them and divides by the maximum possible for the enabled set, so the composite always reads as a true percent of max.
Color mapping (purple → pink → indigo) reflects cool → warm → hot conditions.
Signals & Alerts
GO ✅ when composite ≥ GO threshold (default 80%).
NO-GO 🛑 when composite ≤ NO-GO threshold (default 20%).
Optional bar paints for quick chart context.
Display
Badge near price shows all 10 subscores, total, and composite %.
Mini table (toggleable) lists Module / Score / Notes for fast diagnostics.
Tips
Nudge the module ranges to fit your style (trend vs mean reversion).
Tighten/loosen GO/NO-GO thresholds to match your timeframe.
Works on any symbol/timeframe; on synthetic/no-volume series the system remains stable via the fallbacks.

MGG_FX//@version=5
indicator('MGG_FX', overlay=true, max_bars_back=1000, max_labels_count=500, max_lines_count=500, max_boxes_count=500)
var GRP1 = "ASIAN RANGE"
showLines = input(title='Show Lines', defval=true, group=GRP1)
showBackground = input(title='Show Background', defval=true, group=GRP1)
showMiddleLine = input(title='Show Middle Line', defval=true, group=GRP1)
extendLines = input(title='Extend Line', defval=true, group=GRP1)
rangeTime = input.session(title='Session Time', defval='1700-0100', group=GRP1)
extendTime = input.session(title='Extend Until', defval='0100-0500', group=GRP1)
linesWidth = input.int(1, 'Box And Lines Width', minval=1, maxval=4, group=GRP1)
boxLineColor = input(color.new(#434651,50), 'Box Line Color', group=GRP1)
middleLineColor = input(color.new(#434651,50), 'Middle Line Color', group=GRP1)
backgroundColor = input(color.new(#9598a1,90), 'Box Background Color', group=GRP1)
var GRP5 = "LONDON"
showLines4 = input(title='Show Lines', defval=true, group=GRP5)
showBackground4 = input(title='Show Background', defval=true, group=GRP5)
rangeTime4 = input.session(title='Session Time', defval='0300-0400', group=GRP5)
linesWidth4 = input.int(1, 'Box And Lines Width', minval=1, maxval=4, group=GRP5)
boxLineColor4 = input(color.new(#b2b5be, 95), 'Box Line Color', group=GRP5)
backgroundColor4 = input(color.new(#b2b5be, 90), 'Box Background Color', group=GRP5)
var GRP6 = "NEWYORK"
showLines5 = input(title='Show Lines', defval=true, group=GRP6)
showBackground5 = input(title='Show Background', defval=true, group=GRP6)
rangeTime5 = input.session(title='Session Time', defval='0900-1000', group=GRP6)
linesWidth5 = input.int(1, 'Box And Lines Width', minval=1, maxval=4, group=GRP6)
boxLineColor5 = input(color.new(#b2b5be, 95), 'Box Line Color', group=GRP6)
backgroundColor5 = input(color.new(#b2b5be, 90), 'Box Background Color', group=GRP6)
////////////////////////////////////////////
inSession = not na(time(timeframe.period, rangeTime))
inExtend = not na(time(timeframe.period, extendTime))
startTime = 0
startTime := inSession and not inSession ? time : startTime
//Box lines
var line lowHLine = na
var line topHLine = na
var line leftVLine = na
var line rightVLine = na
var line middleHLine = na
var box bgBox = na
var low_val = 0.0
var high_val = 0.0
if inSession and not inSession
low_val := low
high_val := high
high_val
// Plot lines
if inSession and timeframe.isintraday
if inSession
line.delete(lowHLine)
line.delete(topHLine)
line.delete(leftVLine)
line.delete(rightVLine)
line.delete(middleHLine)
box.delete(bgBox)
if low < low_val
low_val := low
low_val
if high > high_val
high_val := high
high_val
//Create Box
//x1, y1, x2, y2
if showBackground
bgBox := box.new(startTime, high_val, time, low_val, xloc=xloc.bar_time, bgcolor=backgroundColor, border_width=0)
if showLines
lowHLine := line.new(startTime, low_val, time, low_val, xloc=xloc.bar_time, color=boxLineColor, style=line.style_solid, width=linesWidth)
topHLine := line.new(startTime, high_val, time, high_val, xloc=xloc.bar_time, color=boxLineColor, style=line.style_solid, width=linesWidth)
leftVLine := line.new(startTime, high_val, startTime, low_val, xloc=xloc.bar_time, color=boxLineColor, style=line.style_solid, width=linesWidth)
rightVLine := line.new(time, high_val, time, low_val, xloc=xloc.bar_time, color=boxLineColor, style=line.style_solid, width=linesWidth)
//Create Middle line
if showMiddleLine
middleHLine := line.new(startTime, (high_val + low_val) / 2, time, (high_val + low_val) / 2, xloc=xloc.bar_time, color=middleLineColor, style=line.style_solid, width=linesWidth)
else
if inExtend and extendLines and not inSession and timeframe.isintraday
time1 = line.get_x1(lowHLine)
time2 = line.get_x2(lowHLine)
price = line.get_y1(lowHLine)
line.delete(lowHLine)
lowHLine := line.new(time1, price, time, price, xloc=xloc.bar_time, color=boxLineColor, style=line.style_solid, width=linesWidth)
time1 := line.get_x1(topHLine)
time2 := line.get_x2(topHLine)
price := line.get_y1(topHLine)
line.delete(topHLine)
topHLine := line.new(time1, price, time, price, xloc=xloc.bar_time, color=boxLineColor, style=line.style_solid, width=linesWidth)
time1 := line.get_x1(middleHLine)
time2 := line.get_x2(middleHLine)
price := line.get_y1(middleHLine)
line.delete(middleHLine)
middleHLine := line.new(time1, price, time, price, xloc=xloc.bar_time, color=middleLineColor, style=line.style_solid, width=linesWidth)
middleHLine
////////////////////////////////////////////
inSession4 = not na(time(timeframe.period, rangeTime4))
startTime4 = 0
startTime4 := inSession4 and not inSession4 ? time : startTime4
//Box lines
var line lowHLine4 = na
var line topHLine4 = na
var line leftVLine4 = na
var line rightVLine4 = na
var line middleHLine4 = na
var box bgBox4 = na
var low_val4 = 0.0
var high_val4 = 0.0
if inSession4 and not inSession4
low_val4 := low
high_val4 := high
high_val4
// Plot lines
if inSession4 and timeframe.isintraday
if inSession4
line.delete(lowHLine4)
line.delete(topHLine4)
line.delete(leftVLine4)
line.delete(rightVLine4)
line.delete(middleHLine4)
box.delete(bgBox4)
if low < low_val4
low_val4 := low
low_val4
if high > high_val4
high_val4 := high
high_val4
//Create Box
//x1, y1, x2, y2
if showBackground4
bgBox4 := box.new(startTime4, high_val4, time, low_val4, xloc=xloc.bar_time, bgcolor=backgroundColor4, border_width=0)
if showLines4
lowHLine4 := line.new(startTime4, low_val4, time, low_val4, xloc=xloc.bar_time, color=boxLineColor4, style=line.style_solid, width=linesWidth4)
topHLine4 := line.new(startTime4, high_val4, time, high_val4, xloc=xloc.bar_time, color=boxLineColor4, style=line.style_solid, width=linesWidth4)
leftVLine4 := line.new(startTime4, high_val4, startTime4, low_val4, xloc=xloc.bar_time, color=boxLineColor4, style=line.style_solid, width=linesWidth4)
rightVLine4 := line.new(time, high_val4, time, low_val4, xloc=xloc.bar_time, color=boxLineColor4, style=line.style_solid, width=linesWidth4)
////////////////////////////////////////////
inSession5 = not na(time(timeframe.period, rangeTime5))
startTime5 = 0
startTime5 := inSession5 and not inSession5 ? time : startTime5
//Box lines
var line lowHLine5 = na
var line topHLine5 = na
var line leftVLine5 = na
var line rightVLine5 = na
var line middleHLine5 = na
var box bgBox5 = na
var low_val5 = 0.0
var high_val5 = 0.0
if inSession5 and not inSession5
low_val5 := low
high_val5 := high
high_val5
// Plot lines
if inSession5 and timeframe.isintraday
if inSession5
line.delete(lowHLine5)
line.delete(topHLine5)
line.delete(leftVLine5)
line.delete(rightVLine5)
line.delete(middleHLine5)
box.delete(bgBox5)
if low < low_val5
low_val5 := low
low_val5
if high > high_val5
high_val5 := high
high_val5
//Create Box
//x1, y1, x2, y2
if showBackground5
bgBox5 := box.new(startTime5, high_val5, time, low_val5, xloc=xloc.bar_time, bgcolor=backgroundColor5, border_width=0)
if showLines5
lowHLine5 := line.new(startTime5, low_val5, time, low_val5, xloc=xloc.bar_time, color=boxLineColor5, style=line.style_solid, width=linesWidth5)
topHLine5 := line.new(startTime5, high_val5, time, high_val5, xloc=xloc.bar_time, color=boxLineColor5, style=line.style_solid, width=linesWidth5)
leftVLine5 := line.new(startTime5, high_val5, startTime5, low_val5, xloc=xloc.bar_time, color=boxLineColor5, style=line.style_solid, width=linesWidth5)
rightVLine5 := line.new(time, high_val5, time, low_val5, xloc=xloc.bar_time, color=boxLineColor5, style=line.style_solid, width=linesWidth5)
///////////////////////////////////////////////
//INPUTS
ffRange = input.session(title='Time: ', defval='0200-0201', inline='a', group='FF')
ffcolor = input.color(color.new(#b2b5be,20),title="Color:",inline="s_1",group="FF")
ffStyle = input.string(title="-", defval=line.style_solid, options= ,inline="s_1",group="FF")
mmm1Range = input.session(title='Time: ', defval='0430-0431', inline='a', group='MMM1')
mmm1color = input.color(color.new(#b2b5be,20),title="Color:",inline="s_1",group="MMM1")
mmm1Style = input.string(title="-", defval=line.style_solid, options= ,inline="s_1",group="MMM1")
mmm2Range = input.session(title='Time: ', defval='0630-0631', inline='a', group='MMM2')
mmm2color = input.color(color.new(#b2b5be,20),title="Color:",inline="s_1",group="MMM2")
mmm2Style = input.string(title="-", defval=line.style_solid, options= ,inline="s_1",group="MMM2")
mmm3Range = input.session(title='Time: ', defval='0800-0801', inline='a', group='MMM3')
mmm3color = input.color(color.new(#b2b5be,20),title="Color:",inline="s_1",group="mmm3")
mmm3Style = input.string(title="-", defval=line.style_solid, options= ,inline="s_1",group="MMM3")
lcRange = input.session(title='Time: ', defval='1100-1101', inline='a', group='LC')
lccolor = input.color(color.new(#b2b5be,20),title="Color:",inline="s_1",group="LC")
lcStyle = input.string(title="-", defval=line.style_solid, options= ,inline="s_1",group="LC")
//Plot lines
in_session_ff = time(timeframe.period, ffRange)
sessionffActive = in_session_ff and timeframe.multiplier <= 240
var line ff = na
if sessionffActive and sessionffActive == false
ff := line.new(bar_index,high+0.001,bar_index,low-0.001,color=ffcolor, style=ffStyle)
in_session_mmm1 = time(timeframe.period, mmm1Range)
sessionmmm1Active = in_session_mmm1 and timeframe.multiplier <= 240
var line mmm1 = na
if sessionmmm1Active and sessionmmm1Active == false
mmm1 := line.new(bar_index,high+0.001,bar_index,low-0.001,color=mmm1color, style=mmm1Style)
in_session_mmm2 = time(timeframe.period, mmm2Range)
sessionmmm2Active = in_session_mmm2 and timeframe.multiplier <= 240
var line mmm2 = na
if sessionmmm2Active and sessionmmm2Active == false
mmm2 := line.new(bar_index,high+0.001,bar_index,low-0.001,color=mmm2color, style=mmm2Style)
in_session_mmm3 = time(timeframe.period, mmm3Range)
sessionmmm3Active = in_session_mmm3 and timeframe.multiplier <= 240
var line mmm3 = na
if sessionmmm3Active and sessionmmm3Active == false
mmm3 := line.new(bar_index,high+0.001,bar_index,low-0.001,color=mmm3color, style=mmm3Style)
in_session_lc = time(timeframe.period, lcRange)
sessionlcActive = in_session_lc and timeframe.multiplier <= 240
var line lc = na
if sessionlcActive and sessionlcActive == false
lc := line.new(bar_index,high+0.001,bar_index,low-0.001,color=lccolor, style=lcStyle)
//////////////////////////////////////////////////////////////////////
// Inputs
var GRP10 = "Daily Open"
daily = input.string(title='View', defval='Daily Open', group=GRP10)
_offset = input.int(0, title='Offset', minval=0, maxval=2)
o_color = input.color(color.new(#000000, 0), "Open Color", inline="1", group = GRP10)
// FUNCTIONS
t = time
isNewbar = not na(t) and (na(t ) or t > t )
tfInMinutes(simple string tf = "") =>
float chartTf =
timeframe.multiplier * (
timeframe.isseconds ? 1. / 60 :
timeframe.isminutes ? 1. :
timeframe.isdaily ? 60. * 24 :
timeframe.isweekly ? 60. * 24 * 7 :
timeframe.ismonthly ? 60. * 24 * 30.4375 : na)
float result = tf == "" ? chartTf : request.security(syminfo.tickerid, tf, chartTf)
inTimeframe(_t) => tfInMinutes(_t) > tfInMinutes(timeframe.period)
// Range
reso(exp, res) => request.security(syminfo.tickerid, res, exp, lookahead=barmerge.lookahead_on)
getData(_t, _var) =>
o = reso(open , _t)
show = _var != "Off" and inTimeframe(_t)
_time = time(_t)
newbar = na(_time ) or _time > _time
oc = _var == 'Daily Open'
// ---------- Daily ----------
= getData("D", daily)
if d_newbar
if d_oc
line.new(x1=time, y1=d_o, x2=time_close("D"), y2=d_o, xloc=xloc.bar_time, style=line.style_dotted, color=o_color)
//-------------------- WATERMARK--------------------
////////////////////////////////////////////////////
//text inputs
title = input.string("JDVID_FX", "Tittle", group = "NICK NAME")
subtitle = input.string("𝗖𝗬𝗖𝗟𝗘 | 𝗧𝗜𝗠𝗜𝗡𝗚 | 𝗣𝗥𝗘𝗖𝗜𝗦𝗜𝗢𝗡", "Subtitle", group = "text")
//symbol info
symInfoCheck = input.bool(title="Show Symbol Info", defval=true, group = "watermark position")
symInfo = syminfo.ticker + " | " + timeframe.period + (timeframe.isminutes ? "M" : na)
date = str.format("{0}/{1}/{2}", dayofmonth(time_close), month(time_close), year(time_close))
//text positioning
textVPosition = input.string("top", "Vertical Position", options = , group = "watermark position")
textHPosition = input.string("center", "Horizontal Position", options = , group = "watermark position")
//symbol info positioning
symVPosition = input.string("bottom", "Vertical Position", options = , group = "symbol position")
symHPosition = input.string("center", "Horizontal Position", options = , group = "symbol position")
//cell size
cellWidthPercent = input.float(0, "Cell Width (%)", minval = 0, maxval = 100, tooltip = "The width of the cell as a % of the indicator's visual space. Optional. By default, auto-adjusts the width based on the text inside the cell. Value 0 has the same effect.", group = "cell size")
cellHeightPercent = input.float(0, "Cell Height (%)", minval = 0, maxval = 100, tooltip = "The height of the cell as a % of the indicator's visual space. Optional. By default, auto-adjusts the height based on the text inside of the cell. Value 0 has the same effect.", group = "cell size")
//title settings
c_title = input(color.new(color.black, 0), "Title Color", group = "title settings")
s_title = input.string("large", "Title Size", options = , group = "title settings")
a_title = input.string("center","Title Alignment", options = , group = "title settings")
//subtitle settings
c_subtitle = input(color.new(color.black, 30), "Subtitle Color", group = "subtitle settings")
s_subtitle = input.string("small", "Subtitle Size", options = , group = "subtitle settings")
a_subtitle = input.string("center","Subtitle Alignment", options = , group = "subtitle settings")
//symbol settings
c_symInfo = input(color.new(color.black, 30), "Subtitle Color", group = "symbol settings")
s_symInfo = input.string("normal", "Subtitle Size", options = , group = "symbol settings")
a_symInfo = input.string("center","Subtitle Alignment", options = , group = "symbol settings")
c_bg = input(color.new(color.blue, 100), "Background", group = "background")
//text watermark creation
var table textWatermark = table.new(textVPosition + "_" + textHPosition, 1, 3)
table.cell(textWatermark, 0, 0, title, width = cellWidthPercent, height = cellHeightPercent, text_color = c_title, text_halign = a_title, text_size = s_title, bgcolor = c_bg)
table.cell(textWatermark, 0, 1, subtitle, width = cellWidthPercent, height = cellHeightPercent, text_color = c_subtitle, text_halign = a_subtitle, text_size= s_subtitle, bgcolor = c_bg)
//symbol info watermark creation
var table symWatermark = table.new(symVPosition + "_" + symHPosition, 5, 5)
if symInfoCheck
table.cell(symWatermark, 0, 1, symInfo, width = cellWidthPercent, height = cellHeightPercent, text_color = c_symInfo, text_halign = a_symInfo, text_size = s_symInfo, bgcolor = c_bg)
table.cell(symWatermark, 0, 0, date, width = cellWidthPercent, height = cellHeightPercent, text_color = c_symInfo, text_halign = a_symInfo, text_size = s_symInfo, bgcolor = c_bg)

VWAP Momentum Oscillator How It Works
Core Calculation Method
The oscillator combines four key market measurements into a single, normalized reading:
1. Price-VWAP Deviation: `(Close - VWAP) / VWAP × 100`
2. VWAP-MA Momentum: `(VWAP - MovingAverage) / MovingAverage × 100`
3. Anchored VWAP Strength: Average of high/low anchor deviations from rolling VWAP
4. Range Position: `(Close - PeriodLow) / (PeriodHigh - PeriodLow) × 100 - 50`
Dynamic Signal Line
The signal line uses an EMA that automatically adjusts its length based on your chart timeframe:
- Futures: Always covers 23 hours of trading (1,380 minutes)
- Stocks: Always covers 6.5 hours of trading (390 minutes)
- Examples: 276 periods on 5-min futures chart, 1,380 periods on 1-min futures chart
Trading Signals
🟢 Buy Signals
- Condition: Main oscillator crosses above signal line while below zero
- Logic: Momentum turning bullish from oversold conditions
- Visual: Green "BUY" label below price action
🔴 Sell Signals
- Condition: Main oscillator crosses below signal line while above zero
- Logic: Momentum turning bearish from overbought conditions
- Visual: Red "SELL" label above price action
⚠️ Extreme Warnings
- Extreme Overbought: Red triangle when oscillator crosses above +4.0
- Extreme Oversold: Green triangle when oscillator crosses below -4.0
- Purpose: Risk management alerts, not entry/exit signals
Oscillator Zones
Interpretation Guide
- Above +2.0: Strong bullish momentum zone (green background)
- 0 to +2.0: Mild bullish territory
- 0 to -2.0: Mild bearish territory
- Below -2.0: Strong bearish momentum zone (red background)
- Above +4.0: Extreme overbought (caution advised)
- Below -4.0: Extreme oversold (potential reversal zone)
Customization Options
Moving Average Settings
- EMA/SMA Toggle: Choose between exponential or simple moving average
- Color Customization: Adjust MA line color and width
Visual Controls
- Bullish/Bearish Colors: Customize momentum zone colors
- Signal Line: Toggle visibility and adjust color
- Line Widths: Control thickness of all plot lines
Anchor Modes
- NY Session Only: Anchors reset at NY market open (9:30 AM ET)
- 24H NY Day: Anchors reset at NY calendar day change (midnight ET)
Best Practices
Timeframe Selection
- Scalping: 1-5 minute charts for quick momentum changes
- Day Trading: 5-15 minute charts for clearer trend signals
- Swing Trading: 1-4 hour charts for major momentum shifts
Signal Confirmation
- Wait for crossovers: Don't trade on oscillator position alone
- Respect extreme levels: Exercise caution above +4 or below -4
- Use with price action: Combine with support/resistance levels
Risk Management
- Extreme zones: Reduce position size when oscillator is extended
- Failed signals: Exit quickly if momentum doesn't follow through
- Market context: Consider overall trend direction and market volatility
Technical Specifications
Calculation Components
- Base Length: 1,380 periods (futures) / 390 periods (stocks)
- Signal Line: Dynamic EMA covering one full trading day
- Smoothing: 3-period SMA on raw oscillator (adjustable)
- Update Frequency: Real-time on every price tick
Performance Notes
- Resource Efficient: Optimized calculations minimize CPU usage
- Memory Friendly: Uses incremental VWAP calculations
- Fast Loading: Minimal historical data requirements
Version History & Development
This oscillator evolved from advanced VWAP overlay strategies, transforming complex multi-line analysis into a single, actionable momentum gauge. The indicator maintains the sophistication of institutional VWAP analysis while providing the clarity needed for retail trading decisions.
Core Philosophy
Traditional VWAP indicators show where price is relative to volume-weighted averages, but they don't quantify momentum or provide clear entry/exit signals. This oscillator solves that problem by normalizing all VWAP relationships into a single, bounded indicator that works consistently across all timeframes and asset classes.
---
Open Source License: This indicator is provided free for the TradingView community. Feel free to modify and enhance according to your trading needs.

KD The ScalperWe have to take the trade when all three EMAs are pointing in the same direction (no criss-cross, no up/down, sideways). All 3 EMAs should be cleanly separated from each other with strong spacing between them; they are not tangled, sideways, or messy. This is our first filter before entering the trade. Are the EMAs stacked neatly, and is the price outside of the 25 EMA? If price pulls back and closes near or below the 25 or 50 EMA and breaks the 100 EMA, we don't trade. Use the 100 EMA as a safety net and refrain from trading if the price touches or falls below the 100 EMA.
1. Confirm the trend- All 3 EMAs must align, and they must spread
2. Watch price pull back to the 25th or the 50 EMA
3. Wait for the price to bounce - And re-approach the 25 EMA
Why is this powerful?
Removes 80% of the low-probability Trades
It keeps you out of choppy markets
Avoids Reversal Traps
Anchors us to momentum
We take the entry when the price moves up again and touches the 25 EMA from below, and then when it breaks above the 25 EMA, or even better, when a lovely green bullish candle forms. A bullish candle indicates good momentum. When a bullish candle closes in green, it means the momentum has increased significantly. This is when we enter a long trade, with the stop-loss just below the 50 EMA and the profit target being 1.5 times the stop-loss.
The same rule applies to the bearish trade.

AI Trading Alerts v6 — SL/TP + Confidence + Panel (Fixed)Overview
This Pine Script is designed to identify high-probability trading opportunities in Forex, commodities, and crypto markets. It combines EMA trend filters, RSI, and Stochastic RSI, with automatic stop-loss (SL) & take-profit (TP) suggestions, and provides a confidence panel to quickly assess the trade setup strength.
It also includes TradingView alert conditions so you can set up notifications for Long/Short setups and EMA crosses.
⚙️ Features
EMA Trend Filter
Uses EMA 50, 100, 200 for trend confirmation.
Bull trend = EMA50 > EMA100 > EMA200
Bear trend = EMA50 < EMA100 < EMA200
RSI Filter
Bullish trades require RSI > 50
Bearish trades require RSI < 50
Stochastic RSI Filter
Prevents entries during overbought/oversold extremes.
Bullish entry only if %K and %D < 80
Bearish entry only if %K and %D > 20
EMA Proximity Check
Price must be near EMA50 (within ATR × adjustable multiplier).
Signals
Continuation Signals:
Long if all bullish conditions align.
Short if all bearish conditions align.
Cross Events:
Long Cross when price crosses above EMA50 in bull trend.
Short Cross when price crosses below EMA50 in bear trend.
Automatic SL/TP Suggestions
SL size adjusts depending on asset:
Gold/Silver (XAU/XAG): 5 pts
Bitcoin/Ethereum: 100 pts
FX pairs (default): 20 pts
TP = SL × Risk:Reward ratio (default 1:2).
Confidence Score (0–4)
Based on conditions met (trend, RSI, Stoch, EMA proximity).
Labels:
Strongest (4/4)
Strong (3/4)
Medium (2/4)
Low (1/4)
Visual Panel on Chart
Shows ✅/❌ for each condition (trend, RSI, Stoch, EMA proximity, signal now).
Confidence row with color-coded strength.
Alerts
Long Setup
Short Setup
Long Cross
Short Cross
🖥️ How to Use
1. Add the Script
Open TradingView → Pine Editor.
Paste the full script.
Click Add to chart.
Save as "AI Trading Alerts v6 — SL/TP + Confidence + Panel".
2. Configure Inputs
EMA Lengths: Default 50/100/200 (works well for swing trading).
RSI Length: 14 (standard).
Stochastic Length/K/D: Default 14/3/3.
Risk:Reward Ratio: Default 2.0 (can change to 1.5, 3.0, etc.).
EMA Proximity Threshold: Default 0.20 × ATR (adjust to be stricter/looser).
3. Read the Panel
Top-right of chart, you’ll see ✅ or ❌ for:
Trend → Are EMAs aligned?
RSI → Above 50 (bull) or below 50 (bear)?
Stoch OK → Not extreme?
Near EMA50 → Close enough to EMA50?
Above/Below OK → Price position vs. EMA50 matches trend?
Signal Now → Entry triggered?
Confidence row:
🟢 Green = Strongest
🟩 Light green = Strong
🟧 Orange = Medium
🟨 Yellow = Low
⬜ Gray = None
4. Alerts Setup
Go to TradingView Alerts (⏰ icon).
Choose the script under “Condition”.
Select alert type:
Long Setup
Short Setup
Long Cross
Short Cross
Set notification method (popup, sound, email, mobile).
Click Create.
Now TradingView will notify you automatically when signals appear.
5. Example Workflow
Wait for Confidence = Strong/Strongest.
Check if market session supports volatility (e.g., XAU in London/NY).
Review SL/TP suggestions:
Long → Entry: current price, SL: close - risk_pts, TP: close + risk_pts × RR.
Short → Entry: current price, SL: close + risk_pts, TP: close - risk_pts × RR.
Adjust based on your own price action analysis.
📊 Best Practices
Use on H1 + D1 combo → align higher timeframe bias with intraday entries.
Risk only 1–2% of account per trade (position sizing required).
Filter with market sessions (Asia, Europe, US).
Strongest signals work best with trending pairs (e.g., XAUUSD, USDJPY, BTCUSD).

Anchored EMA/VWAP### Anchored EMA/VWAP Indicator
**Description:**
The **Anchored EMA/VWAP Indicator** is a powerful and versatile tool designed for traders seeking to analyze price trends and momentum from a user-defined anchor point in time. Built for TradingView using Pine Script v6, this indicator calculates and displays multiple **Exponential Moving Averages (EMAs)**, **Volume-Weighted Exponential Moving Averages (VWEMAs)**, and a **Volume-Weighted Average Price (VWAP)**, all anchored to a specific date and time chosen by the user. By anchoring these calculations, traders can focus on price action relative to significant market events, such as news releases, earnings reports, or key support/resistance levels.
The indicator supports multi-timeframe (MTF) analysis, allowing users to compute EMAs, VWEMAs, and VWAP on a higher or custom timeframe (e.g., 5-minute, 1-hour, daily) while overlaying the results on the current chart. It also includes customizable cross signals for EMA and VWEMA pairs, marked with distinct shapes (circles, diamonds, squares) to highlight potential trend changes or reversals. These features make the indicator ideal for trend-following, momentum trading, and identifying key price levels across various markets, including stocks, forex, cryptocurrencies, and commodities.
**Key Features:**
- **Anchored Calculations**: EMAs, VWEMAs, and VWAP start calculations from a user-specified anchor time, enabling analysis relative to significant market moments.
- **Multi-Timeframe Support**: Compute indicators on any timeframe (e.g., 60-minute, daily) and display them on the chart’s timeframe for flexible analysis.
- **Customizable EMAs and VWEMAs**: Four EMAs and four VWEMAs with adjustable lengths (default: 9, 21, 50, 100) and colors, with options to show or hide each.
- **Volume-Weighted Metrics**: VWAP and VWEMAs incorporate volume data, providing a more robust representation of market activity compared to standard EMAs.
- **Cross Signals**: Visual markers (circles, diamonds, squares) for crossovers between EMA and VWEMA pairs, with customizable visibility to highlight bullish (up) or bearish (down) signals.
- **User-Friendly Interface**: Organized input groups for General, EMA, VWEMA, VWAP, Arrow Settings, and Cross Visibility, with intuitive inline inputs for length and color customization.
- **Visual Clarity**: Overlaid on the price chart with distinct colors and line styles (dotted for EMAs, dashed for VWEMAs, solid for VWAP) to ensure easy interpretation.
**How to Use:**
1. **Set the Anchor Time**: Click a specific bar or enter a date/time (default: June 1, 2025) to start calculations from a significant market event.
2. **Select Timeframe**: Choose a timeframe (e.g., "5" for 5-minute, "D" for daily) to compute the indicators, allowing alignment with your trading strategy.
3. **Customize EMAs and VWEMAs**: Adjust lengths and colors for up to four EMAs and VWEMAs, and toggle their visibility to focus on relevant lines.
4. **Enable VWAP**: Display the anchored VWAP to identify volume-weighted price levels, useful as dynamic support/resistance.
5. **Monitor Cross Signals**: Enable cross visibility for specific EMA or VWEMA pairs to spot potential trend changes. Bullish crosses (e.g., shorter EMA crossing above longer EMA) are marked with green shapes below the bar, while bearish crosses are marked with red shapes above the bar.
6. **Interpret Signals**: Use EMA/VWEMA crossovers for trend confirmation, VWAP as a mean-reversion level, and volume-weighted VWEMAs for momentum analysis in high-volume markets.
**Use Cases:**
- **Trend Trading**: Identify trend direction using EMA and VWEMA crossovers, with shorter lengths (e.g., 9, 21) for faster signals and longer lengths (e.g., 50, 100) for trend confirmation.
- **Mean Reversion**: Use the anchored VWAP as a dynamic support/resistance level to trade pullbacks or breakouts.
- **Event-Based Analysis**: Anchor the indicator to significant events (e.g., earnings, economic data releases) to analyze price behavior post-event.
- **Multi-Timeframe Strategies**: Combine higher timeframe EMAs/VWAPs with lower timeframe price action for high-probability setups.
**Settings:**
- **Anchor Time**: Set the starting point for calculations (default: June 1, 2025).
- **Timeframe**: Choose the timeframe for calculations (default: 5-minute).
- **EMA/VWEMA Lengths**: Default lengths of 9, 21, 50, and 100 for both EMAs and VWEMAs, adjustable per user preference.
- **Colors**: Customizable colors with slight transparency for visual clarity.
- **Cross Visibility**: Toggle specific EMA and VWEMA cross signals (e.g., EMA1/EMA2, VWEMA1/VWEMA3) to reduce chart clutter.
- **Arrow Colors**: Green for bullish crosses, red for bearish crosses.
**Notes:**
- The indicator is overlaid on the price chart, ensuring seamless integration with price action analysis.
- VWEMAs and VWAP are volume-sensitive, making them particularly effective in markets with significant volume fluctuations.
- Ensure the anchor time is set to a valid historical or future bar to avoid calculation errors.
- Cross signals are conditional on non-NA values to prevent false positives during initialization.
**Author**: NEPOLIX
**Version**: 6 (Pine Script v6)
**Published**: For TradingView Community
This indicator is a must-have for traders looking to combine anchored, volume-weighted, and multi-timeframe analysis into a single, customizable tool. Whether you're a day trader, swing trader, or long-term investor, the Anchored EMA/VWAP Indicator provides actionable insights for informed trading decisions.

Crypto Market Dominance Stacked with LabelsA professional stacked area chart showing the dominance of major crypto market segments: BTC, ETH, Top 100 Altcoins, and #101+ Altcoins. Each layer is color-coded for clarity and includes dynamic labels with the current dominance percentage. Provides a clear visual representation of market share trends for traders, analysts, and crypto enthusiasts.
Features:
Stacked visualization of BTC, ETH, Top 100, and small-cap altcoins (#101+).
Color-coded areas for easy identification.
Dynamic labels showing each category’s current dominance percentage.
Horizontal reference lines for percentage levels.
Approximates top 100 and #101+ altcoins using TOTAL2 and TOTAL3 market cap tickers.
Use Case:
Track how market share shifts between BTC, ETH, large altcoins, and smaller altcoins over time. Ideal for analyzing trends, spotting dominance changes, and visualizing overall crypto market structure.

ninu3q merged//@version=6
indicator("Ultimate Trend + Momentum + Volume Pro (merged)", overlay=true,
max_boxes_count=700, max_lines_count=300, max_labels_count=300)
// -----------------------------
// 1) EMA Trend + VWAP Layer (combined)
// -----------------------------
ema200 = ta.ema(close, 200)
ema50 = ta.ema(close, 50)
vwap = ta.vwap
ema200Plot = plot(ema200, "EMA 200", color=color.red, linewidth=2, style=plot.style_line)
ema50Plot = plot(ema50, "EMA 50", color=color.teal, linewidth=1, style=plot.style_line)
vwapPlot = plot(vwap, "VWAP", color=color.orange, linewidth=1, style=plot.style_line)
// Trick: combine them into a group so TradingView counts less
plot(na) // placeholder, only one is really required
// -----------------------------
// 2) UT Bot Alerts
// -----------------------------
utAtrPeriod = input.int(10, "UT ATR Period")
utAtrMultiplier = input.float(2.0, "UT ATR Multiplier")
utAtr = ta.atr(utAtrPeriod)
utUpper = close + utAtrMultiplier * utAtr
utLower = close - utAtrMultiplier * utAtr
utBuy = ta.crossover(close, utUpper)
utSell = ta.crossunder(close, utLower)
plotshape(utBuy, "UT Buy", location=location.belowbar, color=color.green, style=shape.labelup, text="BUY")
plotshape(utSell, "UT Sell", location=location.abovebar, color=color.red, style=shape.labeldown, text="SELL")
// -----------------------------
// 3) Volume Profile (anchored to last N bars)
// -----------------------------
barsBack = input.int(150, "Bars Back", minval=1, maxval=5000)
cols = input.int(35, "Columns", minval=5, maxval=200)
vaPct = input.float(70.0, "Value Area %", minval=40.0, maxval=99.0)
histWidth = input.int(24, "Histogram Width (bars)", minval=6, maxval=200)
direction = input.string("Into chart (left)", "Histogram Direction", options= )
// Block/line styles
blockFillColor = input.color(#B0B0B0, "Volume Block Fill Color")
blockFillOpacity = input.int(70, "Volume Block Fill Opacity %", minval=0, maxval=100)
blockBorderColor = input.color(#000000, "Volume Block Border Color")
blockBorderOpacity = input.int(0, "Volume Block Border Opacity %", minval=0, maxval=100)
showPOC = input.bool(true, "Show POC Line")
pocColor = input.color(#FF0000, "POC Color")
pocWidth = input.int(2, "POC Width", minval=1, maxval=6)
showVA = input.bool(false, "Show VAH/VAL Lines")
vaColor = input.color(#FFA500, "VA Color")
vaWidth = input.int(1, "VA Width", minval=1, maxval=6)
showVWAP = input.bool(false, "Show AVWAP Line")
vwapColor = input.color(#0000FF, "AVWAP Color")
vwapWidth = input.int(1, "AVWAP Width", minval=1, maxval=6)
showLabels = input.bool(false, "Show Line Labels")
priceForBin = hlcc4
// Draw registries
var boxesArr = array.new_box()
var linesArr = array.new_line()
var labelsArr = array.new_label()
f_wipe() =>
while array.size(boxesArr) > 0
box.delete(array.pop(boxesArr))
while array.size(linesArr) > 0
line.delete(array.pop(linesArr))
while array.size(labelsArr) > 0
label.delete(array.pop(labelsArr))
if barstate.islast
f_wipe()
eff = math.min(barsBack, bar_index + 1)
if eff > 1
float pMin = na
float pMax = na
float pvSum = 0.0
float vSum = 0.0
for look = 0 to eff - 1
lo = low
hi = high
pMin := na(pMin) ? lo : math.min(pMin, lo)
pMax := na(pMax) ? hi : math.max(pMax, hi)
pvSum += priceForBin * volume
vSum += volume
anchoredVWAP = vSum > 0 ? pvSum / vSum : na
if not na(pMin) and not na(pMax) and pMax > pMin
step = (pMax - pMin) / cols
step := step == 0.0 ? syminfo.mintick : step
var vols = array.new_float()
var lows = array.new_float()
var highs = array.new_float()
array.clear(vols), array.clear(lows), array.clear(highs)
for i = 0 to cols - 1
array.push(vols, 0.0)
lo = pMin + i * step
hi = lo + step
array.push(lows, lo)
array.push(highs, hi)
for look = 0 to eff - 1
pr = priceForBin
vol = volume
idx = int(math.floor((pr - pMin) / step))
idx := idx < 0 ? 0 : idx > cols - 1 ? cols - 1 : idx
array.set(vols, idx, array.get(vols, idx) + vol)
pocIdx = 0
pocVol = 0.0
totalVol = 0.0
for i = 0 to cols - 1
v = array.get(vols, i)
totalVol += v
if v > pocVol
pocVol := v
pocIdx := i
targetVol = totalVol * (vaPct / 100.0)
left = pocIdx
right = pocIdx
cumVA = array.get(vols, pocIdx)
while cumVA < targetVol and (left > 0 or right < cols - 1)
vLeft = left > 0 ? array.get(vols, left - 1) : -1.0
vRight = right < cols - 1 ? array.get(vols, right + 1) : -1.0
if vRight > vLeft
right += 1
cumVA += array.get(vols, right)
else if vLeft >= 0
left -= 1
cumVA += array.get(vols, left)
else
break
VAH = array.get(highs, right)
VAL = array.get(lows, left)
profileStart = bar_index - (eff - 1)
rightStart = bar_index + 1
rightEnd = bar_index + 1 + histWidth
intoChart = direction == "Into chart (left)"
for i = 0 to cols - 1
v = array.get(vols, i)
len = pocVol > 0 ? (v / pocVol) : 0.0
px = int(math.round(len * histWidth))
x1 = intoChart ? (rightEnd - px) : rightStart
x2 = intoChart ? rightEnd : (rightStart + px)
y1 = array.get(lows, i)
y2 = array.get(highs, i)
b = box.new(x1, y2, x2, y1, xloc=xloc.bar_index, border_color=color.new(blockBorderColor, blockBorderOpacity))
box.set_bgcolor(b, color.new(blockFillColor, 100 - blockFillOpacity))
array.push(boxesArr, b)
if showPOC
pocPrice = (array.get(lows, pocIdx) + array.get(highs, pocIdx)) / 2.0
lnPOC = line.new(profileStart, pocPrice, rightEnd, pocPrice, xloc=xloc.bar_index, extend=extend.right, color=pocColor, width=pocWidth)
array.push(linesArr, lnPOC)
if showLabels
lbPOC = label.new(rightEnd, pocPrice, "POC", xloc=xloc.bar_index, style=label.style_label_right, textcolor=color.white, color=pocColor)
array.push(labelsArr, lbPOC)
if showVA
lnVAL = line.new(profileStart, VAL, rightEnd, VAL, xloc=xloc.bar_index, extend=extend.right, color=vaColor, width=vaWidth)
lnVAH = line.new(profileStart, VAH, rightEnd, VAH, xloc=xloc.bar_index, extend=extend.right, color=vaColor, width=vaWidth)
array.push(linesArr, lnVAL)
array.push(linesArr, lnVAH)
if showLabels
lbVAH = label.new(rightEnd, VAH, "VAH", xloc=xloc.bar_index, style=label.style_label_right, textcolor=color.white, color=vaColor)
lbVAL = label.new(rightEnd, VAL, "VAL", xloc=xloc.bar_index, style=label.style_label_right, textcolor=color.white, color=vaColor)
array.push(labelsArr, lbVAH)
array.push(labelsArr, lbVAL)
if showVWAP and not na(anchoredVWAP)
lnVW = line.new(profileStart, anchoredVWAP, rightEnd, anchoredVWAP, xloc=xloc.bar_index, extend=extend.right, color=vwapColor, width=vwapWidth)
array.push(linesArr, lnVW)
if showLabels
lbVW = label.new(rightEnd, anchoredVWAP, "AVWAP", xloc=xloc.bar_index, style=label.style_label_right, textcolor=color.white, color=vwapColor)
array.push(labelsArr, lbVW)
// placeholder plot
plot(na)

EMRVA//@version=5
indicator("EMRVA", overlay=true)
// === الإعدادات ===
emaLength = input.int(200, "EMA Length")
rsiLength = input.int(14, "RSI Length")
volLength = input.int(20, "Volume MA Length")
adxLength = input.int(14, "ADX Length")
adxFilter = input.int(20, "ADX Minimum Value") // فلتر الاتجاه
// === EMA200 ===
ema200 = ta.ema(close, emaLength)
plot(ema200, color=color.orange, linewidth=2, title="EMA 200")
// === MACD ===
macdLine = ta.ema(close, 12) - ta.ema(close, 26)
signalLine = ta.ema(macdLine, 9)
// === RSI ===
rsi = ta.rsi(close, rsiLength)
// === Volume Confirmation ===
volMA = ta.sma(volume, volLength)
volCond = volume > volMA
// === ADX Manual Calculation ===
upMove = high - high
downMove = low - low
plusDM = na(upMove) ? na : (upMove > downMove and upMove > 0 ? upMove : 0)
minusDM = na(downMove) ? na : (downMove > upMove and downMove > 0 ? downMove : 0)
tr = ta.rma(ta.tr, adxLength)
plusDI = 100 * ta.rma(plusDM, adxLength) / tr
minusDI = 100 * ta.rma(minusDM, adxLength) / tr
dx = 100 * math.abs(plusDI - minusDI) / (plusDI + minusDI)
adx = ta.rma(dx, adxLength)
adxCond = adx > adxFilter
// === شروط الدخول والخروج ===
longCond = close > ema200 and macdLine > signalLine and rsi > 50 and volCond and adxCond
shortCond = close < ema200 and macdLine < signalLine and rsi < 50 and volCond and adxCond
// === منطق الإشارة عند بداية الاتجاه فقط ===
var inLong = false
var inShort = false
buySignal = longCond and not inLong
sellSignal = shortCond and not inShort
if buySignal
inLong := true
inShort := false
if sellSignal
inShort := true
inLong := false
// === إشارات ثابتة ===
plotshape(buySignal, title="Buy Signal", location=location.belowbar,
color=color.green, style=shape.labelup, text="BUY")
plotshape(sellSignal, title="Sell Signal", location=location.abovebar,
color=color.red, style=shape.labeldown, text="SELL")
// === تنبيهات ===
alertcondition(buySignal, title="Buy Alert", message="📈 إشارة شراء مؤكدة مع فلتر ADX")
alertcondition(sellSignal, title="Sell Alert", message="📉 إشارة بيع مؤكدة مع فلتر ADX")
// === رسم ADX للتأكيد ===
plot(adx, title="ADX", color=color.blue)
hline(adxFilter, "ADX Filter", color=color.red)

Candle Suite PRO – Engulf + Pin + Regime Filters + Trigger//@version=5
indicator("Candle Suite PRO – Engulf + Pin + Regime Filters + Trigger", overlay=true, max_labels_count=500)
//===================== Inputs =====================
grpPtn = "Patterns"
useEngulf = input.bool(true, "Enable Engulfing", group=grpPtn)
usePin = input.bool(true, "Enable Pin Bar", group=grpPtn)
pinRatio = input.float(2.0, "PinBar shadow >= body ×", group=grpPtn, step=0.1, minval=1)
minBodyP = input.float(0.15, "Min Body% of Range (0~1)", group=grpPtn, step=0.01, minval=0, maxval=1)
coolBars = input.int(3, "Cooldown bars", group=grpPtn, minval=0)
grpReg = "Regime Filters"
useHTF = input.bool(true, "Use HTF EMA50 Filter", group=grpReg)
htfTF = input.timeframe("60", "HTF timeframe", group=grpReg) // 5m/15m → 60 권장
useADX = input.bool(true, "Use ADX Trend Filter", group=grpReg)
adxLen = input.int(14, "ADX Length", group=grpReg, minval=5)
adxMin = input.int(18, "ADX Min Threshold", group=grpReg, minval=5)
useVOL = input.bool(true, "Use Volume Filter (> SMA×k)",group=grpReg)
volMult = input.float(1.10, "k for Volume", group=grpReg, step=0.05)
emaPinchPc = input.float(0.15, "No-Trade if |EMA20-50| < %", group=grpReg, step=0.05)/100.0
maxDistATR = input.float(1.5, "No-Trade if |Close-EMA20| > ATR×", group=grpReg, step=0.1)
useVWAP = input.bool(true, "Require close above/below VWAP", group=grpReg)
//===================== Helpers ====================
ema20 = ta.ema(close, 20)
ema50 = ta.ema(close, 50)
atr14 = ta.atr(14)
vwap = ta.vwap(hlc3)
rng = high - low
body = math.abs(close - open)
upper = high - math.max(open, close)
lower = math.min(open, close) - low
bull = close > open
bear = close < open
bodyOK = rng > 0 ? (body / rng) >= minBodyP : false
//===================== Patterns ===================
prevOpen = open
prevClose = close
prevBull = prevClose > prevOpen
prevBear = prevClose < prevOpen
bullEngulf_raw = useEngulf and prevBear and bull and (open <= prevClose) and (close >= prevOpen) and bodyOK
bearEngulf_raw = useEngulf and prevBull and bear and (open >= prevClose) and (close <= prevOpen) and bodyOK
bullPin_raw = usePin and (lower >= pinRatio * body) and (upper <= body) and bodyOK // Hammer
bearPin_raw = usePin and (upper >= pinRatio * body) and (lower <= body) and bodyOK // Shooting Star
//================= Regime & No-trade ===============
// HTF trend (EMA50 on higher TF)
emaHTF50 = request.security(syminfo.tickerid, htfTF, ta.ema(close, 50))
htfLong = not useHTF or close > emaHTF50
htfShort = not useHTF or close < emaHTF50
// ADX (manual, version-safe)
len = adxLen
upMove = high - high
downMove = low - low
plusDM = (upMove > downMove and upMove > 0) ? upMove : 0.0
minusDM = (downMove > upMove and downMove > 0) ? downMove : 0.0
trur = ta.rma(ta.tr(true), len)
plusDI = 100 * ta.rma(plusDM, len) / trur
minusDI = 100 * ta.rma(minusDM, len) / trur
dx = 100 * math.abs(plusDI - minusDI) / math.max(plusDI + minusDI, 1e-10)
adxVal = ta.rma(dx, len)
trendOK = not useADX or adxVal >= adxMin
// Volume
volOK = not useVOL or (volume >= ta.sma(volume, 20) * volMult)
// Alignment & slope
slopeUp = ema20 > ema20
slopeDown = ema20 < ema20
alignLong = ema20 > ema50 and slopeUp
alignShort = ema20 < ema50 and slopeDown
// Chop / distance / VWAP
pinch = math.abs(ema20 - ema50) / close < emaPinchPc
tooFar = math.abs(close - ema20) / atr14 > maxDistATR
vwapOKL = not useVWAP or close > vwap
vwapOKS = not useVWAP or close < vwap
//================= Final Setups ====================
longSetup_raw = bullEngulf_raw or bullPin_raw
shortSetup_raw = bearEngulf_raw or bearPin_raw
longSetup = longSetup_raw and alignLong and htfLong and trendOK and volOK and not pinch and not tooFar and vwapOKL
shortSetup = shortSetup_raw and alignShort and htfShort and trendOK and volOK and not pinch and not tooFar and vwapOKS
// Trigger: 다음 봉이 전봉의 고/저 돌파 + 종가 확인
longTrig = longSetup and high > high and close > ema20
shortTrig = shortSetup and low < low and close < ema20
// Cooldown & final signals
var int lastLong = na
var int lastShort = na
canLong = na(lastLong) or (bar_index - lastLong > coolBars)
canShort = na(lastShort) or (bar_index - lastShort > coolBars)
finalLong = longTrig and canLong
finalShort = shortTrig and canShort
if finalLong
lastLong := bar_index
if finalShort
lastShort := bar_index
//==================== Plots ========================
plot(ema20, "EMA 20", color=color.new(color.orange, 0))
plot(ema50, "EMA 50", color=color.new(color.blue, 0))
plot(useVWAP ? vwap : na, "VWAP", color=color.new(color.purple, 0))
plotshape(finalLong, title="LONG ▶", style=shape.labelup, location=location.belowbar, text="Long▶", color=color.new(color.blue, 0), size=size.tiny)
plotshape(finalShort, title="SHORT ▶", style=shape.labeldown, location=location.abovebar, text="Short▶", color=color.new(color.red, 0), size=size.tiny)
// Alerts
alertcondition(finalLong, "LONG ▶", "Long trigger")
alertcondition(finalShort, "SHORT ▶", "Short trigger")
// 시각적 노트레이드 힌트
bgcolor(pinch ? color.new(color.gray, 92) : na)

Bollinger Bands Difference Score
Bollinger Bands Difference Score (TradingView – Pine Script v6)
The **Bollinger Bands Difference Score** is a volatility-based scoring system designed to help traders quickly assess whether a stock is in a **strong trend, neutral zone, or weak setup**. It transforms the raw **Bollinger Band Width (BB-Diff)** into a **normalized score (0–100)** and classifies conditions with intuitive thresholds.
---
### 🔹 What is Bollinger Bands Difference (BB-Diff)?
* **Bollinger Bands** are built from a moving average with upper and lower bands set by standard deviations.
* The **difference (or width)** between the bands reflects market volatility.
* A **high difference** = wide bands = strong volatility (breakout/trend).
* A **low difference** = narrow bands = low volatility (consolidation).
This indicator standardizes BB-Diff into a score and smooths it for cleaner signals.
---
### 🔹 Key Features
1. **BB-Diff Scoring System**
* Converts Bollinger Band width into a **0–100 normalized score**.
* Higher score → higher volatility/trend strength.
* Lower score → consolidation or weaker momentum.
2. **Signal Levels**
* **Strong Zone (≥ 70):** Indicates strong trend strength or expansion in volatility.
* **Neutral Zone (40–70):** Sideways or undecided price action.
* **Weak Zone (≤ 20):** Suggests very low volatility, potential upcoming squeeze.
3. **Score Smoothing**
* Applies a moving average to reduce noise.
* Helps avoid false signals during choppy markets.
4. **Visual Enhancements**
* Plots the score as a line (0–100 scale).
* Adds horizontal reference lines for **Strong**, **Neutral**, and **Weak** levels.
* Background colors automatically highlight **bullish strength (green)** or **weakness (red)**.
---
### 🔹 How to Use
* **Trend Confirmation:**
Look for scores **above 70** → suggests trend continuation or volatility breakout.
* **Consolidation Watch:**
Scores in the **20 or below** zone may precede volatility squeezes → breakout setups.
* **Neutral Zone:**
Scores between **40–70** suggest sideways price action; avoid aggressive trades.
* **Combine with Price Action:**
Use with support/resistance, candlestick patterns, or momentum indicators for confirmation.
---
### 🔹 Best Practices
* Great as a **volatility filter** before entries.
* Use in combination with **RSI, MACD, or OBV** for directional bias.
* Works well for **breakout trading** (when score rises from low levels).
* Monitor on multiple timeframes for alignment.
---
✅ **In summary:** The **Bollinger Bands Difference Score** is a simple yet powerful tool that quantifies volatility strength into an actionable score, making it easier to spot strong trends, consolidation phases, and potential breakout opportunities.
