SAl VWAP LITE SA Final VWAP — LITE (Beginner Guide)
This strategy is designed to only take trades when 3 layers agree:
Market posture (HTF = 1H VWAP direction)
Mid confirmation (MID = 15m VWAP direction)
Execution entry (your chart timeframe signal: SMA trend + VWAP + wick flip + RSI)
It’s built to avoid chop by requiring trend + location + momentum + a reversal wick trigger.
1) What the script does (in plain English)
A Long (green) signal happens only when ALL are true:
✅ HTF VWAP is bullish (price above VWAP on 1H)
✅ MID VWAP is bullish (price above VWAP on 15m)
✅ Execution trend is bullish (SMA3 > SMA8 AND close > SMA8)
✅ Price is above VWAP on your current chart
✅ The prior candle had an upper wick (bearish rejection wick)
✅ RSI is strong (RSI > 55 by default)
A Short (red) signal happens only when ALL are true:
✅ HTF VWAP is bearish (price below VWAP on 1H)
✅ MID VWAP is bearish (price below VWAP on 15m)
✅ Execution trend is bearish (SMA3 < SMA8 AND close < SMA8)
✅ Price is below VWAP on your current chart
✅ The prior candle had a lower wick (bullish rejection wick)
✅ RSI is weak (RSI < 45 by default)
If those aren’t met, candles stay gray = no trade / neutral.
2) How to add it on TradingView (step-by-step)
Open TradingView
Click Pine Editor (bottom panel)
Paste the full script
Click Save
Click Add to chart
Go to Strategy Tester (bottom) to view results
If you want alerts:
You can still create alerts for strategy orders, but it works best if we convert it to an indicator version with alert conditions. (If you want, tell me and I’ll generate that version.)
3) Best instruments to use it on
This type of VWAP+trend+RSI filter works best on instruments with:
High liquidity
Clean trend behavior
Tight spreads / stable fills
Best:
Index futures: NQ / ES
Index ETFs: QQQ / SPY
Very liquid mega caps: AAPL / MSFT / NVDA
Avoid thin stocks or random low-volume names.
4) Best timeframes to run it on (beginner safe)
✅ Recommended execution timeframes (where entries trigger)
1 minute (fast, best if you’re experienced)
3 minute (balanced)
5 minute (most beginner friendly)
✅ Gate timeframes (already built in)
HTF = 60 min
MID = 15 min
These should usually stay as-is.
5) How to interpret the candle colors
Green candle = A valid LONG signal fired on that bar
Red candle = A valid SHORT signal fired on that bar
Gray candle = No signal (do nothing)
This is important: Gray is a feature, not a problem.
Gray means the system is protecting you from chop.
6) What “Strict Mode (HTF=MID)” really means
When Strict Mode = ON:
HTF and MID must agree exactly
This reduces signals but improves quality
When Strict Mode = OFF:
HTF alone can allow direction
More trades, more noise
Beginner rule: keep Strict Mode ON.
7) How to trade it (simple beginner rules)
Long trade rules
Wait for a green candle (signal candle)
Enter at the close of the candle (or next candle open)
Use your stop (your script currently uses TP+SL inside strategy)
Short trade rules
Wait for a red candle
Enter at the close (or next candle open)
Respect stop loss
Most important discipline rule
Do not take trades “because it’s close.”
Take only when the candle is green/red.
8) Why the wick rule is powerful
This is a key “needle shifter.”
Long requires prior bearish wick (upper wick):
That shows sellers tried to push up resistance / reject price — and failed.
If the market is still above VWAP + trend is up, that wick often marks a “dip-then-go” continuation.
Short requires prior bullish wick (lower wick):
Buyers tried to defend and push up — but got rejected.
Under VWAP + downtrend + weak RSI, that wick often becomes the last pullback before continuation down.
So the wick rule helps avoid entering mid-candle or late chase entries.
9) How to avoid the 100-point reversal problem you mentioned
Those big reversals usually come from one of these:
(A) Taking signals inside chop
Fix: keep Strict Mode ON, and keep RSI thresholds.
(B) Trading directly into a major support/resistance zone
Fix:
Avoid entries right at prior day high/low, overnight high/low, or major swing points
Don’t short directly into support; don’t long into resistance
(C) News spikes
Fix:
Avoid trading major news windows (CPI, FOMC, Powell, NFP)
VWAP systems can get steamrolled temporarily during high-impact releases
10) Beginner settings I recommend (starting defaults)
Keep these:
Strict Mode = ✅ ON
RSI Length = 14
RSI Bull > 55
RSI Bear < 45
SMA = 3 & 8 (as you have now)
HTF = 60m, MID = 15m
If you want fewer trades but higher quality:
RSI Bull > 58
RSI Bear < 42
wickMinTicks = 2 (filters tiny meaningless wicks)
11) What you should NOT do (common beginner mistakes)
❌ Don’t take trades when candles are gray
❌ Don’t reverse immediately because the opposite color appears one candle later
❌ Don’t use this as a prediction tool — it’s a confirmation tool
❌ Don’t force trades in low volume periods (midday chop)
12) Best “times of day” to trade it (for index products)
For NQ/ES/QQQ/SPY, the cleanest VWAP trend behavior is usually:
9:35–11:00 ET (best)
1:30–3:30 ET (good)
Avoid 11:30–1:15 ET (chop zone)
Why You Should Monitor the Strategy Report (Very Important)
This script is intentionally published as a strategy, not just an indicator.
That is by design.
The Strategy Tester Report is a core part of how this tool should be evaluated.
When you open the Strategy Tester tab in TradingView, you gain insight into:
Win rate consistency across timeframes
Drawdown behavior during choppy vs trending conditions
How often signals occur (selectivity matters)
Performance differences between 1m, 3m, and 5m charts
The value of the HTF + MID gating logic during high-risk periods
⚠️ Do not judge this tool based on a handful of trades or one session.
Its real value shows up when you observe:
Fewer trades during chop
Cleaner participation during directional sessions
Reduced exposure during regime conflict
This is exactly why the higher-timeframe VWAP posture and RSI/wick filters exist.
🧠 How to Use the Strategy Report Effectively (Beginner Tip)
To properly evaluate the system:
Apply the strategy to one instrument (ex: NQ, ES, QQQ)
Test one execution timeframe at a time (1m, 3m, or 5m)
Keep HTF = 60m and MID = 15m fixed
Review results over multiple days, not single sessions
Pay attention to:
Max drawdown
Trade clustering
Losing streak behavior (this matters more than win rate alone)
This will give you a much more realistic understanding of what the system is designed to do.
🔒 About This Script (Important Notice)
This SA Final VWAP — LITE script is intentionally:
Condensed
Restricted
Directionally gated
Missing advanced logic layers
It represents the last free public release of this VWAP-based framework.
The full version includes additional proprietary components such as:
Expanded regime classification
Enhanced VWAP slope and acceptance logic
Advanced no-trade zones
Multi-setup prioritization
Internal failure-state suppression
Additional probabilistic filters not exposed here
These components materially change behavior during difficult market conditions and are not included in this public script.
📩 For Serious Users / Full Version Access
If you find this indicator useful, insightful, or different from typical TradingView tools, you are encouraged to reach out directly.
This script is meant to:
Demonstrate the core logic
Allow you to validate performance via the strategy report
Help you decide whether the full framework is appropriate for your trading
📬 For access to the complete version and additional attributes of the algorithm, contact the author directly.
This separation is intentional to:
Protect intellectual property
Maintain system integrity
Ensure serious users receive proper context and guidance
🧭 Final Note
This is not a prediction tool.
It is a confirmation and participation framework designed to operate when probability, structure, and momentum align.
Gray candles are protection.
Green and red candles are permission.
Use it with patience, discipline, and proper evaluation — and let the strategy report tell you the real story.
Vwaps

Rolling VWAP + Bands (Tighter Option) + 2.35/3.0 Re-entry AlertsRolling VWAP + σ Bands — How to Trade It
This indicator plots a Rolling VWAP (a volume-weighted mean over a fixed bar window) along with standard deviation (σ) bands around that VWAP. The goal is simple:
Quantify “normal” price distance from value (VWAP)
Highlight statistical extremes and pullback zones
Trigger re-entry signals when price returns from extreme deviation back inside key bands (±2.35σ and ±3σ)
It’s designed for scalping and short-term decision support, especially on lower timeframes.
What the Lines Mean
VWAP (Rolling Window)
The VWAP line represents the rolling “fair value” of price, weighted by volume across the lookback window.
In ranges: VWAP acts like a gravity center
In trends: VWAP acts like a dynamic mean that price may pull back toward before continuing
σ Bands (Standard Deviation)
The σ bands show how far price is from VWAP in statistical terms:
±1σ: Normal variation
±1.5σ: Common pullback / continuation zone in trends
±2σ: Extended move / trend stress
±2.35σ: Deep extension (often a “stretched” market)
±3σ: Rare extreme (often emotional moves / liquidation wicks)
The Most Important Feature: 2.35σ and 3σ Re-entry Signals
A Re-entry signal fires when price was outside a band on the previous bar and closes back inside that band on the current bar.
Why this matters:
The market pushed into an extreme zone…
…then failed to stay there
That “failure” often leads to a snap-back toward value (VWAP) or at least toward inner bands.
In general, a 3σ re-entry is stronger than a 2.35σ re-entry, because it represents a more statistically extreme excursion that couldn’t hold.
These are not “magic reversal calls” — they’re high-quality mean-reversion triggers when conditions favor mean reversion.
Regime 1: Contracting Bands = Mean Reversion Environment
What contracting bands imply
When the bands tighten / contract, volatility is compressed. In this environment:
Price tends to oscillate around VWAP
Deviations are more likely to mean revert
Extremes are clearer and usually followed by a return toward value
How to trade mean reversion with this indicator
Core idea: fade extremes and target VWAP / inner bands.
A) Highest quality setups: 2.35σ and 3σ re-entries
These are your “strongest” mean reversion events.
Short bias setup
Price closes outside +2.35σ or +3σ
Then re-enters back below that band (signal)
Typical targets: +2σ → +1.5σ → VWAP (depending on momentum)
Long bias setup
Price closes outside −2.35σ or −3σ
Then re-enters back above that band (signal)
Typical targets: −2σ → −1.5σ → VWAP
Why these work best in contraction:
The market is statistically “stretched”
With low volatility, it’s harder for price to stay extended
Re-entry often starts the “snap-back” leg
B) Scaling / partial targets (optional approach)
If you manage positions actively:
Take partial profits at inner bands
Use VWAP as the “magnet” target when conditions remain range-bound
Risk framing for mean reversion
Mean reversion fails when price keeps walking the band and volatility expands.
Common failure clues:
Bands begin to widen aggressively
Price repeatedly holds outside outer bands
VWAP slope starts to accelerate in one direction
If that starts happening, the market is likely shifting to a trend regime.
Regime 2: Expanding Bands + VWAP Slope = Trending Environment
What trending conditions look like
Trends typically show:
VWAP sloping consistently
Bands expanding (higher volatility)
Price spending more time on one side of VWAP
Pullbacks that stall near inner/mid bands instead of reverting fully
In this environment, fading outer bands becomes lower probability because price can “ride” deviations during strong directional flow.
How to trade continuation with this indicator
Core idea: use VWAP and inner bands as pullback zones, then trade in the direction of the VWAP slope.
A) Trend continuation zones (most practical)
VWAP: first pullback level in mild trends
±1σ: shallow pullback continuation
±1.5σ: higher-quality pullback depth in stronger trends
±2σ: deep pullback / trend stress (more caution)
Example (uptrend):
VWAP rising
Price pulls down into VWAP / +1σ / +1.5σ area
Continuation entries are considered when price stabilizes and pushes back with the trend
Example (downtrend):
VWAP falling
Price pulls up into VWAP / −1σ / −1.5σ area
Continuation entries are considered when price rejects and rotates back down
What to do with 2.35σ / 3σ re-entry signals in trends
Re-entry signals can still occur in trends, but they should be interpreted differently:
In strong trends, an outer-band re-entry may only produce a brief bounce/rotation, not a full mean reversion to VWAP.
Targets may be more realistic at inner bands rather than expecting VWAP every time.
In other words:
Range: outer-band re-entries often aim toward VWAP.
Trend: outer-band re-entries often aim toward 2σ / 1.5σ / 1σ first.
Practical Regime Filter (simple visual read)
This script intentionally doesn’t hard-code a “trend/range detector,” but you can visually infer regime quickly:
Mean reversion bias
Bands contracting or stable
VWAP mostly flat
Price crossing VWAP frequently
Trend continuation bias
Bands expanding
VWAP clearly sloped
Price holding mostly on one side of VWAP
Notes on σ Calculation Options
This indicator includes σ mode toggles:
Unweighted σ (tighter): treats price deviations more “purely” and often gives bands that react more tightly to price behavior.
Volume-weighted σ: emphasizes high-volume price action in the deviation calculation.
Both are valid — test based on your market and timeframe.
Summary Cheat Sheet
Contracting bands (range / compression)
Favor: mean reversion
Best signals: 2.35σ and 3σ re-entry
Typical targets: inner bands → VWAP
Expanding bands + sloped VWAP (trend)
Favor: continuation
Use pullbacks to: VWAP / 1σ / 1.5σ as entry zones
Outer-band re-entries: treat as rotation opportunities, not guaranteed full reversals

Multi Market VWAP SystemMulti‑VWAP — Adaptive, Multi‑Session Anchored VWAP Suite
Multi‑VWAP is a comprehensive, multi‑session Volume‑Weighted Average Price engine designed for traders who rely on precise, session‑aware VWAP levels across equities, futures, and crypto.
Built for Pine Script v6, it handles complex market structures, custom anchor dates, and non‑standard trading sessions with robust error‑tolerant logic.
What This Indicator Does
This tool calculates and displays a full suite of anchored VWAPs, including:
Standard Period VWAPs
- Daily
- Weekly
- Monthly
- Yearly
To‑Date VWAPs
- Week‑to‑Date (WTD)
- Month‑to‑Date (MTD)
- Year‑to‑Date (YTD)
Custom Anchored VWAP
- Anchor to any user‑selected date
- Automatically recalculates from the first bar of that date
- Works across all markets, including 24/7 crypto
Multi‑Day Rolling VWAPs
Optional rolling VWAPs for:
- 2‑day
- 3‑day
- 4‑day
- 5‑day
- 10‑day
- 20‑day
- 50‑day
Each VWAP can be toggled individually for a clean, customizable chart.
Key Features
✔ Market‑Adaptive Session Handling
Automatically adjusts for:
- Regular equities sessions
- Futures extended hours
- 24/7 crypto markets
- Holidays (via MarketHolidays library)
✔ Clean, Efficient, Pine v6 Architecture
- No deprecated functions
- No array overflows
- No undefined variables
- Defensive programming for unsupported markets
- Optimized for performance on lower‑timeframe charts
✔ Visual Clarity & Control
- Independent color and visibility toggles
- Optional labels showing VWAP values
- Smart timestamp anchoring for all VWAP types
- Minimal chart clutter with maximum information density
Who This Indicator Is For
This tool is ideal for traders who rely on VWAP structure for:
- Intraday mean‑reversion
- Swing anchoring
- Multi‑session bias
- Institutional level mapping
- Crypto VWAP structure where no “session” exists
If you use VWAP as a core part of your workflow, this script gives you the flexibility and precision needed for modern multi‑market trading.
Notes
- This script does not repaint.
- All VWAPs are calculated using standard cumulative volume‑weighted methodology.
- Custom date VWAP begins at the first bar of the selected date on the chart’s timeframe.

VWAP Confluence Pro█ OVERVIEW
VWAP Confluence Pro is a high-precision trading indicator that combines VWAP with multiple confirmation filters to generate reliable buy and sell signals. Unlike basic VWAP crossover strategies that produce excessive noise, this indicator requires alignment across six independent conditions before triggering a signal, dramatically reducing false entries while capturing high-probability setups.
█ FEATURES
Multi-Layer Confirmation System
The indicator employs a strict confluence approach requiring all of the following conditions to align:
- VWAP Cross: Price must cross above (buy) or below (sell) the VWAP line
- VWAP Trend: The VWAP itself must be rising for buys or falling for sells, confirming directional bias
- Price Trend: A 20-period moving average filter ensures trades align with the prevailing trend
- Volume Confirmation: Signals only trigger when volume exceeds 1.5x the 20-bar average, indicating institutional participation
- RSI Filter: Buys require RSI between 50-60 (bullish momentum without overbought conditions), sells require 40-50 (bearish momentum without oversold conditions)
- MACD Momentum: MACD must confirm directional bias with the MACD line above the signal line for buys, below for sells
Signal Cooldown Period
A configurable cooldown mechanism (default 10 bars) prevents signal clustering and overtrading by ensuring adequate spacing between alerts. This feature is critical for maintaining discipline and avoiding choppy market conditions.
Visual Elements
- Purple VWAP Line: The cornerstone of the strategy, plotted with high visibility
- Green Up Arrows: Buy signals appear below price candles when all conditions align
- Red Down Arrows: Sell signals appear above price candles when all conditions align
- Blue Trend MA: A semi-transparent moving average provides visual trend context
- Background Shading: Subtle green/red backgrounds indicate when multiple confluence factors are aligned, even without a cross
█ HOW TO USE
Timeframe Selection
This indicator is optimized for intraday trading on 1-minute to 15-minute charts, where VWAP is most effective. It can also be used on hourly charts for swing trade entries or daily charts with appropriate parameter adjustments.
Parameter Optimization
All key parameters are customizable through the indicator settings:
- VWAP Deviation %: Controls sensitivity (default 0.8%). Lower values = stricter signals
- Volume Multiplier: Defines volume threshold (default 1.5x). Higher values = stronger volume confirmation required
- Trend Filter Length: Moving average period (default 20). Adjust based on your timeframe
- Cooldown Period: Minimum bars between signals (default 10). Increase for slower markets
- RSI/MACD Settings: Standard values provided, adjust for specific instruments if needed
Trading Strategy
1 — Wait for a signal arrow to appear (green for buy, red for sell)
2 — Confirm the background shading supports the signal direction
3 — Enter on the close of the signal candle or the open of the next candle
4 — Set stop loss below/above the recent swing low/high or the VWAP line
5 — Take profit at logical resistance/support levels or when opposing confluence develops
Best Practices
- Only take long trades when price is above a rising VWAP
- Only take short trades when price is below a falling VWAP
- Avoid trading during low volume periods (first/last 15 minutes of sessions)
- Use the background shading to gauge overall market bias between signals
- Consider increasing the cooldown period in choppy or range-bound conditions
█ LIMITATIONS
- This indicator is designed for trending markets and will produce fewer signals during consolidation periods
- The strict confluence requirements mean you may miss some valid moves in exchange for higher signal quality
- VWAP resets at the start of each session, making it less reliable on 24-hour markets without session breaks (use anchored VWAP for crypto/forex)
- Requires real-time volume data to function properly, less effective on thinly traded instruments
- Not suitable for scalping strategies requiring rapid entries, as the cooldown mechanism intentionally limits signal frequency
█ NOTES
Signal Quality Over Quantity
This indicator prioritizes accuracy over frequency. You may only see 1-3 signals per session on lower timeframes, but each signal represents a setup where trend, momentum, and volume are all aligned. This approach is designed to keep you out of low-probability trades and focused on the best opportunities.
Customization Encouraged
The default parameters provide a solid foundation, but different instruments and timeframes may benefit from optimization. Test the indicator across various settings to find what works best for your specific trading style and markets.
═════════════════════════════════════════════════════════════════════════
This indicator synthesizes best practices from institutional VWAP trading with momentum confirmation from RSI and MACD. By requiring multiple independent factors to align, it filters out the noise common in single-indicator systems and focuses on setups where probability favors directional moves.

Dual Session VWAPs by GK snipervwaps automatically
for london
new york session
easy
will remove automatically next day

8 EMA. 21 EMA. VWAP This trio is popular for momentum, scalping, and trend-following on 1m–15m charts (stocks, futures, indices).
1. Trend & Bias Filter
• Overall bullish when: Price > VWAP and 8 EMA > 21 EMA
• Overall bearish when: Price < VWAP and 8 EMA < 21 EMA
VWAP adds volume context — many ignore EMA signals against the VWAP side.
2. Crossover Signals (Primary Entries)
• Bullish crossover: 8 EMA crosses above 21 EMA → potential long (especially if price is already above VWAP)
• Bearish crossover: 8 EMA crosses below 21 EMA → potential short (especially if price is below VWAP)
VWAP confirmation reduces whipsaws: only take longs above VWAP, shorts below it.
3. Pullback / Retest Entries (Higher Probability)
• In an uptrend (price > VWAP, 8 > 21): Wait for dips to the 8 EMA (or sometimes 21 EMA) → buy the bounce.
• In a downtrend: Wait for rallies to the 8 EMA → short the rejection.
VWAP often acts as a magnet or pivot — price gravitating toward it can signal mean-reversion trades.

Daily maximum price range for Credit SpreadsVolatility & Momentum for Credit Spreads
It is a specialized mean-reversion tool designed primarily for options traders focusing on Credit Spreads (specifically 0DTE on SPX) and intraday reversals. By combining Volume Weighted Average Price (VWAP) with VIX-adjusted volatility bands, this indicator identifies statistical extremes where price is likely to revert.
Unlike standard Bollinger Bands or Keltner Channels, TITAN adapts its width based on real-time implied volatility (VIX), ensuring that your "overextended" zones are accurate whether the market is calm or chaotic.
🎯 Core Concept
The indicator relies on the principle that price moves within a definable "Daily Range" relative to the VWAP. When price pushes to the outer limits of this range while simultaneously hitting RSI extremes; it signals a high-probability reversal setup ideal for selling premium.
🛠 How It Works
The engine is built on three pillars:
Volatility-Adaptive Bands: The bands are calculated using a 14-day Average Daily Range (ADR), which is then dynamically scaled by the current VIX relative to a baseline. If VIX spikes, the bands widen instantly to keep you safe from premature entries.
Momentum Triggers: Signals are generated only when the RSI (14) hits extreme Overbought (>70) or Oversold (<30) levels.
"Golden Hour" Filtering: To avoid market open noise or late-day chop, the indicator includes a customizable time filter (Default: 10:15 – 11:30 AM EST). Signals outside this window are suppressed to enforce trading discipline.
🚀 Key Features
Visual Strategy Simulation: The indicator now includes a built-in "Strike Simulator." Upon the first valid signal of the session, it automatically plots a horizontal "Strike Line" at the Outer Band ± a user-defined buffer (e.g., 10 points). This helps you visualize your theoretical strike price for the rest of the day.
Bull & Bear Zones: Color-coded fills (Green for Bullish Buy Zones, Red for Bearish Sell Zones) make it easy to see market context at a glance.
Live Dashboard: A Heads-Up Display (HUD) in the bottom right shows real-time RSI values, Golden Hour status, and current signal state.
Unified Alert System: A single master alert condition triggers if price hits an RSI extreme OR touches a volatility band during your active trading window.
📉 How to Trade It (Example Strategy)
Wait for the Window: Ensure the "Golden Hour" on the dashboard reads ACTIVE (Default 10:15 AM EST).
Identify the Zone: Short Setup (Call Credit Spread): Price pushes into the Red Zone (Outer High). Long Setup (Put Credit Spread): Price pushes into the Green Zone (Outer Low).
Confirm the Signal: Look for the Diamond Icon. This confirms RSI has hit the extreme threshold.
Check the "Strike Line": Use the simulated horizontal line to identify where your short strike would be (Outer Band + Buffer) to verify it is at a safe distance from current price.
⚙️ Settings
ADR Length: Lookback period for daily range calculation (Default: 10).
Baseline VIX:* The standard VIX level used for normalization (Default: 15.0).
Inner/Outer Multipliers: Controls the width of the bands.
Golden Hour: The specific time window for valid signals.
Strike Buffer: Points added to the outer band to simulate your option strike price.
⚠️ Disclaimer
This tool is for informational purposes only. Trading options, especially 0DTE credit spreads, involves significant risk. Always backtest strategies and manage risk accordingly.

Ultimate Futures Daytrade Suite v1 - The Strategy GuideHere is the complete **Strategy Guide** translated into English.
---
# 📘 Ultimate Futures Daytrade Suite – The Strategy Guide
### 1. The Visual Legend (What is what?)
Before you trade, you need to understand the hierarchy of your lines. Not every line has the same importance.
* **🟣 Daily EMA 50 (Neon Violet):** The **"Big Boss"**. It determines the **Macro Trend**.
* *Price above:* We are primarily looking for Longs.
* *Price below:* We are primarily looking for Shorts.
* **🟢 4h EMA 50 (Neon Green):** The **"Swing Trend"**. Your most important level for **Pullback Entries** (Re-entries).
* **🟡 POC (Gold) & TPO:** The **"Magnet"**. Price often returns here.
* *Rule:* Never open a trade directly *on* the POC (Risk of "Chop"). Use it as a **Target** (Take Profit).
* **🟠 IB High/Low (Orange Lines):** The **"Daily Structure"**.
* A breakout from the IB (Initial Balance) often indicates the trend direction for the day.
* **🟥/🟩 Boxes (Supply/Demand):** Resistance and Support zones from the 1h timeframe.
* **⬜ FVG Boxes:** "Gaps" in the market that are often filled.
---
### 2. The Trading Workflow (Top-Down Method)
Go through this mental checklist before every trade:
#### Step 1: Trend Check (The Traffic Light)
Look at the **Violet Line (Daily)** and the **Green Line (4h)**.
* **Bullish:** Price is above Violet AND above Green. -> *Focus: Buy dips.*
* **Bearish:** Price is below Violet AND below Green. -> *Focus: Sell rallies.*
* **Mixed:** Price is between Violet and Green. -> *Caution! Market is undecided (Range Trading).*
#### Step 2: Location (The Context)
Where is the price currently located?
* Are we at a **Green Demand Zone**?
* Are we testing the **4h EMA 50 (Green)** from above?
* Are we at the **VWAP**?
* *Never trade in "No Man's Land"!* Wait until the price touches one of your lines.
#### Step 3: Trigger (The Execution)
Now zoom into your lower timeframe (e.g., 5min or 15min).
* Wait for a reaction at the zone.
* Use the **EMA 9 (Yellow)** as a momentum trigger. If price breaks the EMA 9 and closes above/below it, that is your "Go".
---
### 3. The Setup Blueprints
Here are the two most profitable scenarios you can trade with this script:
#### A) The "Golden Trend" Setup (Long)
* **Context:** Price > **Daily EMA (Violet)**.
* **Preparation:** Price corrects (drops) back to the **4h EMA 50 (Green)** or to the **VWAP**.
* **Confluence:** Ideally, there is also a **Demand Zone (Green Box)** or an **FVG** at that level.
* **Entry:** As soon as a candle touches the zone and closes bullish again (or reclaims the EMA 9).
* **Stop-Loss:** Below the 4h EMA 50.
* **Take-Profit:** Next **Supply Zone (Red)** or the **IB High (Orange)**.
#### B) The "Daytrade Breakout" (Intraday)
* **Context:** Price opens inside yesterday's Value Area.
* **Signal:** Price breaks through the **IB High (Orange)** with momentum.
* **Filter:** Price must be above the **VWAP**.
* **Entry:** On the retest of the IB High or directly on the breakout.
* **Target:** Price often trends in that direction for the rest of the day.
---
### 4. Warning Signals (When NOT to trade)
1. **The "Concrete Ceiling":** If you want to go Long, but the **Violet Daily EMA 50** is running directly above you. This is massive resistance. Better wait until it is broken.
2. **The "POC Dance":** If price is dancing sideways around the **Gold Line (POC)**. This is a "No-Trade Zone". Day traders lose the most money here due to fees and whipsaws.
3. **Overextension:** If price is extremely far away from the **4h EMA 50 (Green)** (Rubber Band Effect). Do not enter in the trend direction here; wait for a pullback to the line.
### Summary
Your chart is now telling you a story:
* **Violet** tells you the Direction.
* **Green** gives you the Entry.
* **Red/Green Boxes** show you the Obstacles.
* **Yellow (EMA 9)** gives you the Timing.
Good luck with the Suite! This is a setup similar to what institutional traders use.

Auction Context Engine ( Value Area, VWAP & Regime)📌 Indicator Name
Auction Context Engine (Value Area, VWAP & Regime)
Short name: ACE Context
🧠 Description
Auction Context Engine (ACE) is a professional market context and structure indicator based on Auction Market Theory.It is designed to help traders understand where the market is positioned, not to generate trade signals.
ACE focuses on:
• Developing Value Area (VAH / VAL)
• Developing Point of Control (POC)
• Session VWAP positioning
• Volatility regime expansion
• Opening Range context
• Failed auction / trap detection
• Market bias and environment quality
This indicator provides context only and is intended to be used alongside a separate execution strategy or system.
🎯 What This Indicator Is
✔ A context engine
✔ A market structure filter
✔ A bias alignment tool
✔ A regime and environment classifier
❌ What This Indicator Is NOT
✘ Not a signal generator
✘ Not a buy/sell system
✘ Not a strategy
✘ Not a profitability promise
📊 How To Use
Use ACE to answer:
• Is price accepting or rejecting value?
• Is the market in balance or expansion?
• Is VWAP supporting or opposing price?
• Is this a breakout environment or a trap?
• Is volatility expanding?
• Is the market trending or ranging?
You may then use your own execution strategy aligned with this context.
🟢 Core Components
Developing Value Area
• VAH / VAL dynamically update through the session
• POC tracks highest traded volume area
VWAP Position
• Above VWAP = bullish bias
• Below VWAP = bearish bias
Opening Range Context
• Detects breakouts or balance after session open
Volatility Regime
• Identifies expansion vs normal conditions
Failed Auction Detection
• Highlights trap conditions near value extremes
Market Quality
• Strong / Mixed / Weak environment classification
Context Table
• Clean 1-column vertical dashboard with color-coded bias
🔵 Visual Elements
• Developing VAH, VAL, POC lines
• Session VWAP
• Small context dots when environment turns READY
• Compact professional context table
⚙️ Settings
• Value Area bin size
• Value area percentage
• Opening range duration
• Regime expansion factor
• Line colors and thickness
• Context table ON/OFF
• Context dots ON/OFF
🧩 Best Use Case
This indicator is ideal for:
• Intraday trading
• Index futures and equities
• Options context filtering
• Trend / range regime identification
• Professional discretionary traders
⚠️ Disclaimer
This script is provided for educational and informational purposes only.It does not constitute financial or investment advice.Trading involves risk. Always use proper risk management.

Apex ICT Delivery & Session Flow ProDescription
The Apex ICT Delivery & Session Flow Pro is a high-precision technical analysis indicator designed for inner-circle traders who prioritize a clean, institutional-grade chart. This script specializes in identifying real-time liquidity levels and displacement zones while utilizing an automated "Cleanup Engine" to ensure that only the most relevant, unmitigated data remains visible.
Core Functionalities
Multi-Timeframe Displacement Engine: The script scans across multiple timeframes (1m, 5m, 15m, 1H) to identify Fair Value Gaps (FVG) created by high-displacement price action. It automatically plots the FVG boxes and the 50% Consequent Encroachment (CE) line for precise entry and target mapping.
Dynamic Session Liquidity: Automatically identifies and tracks the Highs and Lows of the Asia, London, and New York sessions. These levels are explicitly labeled and extended to act as magnet levels for price or points of liquidity reversal.
CISD (Change in State of Delivery): Visualizes shifts in order flow by marking the opening prices of the last opposite candle when price action confirms a change in delivery state. This provides immediate visual feedback on market sentiment shifts.
NY-Specific VWAP: Features a strict New York Session VWAP that resets daily at the NY open (08:00). This serves as the "Mean" for the session, helping traders identify premium and discount zones specifically within the high-volume New York hours.
The "Clean Chart" Cleanup Engine: Unlike standard indicators that clutter the screen with historical data, this script features an intelligent removal system:
FVGs & Order Blocks: Automatically deleted once price trades through them or if they move too far from current price (Proximity Filter).
Broken Session Levels: Highs and Lows are instantly removed once they are breached by price.
Temporal Decay: CISD markers are automatically cleared after 20 candles to keep the focus on immediate delivery.

0DTE Credit-Spread Morning FilterUPDATE: NATIVE ALERTS ADDED!
You asked, we delivered. You no longer need to sit and stare at the dashboard waiting for a green signal.
1. New "Trade Entry Signal" Alert:
I have added a custom alert condition to the code. This triggers the exact moment the dashboard flips from "NO TRADE" to "GREEN" (Strategy Found).
2. How to set it:
Simply click the "Create Alert" button (clock icon) in TradingView, select this indicator, and choose "Trade Entry Signal" from the list.
Now you can get notified on your phone or desktop instantly when the market conditions align for a 0DTE play.
Happy Trading!

Volume + VWAP + Prior Session Levels DashboardVolume Spike + VWAP + Session Levels Dashboard
This indicator is a real-time market context dashboard designed to help traders quickly understand participation, value, and key reference levels without cluttering the chart with multiple indicators.
Instead of plotting lines or signals, the script summarizes critical intraday information into a compact on-chart table, allowing traders to make faster, more informed decisions based on how active the market is, where fair value is, and where important reference levels exist.
Core Concepts Used
This script is built on three widely used market principles:
Relative Volume Participation
Volume-Weighted Average Price (VWAP)
Prior Session Reference Levels
The indicator does not attempt to predict direction. Its purpose is to provide objective context that traders can combine with their own strategies.
How the Indicator Works
1. Volume Spike Analysis (Relative Volume)
Rather than showing raw volume, the script measures how unusual the current bar’s volume is compared to recent activity.
A moving average of volume is calculated using a user-defined lookback period.
Current volume is divided by this average to produce a volume multiple (for example, 2.0× normal volume).
This multiple is translated into a descriptive strength label, ranging from Below Threshold to Legendary.
This approach helps traders immediately recognize when participation is significantly above normal, which often coincides with institutional activity, breakouts, or important reactions near key levels.
2. Daily VWAP (Current and Prior Day)
VWAP (Volume-Weighted Average Price) represents the average price traded, weighted by volume, and is commonly used as a measure of fair value.
This script calculates VWAP internally by:
Accumulating price × volume throughout the day
Dividing by total volume
Automatically resetting at the start of each new trading day
The dashboard displays:
Current day VWAP – real-time session fair value
Prior day VWAP – an important reference from the previous session
Traders often use these levels to evaluate whether price is trading at a premium, discount, or near equilibrium.
3. Previous Day High and Low
The indicator also displays:
Previous day high
Previous day low
These levels frequently act as liquidity targets, support/resistance zones, or reaction points, especially during intraday trading sessions.
Dashboard Design
All information is presented in a two-column dashboard showing:
Metric name
Current value or status
The dashboard can be positioned in any corner of the chart and updates in real time, allowing traders to maintain awareness without constantly switching indicators or timeframes.
How to Use This Indicator
This script is best used as a decision-support tool, not a standalone trading system.
Typical uses include:
Identifying abnormally high volume near important price levels
Evaluating price position relative to VWAP
Monitoring reactions around prior day highs and lows
Staying oriented during fast market conditions without chart clutter
The indicator works on any timeframe and adapts automatically to the instrument’s trading session.
Customization Options
Users can:
Adjust the volume moving average length to define what “normal” volume means
Choose the price source used for VWAP calculation
Change the dashboard’s on-screen position
Summary
The Volume Spike + VWAP + Session Levels Dashboard provides a clear, objective snapshot of market conditions by combining participation, value, and reference levels into a single visual tool. It is designed to help traders answer a simple but critical question:
“Is the market doing something meaningful right now — and where?”
This indicator focuses on context, clarity, and usability for traders who want insight without unnecessary complexity.

Daytrading Suite: Neon TPO + FVG v6.1Here is the summary of the code and the trading guide in English.
---
### 1. Code Summary: What does the chart show?
The script combines three dimensions of trading into a single chart:
* **The Context (TPO / Market Profile - Yesterday):**
* **Gold Zone (Center):** Yesterday's **POC (Point of Control)**. This was the "fairest price". It often acts as a magnet.
* **White Dashed Lines:** The **VAH (Value Area High)** and **VAL (Value Area Low)**. Yesterday, 70% of all trading volume happened between these lines. This is the area of "Balance".
* **The Structure (HTF - 1 Hour+):**
* **Red/Green Boxes (Right Edge):** Automatic **Supply & Demand Zones** based on the 1-hour chart (or your setting). They indicate major resistance and support levels.
* **The Timing (Entries):**
* **Neon FVG Boxes (Small):** "Fair Value Gaps". These represent imbalances in price. If price revisits these, it is often your **entry signal**.
* **Lines (VWAP, EMA, PDH/PDL):** Act as dynamic support and trend indicators.
---
### 2. Trading Strategy: How to use it
Do not just trade every colored spot. You must combine **Location (TPO)** with **Signal (FVG)**.
#### Step A: The Open (Where are we?)
In the morning (or at the US Open), check where the price is relative to the **white TPO lines**.
1. **Inside the White Lines (In Balance):**
* The market is undecided. Expect ranging/choppy behavior.
* **Strategy:** Buy at the bottom edge (VAL), Sell at the top edge (VAH). The target is often the Gold Zone (POC) in the middle.
2. **Outside the White Lines (Imbalance):**
* The market is seeking new prices. Danger of a Trend!
* **Strategy:** If price breaks above VAH and tests it from above -> **Long**. If it breaks below VAL -> **Short**.
#### Step B: The Setup (The High Probability Scenario)
Here is the "Rejection" Setup (Long Example):
1. Price drops to the lower white line (**VAL**) or into a green **Demand Zone**.
2. It bounces (shows a wick).
3. In the process, a small **green Neon FVG** is formed.
4. **Entry:** Limit Order at the top of the Neon FVG.
5. **Target:** The Gold Zone (POC) or the upper white line (VAH).
6. **Stop Loss:** Below the recent swing low.
#### Step C: Warning Signals (When NOT to trade)
* **In "No Man's Land":** If the price is sitting right in the middle between Gold (POC) and White (VAH/VAL), do nothing. The risk is 50/50. Wait until price hits an edge.
* **Against the Flow:** If EMA 9 and 21 are pointing steeply downwards, do not buy blindly at the VAL just because the line is there. Wait for confirmation (FVG).
### Pre-Trade Checklist:
1. **Level:** Am I at a white line (VAH/VAL) or the Gold Zone (POC)?
2. **Structure:** Do I have an HTF Demand/Supply Zone backing me up?
3. **Trigger:** Do I see a Neon FVG pointing in my direction?

Volume Weighted Average Price @Marx_CapitalSimple VWAP indicator edited to not connect the lines between sessions for a cleaner look without vertical lines at session ends.
Session end and start times are customizable.

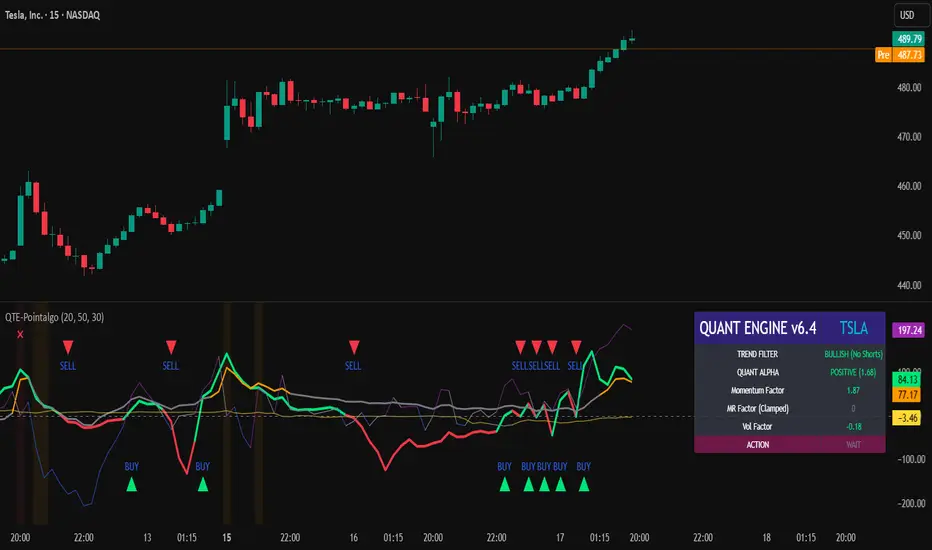
QUANT TRADING ENGINE [PointAlgo]Quant Trading Engine is a quantitative market-analysis indicator that combines multiple statistical factors to study trend behavior, mean reversion, volatility, execution efficiency, and market stability.
The indicator converts raw price behavior into standardized signals to help evaluate directional bias and risk conditions in a systematic way.
This script focuses on factor alignment and regime awareness, not prediction certainty.
Design Philosophy
Markets move through different regimes such as trending, ranging, volatile expansion, and instability.
This indicator attempts to model these regimes by blending:
Momentum strength
Mean-reversion pressure
Volatility risk
Trend filtering
Execution context (VWAP)
Correlation structure
Each component is normalized and combined into a single Quant Alpha framework.
Factor Construction
1. Momentum Factor
Measures directional strength using percentage price change over a rolling window.
Standardized using mean and standard deviation.
Represents trend continuation pressure.
2. Mean Reversion Factor
Measures deviation from a longer moving average.
Standardized to identify stretched conditions.
Designed to capture counter-trend behavior.
Directional Clamping
Mean-reversion signals are dynamically restricted:
No counter-trend buying during downtrends.
No counter-trend selling during uptrends.
Allows both sides only in neutral regimes.
This prevents conflicting signals in strong trends.
3. Volatility Factor
Uses realized volatility derived from price changes.
Penalizes environments where volatility deviates significantly from its norm.
Acts as a risk adjustment rather than a directional driver.
4. Composite Quant Alpha
The final Quant Alpha is a weighted blend of:
Momentum
Mean reversion (trend-clamped)
Volatility risk
The composite is standardized into a Z-score, allowing consistent interpretation across instruments and timeframes.
Signal Logic
Buy signal occurs when Quant Alpha crosses above zero.
Sell signal occurs when Quant Alpha crosses below zero.
Zero-cross logic is used to represent shifts from negative to positive statistical bias and vice versa.
Signals reflect statistical regime change, not trade instructions.
Volatility Smile Context
Measures price deviation from its statistical distribution.
Identifies skewed conditions where upside or downside volatility becomes dominant.
Highlights extreme deviations that may imply elevated derivative risk.
Exotic Risk Conditions
Detects sudden price expansion combined with volatility spikes.
Highlights environments where execution and risk become unstable.
Visual background cues are used for awareness only.
Execution Context (VWAP)
Measures price distance from VWAP.
Used to assess execution efficiency rather than direction.
Helps identify stretched conditions relative to average traded price.
Correlation Structure
Evaluates short-term return correlations.
Detects when price behavior becomes less predictable.
Flags structural instability rather than trend direction.
Visualization
The indicator plots:
Quant Alpha (scaled) with directional coloring
Volatility smile deviation
Price vs VWAP distance
Correlation structure
Signal markers indicate Quant Alpha zero-cross events and risk conditions.
Dashboard
A compact dashboard summarizes:
Trend filter state
Quant Alpha polarity and value
Individual factor readings
Current action state (Buy / Sell / Wait / Risk)
The dashboard provides a real-time snapshot of internal model conditions.
Usage Notes
Designed for analytical interpretation and research.
Best used alongside price action and risk management tools.
Factor behavior depends on instrument liquidity and volatility.
Not optimized for illiquid or irregular markets.
Disclaimer
This script is provided for educational and analytical purposes only.
It does not provide financial, investment, or trading advice.
All outputs should be independently validated before making any trading decisions.
Microstructure Participation & Acceptance Indicator📊 Microstructure Participation & Acceptance Indicator
An advanced participation-based filter combining VWAP distance analysis, volume delta detection, and real-time acceptance/rejection state identification—designed for smaller timeframe trading.
📊 FEATURES
VWAP Distance Normalization
Context-aware fair value measurement:
Automatically resets based on selected anchor (Session/Week/Month)
ATR-normalized distance calculation for universal application
Identifies when price is extended or compressed relative to equilibrium
Configurable extreme distance threshold (default: 1.5 ATR)
Adjustable source input (default: HLC3)
Volume Delta Proxy
Bull vs Bear participation tracking:
Calculates volume imbalance between bullish and bearish candles
EMA smoothing for cleaner signal generation (default: 9 periods)
Delta ratio measurement to identify dominant side
Expansion/compression detection to gauge momentum commitment
Configurable expansion threshold (default: 1.3x)
Acceptance/Rejection State Machine
Real-time market regime identification with six distinct states:
🟢 Accepted Long
Price moving away from VWAP with expanding bullish delta
Distance from VWAP increasing
Volume confirming the move
Indicates real buying pressure—trade WITH the move
🟢 Accepted Short
Price moving away from VWAP with expanding bearish delta
Distance from VWAP increasing
Volume confirming the move
Indicates real selling pressure—trade WITH the move
🟠 Fade Long
Price extended beyond threshold (>1.5 ATR above VWAP)
Delta not supporting the extension
Volume participation absent or diminishing
Potential mean-reversion short setup
🟠 Fade Short
Price extended beyond threshold (>1.5 ATR below VWAP)
Delta not supporting the extension
Volume participation absent or diminishing
Potential mean-reversion long setup
⚪ Chop
Price compressed near VWAP
Bollinger Bands tight (width compressed)
Delta neutral—no clear commitment
NO TRADE ZONE—wait for expansion
⚪ Neutral
Transitional state between regimes
Momentum shifting but not yet confirmed
Monitor for next acceptance signal
Bollinger Bands
Standard volatility measurement with TradingView default styling:
Adjustable period length (default: 20)
Configurable standard deviation multiplier (default: 2.0)
Visual fill between bands for volatility context
Used internally for chop/compression detection
Live Dashboard
Real-time metrics display (top-right corner):
Current market state with color coding
VWAP distance in ATR units
Delta ratio (bull/bear volume balance)
Delta state (Expanding/Compressing)
High-contrast design for instant readability
🎯 HOW TO USE
For Trend Trading:
Accepted Long/Short backgrounds indicate confirmed participation—stay with the trend
Strong moves typically travel 1-1.5 ATR from VWAP with delta support
Use VWAP as dynamic support/resistance
Combine with momentum indicators (MACD, RSI) for confluence
Price above VWAP + Accepted Long state = bullish bias
Price below VWAP + Accepted Short state = bearish bias
For Mean Reversion:
Fade Long/Short states signal overextension without participation
Price beyond 1.5 ATR from VWAP with weak delta = potential reversal
Look for price return to VWAP when extended
Bollinger Band extremes + Fade state = high-probability mean reversion setup
VWAP acts as mean reversion anchor during range-bound sessions
For Risk Management:
Chop state = avoid new entries
Bollinger Band compression + Chop = pre-expansion zone (wait for breakout)
Delta compression after strong move = early exhaustion warning
State transitions (Accepted → Neutral → Fade) = tighten stops
Signal Confirmation:
Strongest setups occur when multiple factors align:
BB breakout + Accepted state + price above/below VWAP
Price rejection at BB bands + Fade state
VWAP support/resistance hold + state transition
Delta expansion + distance increasing + trend direction
⚙️ SETTINGS
All components are fully customizable through organized input groups:
VWAP Distance Group:
VWAP source (default: HLC3)
Anchor period (Session/Week/Month)
ATR length for normalization (default: 14)
Extreme distance threshold in ATR multiples (default: 1.5)
Volume Delta Group:
Delta EMA length (default: 9)
Delta expansion threshold (default: 1.3)
Acceptance Logic Group:
Acceptance lookback period (default: 5)
Chop threshold in VWAP/ATR units (default: 0.3)
Bollinger Bands Group:
BB length (default: 20)
Standard deviation multiplier (default: 2.0)
Display Group:
Toggle state backgrounds
Toggle state change labels
Toggle VWAP line
Toggle Bollinger Bands
💡 EDUCATIONAL VALUE
This indicator teaches important concepts:
How institutional money identifies fair value (VWAP)
The difference between price movement and market acceptance
Why volume participation matters more than price action alone
How to distinguish between noise and committed directional moves
The relationship between volatility compression and expansion cycles
Why distance from equilibrium predicts mean reversion probability
⚠️ IMPORTANT NOTES
This indicator is for educational and informational purposes only
This is a filter, not a standalone trading system
No indicator is perfect—always use proper risk management
Past performance does not guarantee future results
Combine with your own analysis and risk tolerance
Test thoroughly on historical data before live trading
This is not financial advice—use at your own risk
🔧 TECHNICAL DETAILS
Pine Script Version 6
Overlay indicator (displays on price chart)
All calculations use standard, well-documented formulas
No repainting—all signals are confirmed on bar close
Compatible with all timeframes and instruments
Optimized for smaller timeframes (1-5 minute charts)
Minimal computational overhead
📝 CHANGELOG
Version 1.0
Initial release
VWAP distance normalization with ATR scaling
Volume delta proxy system (bull/bear EMA)
6-state acceptance/rejection state machine
Bollinger Bands integration
Real-time dashboard with live metrics
State change labels and background coloring
Full customization options
Developed for traders who need objective participation filters to distinguish high-probability setups from low-quality noise—without cluttering their charts with multiple indicator panels.

RTH & ETH VWAPs (Unified Style)AVWAP indicator showing only the current session. Shows ETH VWAP even when RTH is turned on. Has standard deviation and fills for settings.

Bollinger Bands + VWAP + 4-State MACD BackgroundBollinger Bands + VWAP + 4-State MACD Background
An all-in-one technical analysis indicator combining three proven tools with an intelligent momentum-based background visualization system.
📊 FEATURES
Bollinger Bands
Standard Bollinger Bands implementation with full customization options:
Adjustable period length (default: 20)
Multiple moving average types: SMA, EMA, SMMA (RMA), WMA, VWMA
Configurable standard deviation multiplier (default: 2.0)
Visual fill between bands to highlight volatility zones
Offset capability for forward/backward display
Session VWAP (Volume Weighted Average Price)
Automatically resets at the start of each trading session:
Calculates true volume-weighted average price
Resets daily to provide fresh reference levels
Customizable source input (default: HLC3)
Adjustable line appearance (color and width)
Can be toggled on/off as needed
4-State MACD Background System
This is the unique feature of this indicator. The chart background dynamically changes based on MACD momentum analysis, providing instant visual feedback on trend strength and direction:
🟢 Strong Bullish (Bright Green)
MACD line is above signal line
Histogram is growing (momentum accelerating upward)
Indicates strong upward momentum
🟢 Weak Bullish (Pale Green)
MACD line is above signal line
Histogram is shrinking (momentum decelerating)
Early warning signal that uptrend may be weakening
🔴 Strong Bearish (Bright Red)
MACD line is below signal line
Histogram is falling (momentum accelerating downward)
Indicates strong downward momentum
🔴 Weak Bearish (Pale Red)
MACD line is below signal line
Histogram is rising (momentum decelerating)
Early warning signal that downtrend may be weakening
🎯 HOW TO USE
For Trend Trading:
Strong colored backgrounds indicate confirmed momentum in that direction - consider staying with the trend
Weak colored backgrounds signal potential momentum exhaustion - watch for possible reversals
Use VWAP as a dynamic support/resistance level
Bollinger Band breakouts combined with strong MACD backgrounds can confirm trend strength
Price above VWAP + strong bullish background = bullish bias
Price below VWAP + strong bearish background = bearish bias
For Mean Reversion:
Price touching upper/lower Bollinger Bands with weak MACD background may suggest potential reversal
VWAP acts as a mean reversion anchor during range-bound sessions
Background color shifts from strong to weak often precede price direction changes
Look for price return to VWAP when extended beyond bands with weakening momentum
Signal Confirmation:
Strongest signals occur when multiple indicators align:
BB breakout + MACD strong color + price above/below VWAP
Price rejection at BB bands + MACD color weakening
VWAP support/resistance hold + MACD color change
⚙️ SETTINGS
All components are fully customizable through organized input groups:
Bollinger Bands Group:
Period length
Moving average type (SMA/EMA/SMMA/WMA/VWMA)
Source (close/open/high/low/etc.)
Standard deviation multiplier
Offset
VWAP Group:
Toggle show/hide
Source calculation method
Line color
Line width
MACD Group:
Toggle background on/off
Fast length (default: 12)
Slow length (default: 26)
Signal length (default: 9)
Source
Four separate color settings for each momentum state
All colors include transparency controls
💡 EDUCATIONAL VALUE
This indicator teaches important concepts:
How volatility (Bollinger Bands) relates to price movement
The importance of volume-weighted pricing (VWAP)
Momentum analysis through MACD
How combining multiple timeframes and indicators can provide confluence
The difference between trend strength and trend direction
⚠️ IMPORTANT NOTES
This indicator is for educational and informational purposes only
No indicator is perfect - always use proper risk management
Past performance does not guarantee future results
Combine with your own analysis and risk tolerance
Test thoroughly on historical data before live trading
This is not financial advice - use at your own risk
🔧 TECHNICAL DETAILS
Pine Script Version 6
Overlay indicator (displays on price chart)
All calculations use standard, well-documented formulas
Minimal lag due to efficient coding
Compatible with all timeframes and instruments
No repainting - all signals are confirmed on bar close
📝 CHANGELOG
Version 1.0
Initial release
Bollinger Bands with multiple MA types
Session VWAP with daily reset
4-state MACD background system
Full customization options
Developed for traders who want multiple confirmation signals in a clean, organized format without cluttering their charts with separate indicator panels.

VOLX+ VWAP Range BandsVOLX+ plots multiple VWAP-weighted high/low channels across different lookback periods to show how price behaves relative to short-term and long-term value zones.
Instead of using a single VWAP line, this tool creates four rolling VWAP envelopes:
Short-term range (fast reaction)
Mid-term range
Mid-mid range (transitional layer)
Long-term range (macro context)
Each band is computed as:
VWAP-High = SMA(high × volume, length) ÷ SMA(volume, length)
VWAP-Low = SMA(low × volume, length) ÷ SMA(volume, length)
This produces dynamic price channels that account for both price and traded volume, offering a clearer sense of where the market is accepting or rejecting value.
What It Shows
Four VWAP-weighted high/low bands
A short-term VWAP midline
Price line
Three SMAs for trend context
Optional visibility switches for each VWAP band
The filled regions between VWAP highs and lows create a layered “value map,” helping you interpret:
Trend continuation (price hugging outer VWAP bands)
Mean reversion (price returning toward inner bands)
Volatility contraction/expansion
Shifts in short-term vs long-term balance
🧠 How to Use
Use the short-term band for day-trading context or detecting short-term excess.
Use mid-term and mid-mid bands to confirm developing structure.
Use the long-term VWAP band to understand broader value zones.
Combine VWAP bands with SMAs and structure analysis for confluence.
This indicator is intended for price interpretation and analytical support.
✔ Does Not Repaint
The script uses rolling VWAP formulas and standard MAs; everything is stable and non-repainting.

Session VWAPs [cryptalent]This indicator provides a more granular and timely analysis of market structure compared to traditional daily Volume Weighted Average Price (VWAP). It splits the 24-hour trading day into four distinct, customizable sessions (T1, T2, T3, T4), calculating an independent Session VWAP and Standard Deviation Bands for each segment.
🌟 Key Features and Functionality
1. Segmented VWAP Calculation
Purpose: To track the true Volume Weighted Average Price (Fair Value) specific to the participants and trading activities within different global market sessions (e.g., Asian, European, US sessions).
Design: By default, the 24 hours (based on UTC time) are divided into T1 (00:00-06:00), T2 (06:00-12:00), T3 (12:00-20:00), and T4 (20:00-00:00).
Mechanism: The VWAP calculation resets at the start of each designated session, offering a clearer, segment-specific view of market consensus and volume absorption.
2. Standard Deviation Bands
Calculation: Each Session VWAP line is accompanied by upper and lower standard deviation bands.
Control: The width of these bands is controlled by the user input "Band Multiplier" (default is 1.0, representing one standard deviation).
Application: These bands measure the Volume-Weighted Volatility and define the expected "normal" trading range for the current session.
- Price within the bands suggests consolidation or a normal auction process.
- Price breaking out of the bands indicates strong directional momentum or an extreme/overbought/oversold condition for that specific session.
3. High Customization (User Inputs)
Session Timing: All four session start and end times (in UTC) are customizable, allowing traders to align the indicator with specific market hours or individual trading strategies.
Price Source: The source price used for the VWAP calculation is selectable (default is close).
💡 Trading Applications
1. Fair Value Identification: The VWAP line serves as the "Fair Value" or "Volume-Weighted Consensus Cost" for the active session.
Price above VWAP: Buyers are in control during that session.
Price below VWAP: Sellers are in control during that session.
2. Dynamic Support & Resistance: Both the VWAP and the Standard Deviation Bands often act as reliable dynamic support and resistance levels.
3. Volatility Assessment: The width of the bands reflects the volume-weighted volatility of the current session. Narrow bands suggest range-bound trading; wide bands imply strong directional activity.
4. Trend Strength: Sustained price action outside of the standard deviation bands is a key measure of the strength and commitment behind a current trend.

Obsidian Flux Matrix# Obsidian Flux Matrix | JackOfAllTrades
Made with my Senior Level AI Pine Script v6 coding bot for the community!
Narrative Overview
Obsidian Flux Matrix (OFM) is an open-source Pine Script v6 study that fuses social sentiment, higher timeframe trend bias, fair-value-gap detection, liquidity raids, VWAP gravitation, session profiling, and a diagnostic HUD. The layout keeps the obsidian palette so critical overlays stay readable without overwhelming a price chart.
Purpose & Scope
OFM focuses on actionable structure rather than marketing claims. It documents every driver that powers its confluence engine so reviewers understand what triggers each visual.
Core Analytical Pillars
1. Social Pulse Engine
Sentiment Webhook Feed: Accepts normalized scores (-1 to +1). Signals only arm when the EMA-smoothed value exceeds the `sentimentMin` input (0.35 by default).
Volume Confirmation: Requires local volume > 30-bar average × `volSpikeMult` (default 2.0) before sentiment flags.
EMA Cross Validation: Fast EMA 8 crossing above/below slow EMA 21 keeps momentum aligned with flow.
Momentum Alignment: Multi-timeframe momentum composite must agree (positive for longs, negative for shorts).
2. Peer Momentum Heatmap
Multi-Timeframe Blend: RSI + Stoch RSI fetched via request.security() on 1H/4H/1D by default.
Composite Scoring: Each timeframe votes +1/-1/0; totals are clamped between -3 and +3.
Intraday Readability: Configurable band thickness (1-5) so scalpers see context without losing space.
Dynamic Opacity: Stronger agreement boosts column opacity for quick bias checks.
3. Trend & Displacement Framework
Dual EMA Ribbon: Cyan/magenta ribbon highlights immediate posture.
HTF Bias: A higher-timeframe EMA (default 55 on 4H) sets macro direction.
Displacement Score: Body-to-ATR ratio (>1.4 default) detects impulses that seed FVGs or VWAP raids.
ATR Normalization: All thresholds float with volatility so the study adapts to assets and regimes.
4. Intelligent Fair Value Gap (FVG) System
Gap Detection: Three-candle logic (bullish: low > high ; bearish: high < low ) with ATR-sized minimums (0.15 × ATR default).
Overlap Prevention: Price-range checks stop redundant boxes.
Spacing Control: `fvgMinSpacing` (default 5) avoids stacking from the same impulse.
Storage Caps: Max three FVGs per side unless the user widens the limit.
Session Awareness: Kill zone filters keep taps focused on London/NY if desired.
Auto Cleanup: Boxes delete when price closes beyond their invalidation level.
5. VWAP Magnet + Liquidity Raid Engine
Session or Rolling VWAP: Toggle resets to match intraday or rolling preferences.
Equal High/Low Scanner: Looks back 20 bars by default for liquidity pools.
Displacement Filter: ATR multiplier ensures raids represent genuine liquidity sweeps.
Mean Reversion Focus: Signals fire when price displaces back toward VWAP following a raid.
6. Session Range Breakout System
Initial Balance Tracking: First N bars (15 default) define the session box.
Breakout Logic: Requires simultaneous liquidity spikes, nearby FVG activity, and supportive momentum.
Z-Score Volume Filter: >1.5σ by default to filter noisy moves.
7. Lifestyle Liquidity Scanner
Volume Z-Scores: 50-bar baseline highlights statistically significant spikes.
Smart Money Footprints: Bottom-of-chart squares color-code buy vs sell participation.
Panel Memory: HUD logs the last five raid timestamps, direction, and normalized size.
8. Risk Matrix & Diagnostic HUD
HUD Structure: Table in the top-right summarizes HTF bias, sentiment, momentum, range state, liquidity memory, and current risk references.
Signal Tags: Aggregates SPS, FVG, VWAP, Range, and Liquidity states into a compact string.
Risk Metrics: Swing-based stops (5-bar lookback) + ATR targets (1.5× default) keep risk transparent.
Signal Families & Alerts
Social Pulse (SPS): Volume-confirmed sentiment alignment; triangle markers with “SPS”.
Kill-Zone FVG: Session + HTF alignment + FVG tap; arrow markers plus SL/TP labels.
Local FVG: Captures local reversals when HTF bias has not flipped yet.
VWAP Raid: Equal-high/low raids that snap toward VWAP; “VWAP” label markers.
Range Breakout: Initial balance violations with liquidity and imbalance confirmation; circle markers.
Liquidity Spike: Z-score spikes ≥ threshold; square markers along the baseline.
Visual Design & Customization
Theme Palette: Primary background RGB (12,6,24). Accent shading RGB (26,10,48). Long accents RGB (88,174,255). Short accents RGB (219,109,255).
Stylized Candles: Optional overlay using theme colors.
Signal Toggles: Independently enable markers, heatmap, and diagnostics.
Label Spacing: Auto-spacing enforces ≥4-bar gaps to prevent text overlap.
Customization & Workflow Notes
Adjust ATR/FVG thresholds when volatility shifts.
Re-anchor sentiment to your webhook cadence; EMA smoothing (default 5) dampens noise.
Reposition the HUD by editing the `table.new` coordinates.
Use multiples of the chart timeframe for HTF requests to minimize load.
Session inputs accept exchange-local time; align them to your market.
Performance & Compliance
Pure Pine v6: Single-line statements, no `lookahead_on`.
Resource Safe: Arrays trimmed, boxes limited, `request.security` cached.
Repaint Awareness: Signals confirm on close; alerts mirror on-chart logic.
Runtime Safety: Arrays/loops guard against `na`.
Use Cases
Measure when social sentiment aligns with structure.
Plan ICT-style intraday rebalances around session-specific FVG taps.
Fade VWAP raids when displacement shows exhaustion.
Watch initial balance breaks backed by statistical volume.
Keep risk/target references anchored in ATR logic.
Signal Logic Snapshot
Social Pulse Long/Short: `sentimentEMA` gated by `sentimentMin`, `volSpike`, EMA 8/21 cross, and `momoComposite` sign agreement. Keeps hype tied to structural follow-through.
Kill-Zone FVG Long/Short: Requires session filter, HTF EMA bias alignment, and an active FVG tap (`bullFvgTap` / `bearFvgTap`). Labels include swing stops + ATR targets pulled from `swingLookback` and `liqTargetMultiple`.
Local FVG Long/Short: Uses `localBullish` / `localBearish` heuristics (EMA slope, displacement, sequential closes) to surface intraday reversals even when HTF bias has not flipped.
VWAP Raids: Detect equal-high/equal-low sweeps (`raidHigh`, `raidLow`) that revert toward `sessionVwap` or rolling VWAP when displacement exceeds `vwapAlertDisplace`.
Range Breakouts: Combine `rangeComplete`, breakout confirmation, liquidity spikes, and nearby FVG activity for statistically backed initial balance breaks.
Liquidity Spikes: Volume Z-score > `zScoreThreshold` logs direction, size, and timestamp for the HUD and optional review workflows.
Session Logic & VWAP Handling
Kill zone + NY session inputs use TradingView’s session strings; `f_inSession()` drives both visual shading and whether FVG taps are tradeable when `killZoneOnly` is true.
Session VWAP resets using cumulative price × volume sums that restart when the daily timestamp changes; rolling VWAP falls back to `ta.vwap(hlc3)` for instruments where daily resets are less relevant.
Initial balance box (`rangeBars` input) locks once complete, extends forward, and stays on chart to contextualize later liquidity raids or breakouts.
Parameter Reference
Trend: `emaFastLen`, `emaSlowLen`, `htfResolution`, `htfEmaLen`, `showEmaRibbon`, `showHtfBiasLine`.
Momentum: `tf1`, `tf2`, `tf3`, `rsiLen`, `stochLen`, `stochSmooth`, `heatmapHeight`.
Volume/Liquidity: `volLookback`, `volSpikeMult`, `zScoreLen`, `zScoreThreshold`, `equalLookback`.
VWAP & Sessions: `vwapMode`, `showVwapLine`, `vwapAlertDisplace`, `killSession`, `nySession`, `showSessionShade`, `rangeBars`.
FVG/Risk: `fvgMinTicks`, `fvgLookback`, `fvgMinSpacing`, `killZoneOnly`, `liqTargetMultiple`, `swingLookback`.
Visualization Toggles: `showSignalMarkers`, `showHeatmapBand`, `showInfoPanel`, `showStylizedCandles`.
Workflow Recipes
Kill-Zone Continuation: During the defined kill session, look for `killFvgLong` or `killFvgShort` arrows that line up with `sentimentValid` and positive `momoComposite`. Use the HUD’s risk readout to confirm SL/TP distances before entering.
VWAP Raid Fade: Outside kill zone, track `raidToVwapLong/Short`. Confirm the candle body exceeds the displacement multiplier, and price crosses back toward VWAP before considering reversions.
Range Break Monitor: After the initial balance locks, mark `rangeBreakLong/Short` circles only when the momentum band is >0 or <0 respectively and a fresh FVG box sits near price.
Liquidity Spike Review: When the HUD shows “Liquidity” timestamps, hover the plotted squares at chart bottom to see whether spikes were buy/sell oriented and if local FVGs formed immediately after.
Metadata
Author: officialjackofalltrades
Platform: TradingView (Pine Script v6)
Category: Sentiment + Liquidity Intelligence
Hope you Enjoy!

Range Lattice## RangeLattice
RangeLattice constructs a higher-timeframe scaffolding on any intraday chart, locking in structural highs/lows, mid/quarter grids, VWAP confluence, and live acceptance/break analytics. It provides a non-repainting overlay that turns range management into a disciplined process.
HOW IT WORKS
Structure Harvesting – Using request.security() , the script samples highs/lows from a user-selected timeframe (default 240 minutes) over a configurable lookback to establish the dominant range.
Grid Construction – Midpoint and quarter levels are derived mathematically, mirroring how institutional traders map distribution/accumulation zones.
Acceptance Detection – Consecutive closes inside the range flip an acceptance flag and darken the cloud, signaling balanced auction conditions.
Break Confirmation – Multi-bar closes outside the structure raise break labels and alerts, filtering the countless fake-outs that plague breakout traders.
VWAP Fan Overlay – Session VWAP plus ATR-based bands provide a live measure of flow centering relative to the lattice.
HOW TO USE IT
Range Plays : Fade taps of the outer rails only when acceptance is active and VWAP sits inside the grid—this is where mean-reversion works best.
Breakout Plays : Wait for confirmed break labels before entering expansion trades; the dashboard's Width/ATR metric tells you if the expansion has enough fuel.
Market Prep : Carry the same lattice from pre-market into regular trading hours by keeping the structure timeframe fixed; alerts keep you notified even when managing multiple tickers.
VISUAL FEATURES
Range Tap and Mid Pivot markers provide a tape-reading breadcrumb trail for journaling.
Cloud fill opacity tightens when acceptance persists, visually signaling balance compressions ready to break.
Dashboard displays absolute width, ATR-normalized width, and current state (Balanced vs Transitional) so you can glance across charts quickly.
Acceptance Flag toggle: Keep the repeated acceptance squares hidden until you need to audit balance.
PARAMETERS
Structure Timeframe (default: 240): Choose the timeframe whose ranges matter most (4H for indices, Daily for stocks).
Structure Lookback (default: 60): Bars sampled on the structure timeframe.
Acceptance Bars (default: 8): How many consecutive bars inside the range confirm balance.
Break Confirmation Bars (default: 3): Bars required outside the range to validate a breakout.
ATR Reference (default: 14): ATR period for width normalization.
Show Midpoint Grid (default: enabled): Display the midpoint and quarter levels.
Show Adaptive VWAP Fan (default: enabled): Toggle the VWAP channel for assets where volume distribution matters most.
Show Acceptance Flags (default: disabled): Turn the acceptance markers on/off for maximum visual control.
Show Range Dashboard (default: enabled): Disable if screen space is limited, re-enable during prep sessions.
ALERTS
The indicator includes five alert conditions:
Range High Tap: Price interacted with the RangeLattice high
Range Low Tap: Price interacted with the RangeLattice low
Range Mid Tap: Price interacted with the RangeLattice mid
Range Break Up: Confirmed upside breakout
Range Break Down: Confirmed downside breakout
Where it works best
This indicator works best on liquid instruments with clear structural levels. On very low timeframes (1-minute and below), the structure may update too frequently to be useful. The acceptance/break confirmation system requires patience—faster traders may find the multi-bar confirmation too slow for scalping. The VWAP fan is session-based and resets daily, which may not suit all trading styles.

FluxPulse Beacon## FluxPulse Beacon
FluxPulse Beacon applies a microstructure lens to every bar, combining directional thrust, realized volatility, and multi-timeframe liquidity checks to decide whether the tape is being pushed by real sponsorship or just noise. The oscillator's color-coded columns and adaptive burst thresholds transform complex flow dynamics into a single actionable flux score for futures and equities traders.
HOW IT WORKS
Momentum Extraction – Price differentials over a configurable pulse distance are smoothed using exponential moving averages to isolate directional thrust without reacting to single prints.
Volatility + Liquidity Normalization – The momentum stream is divided by realized volatility and multiplied by both local and higher-timeframe EMA volume ratios, ensuring pulses only appear when volatility and liquidity align.
Adaptive Thresholding – A volatility-derived standard deviation of flux is blended with the base threshold so bursts scale automatically between low-volatility and high-volatility market conditions.
Divergence Engine – Linear regression slopes compare price vs. flux to tag bullish/bearish divergences, highlighting stealth accumulation or distribution zones.
HOW TO USE IT
Continuation Entries : Go with the trend when histogram bars stay above the adaptive threshold, the signal line confirms, and trend bias agrees—this is where liquidity-backed follow-through lives.
Fade Plays : Watch for divergence alerts and shrinking compression values; when flux prints below zero yet price grinds higher, hidden selling pressure often precedes rollovers.
Session Filter : Compression percentage in the diagnostics table instantly tells you whether to trade thin overnight sessions—low compression means stand down.
VISUAL FEATURES
Dynamic background heat maps flux magnitude, while threshold lines provide a quick read on whether a pulse is statistically significant.
Diagnostics table displays live flux, signal, adaptive threshold, and compression for quick reference.
Alert-first workflow: The surface is intentionally clean—bursts and divergences are delivered via alerts instead of on-chart clutter.
PARAMETERS
Trend EMA Length (default: 34): Defines the macro bias anchor; increase for higher-timeframe confirmation.
Pulse Distance (default: 8): Controls how sensitive momentum extraction becomes.
Volatility Window (default: 21): Sample window for realized volatility normalization.
Liquidity Window (default: 55): Volume smoothing window that proxies liquidity expansion.
Liquidity Reference TF (default: 60): Select a higher timeframe to cross-check whether current volume matches institutional flows.
Adaptive Threshold (default: enabled): Disable for fixed thresholds on slower markets; enable for high-volatility assets.
Base Burst Threshold (default: 1.25): Minimum flux magnitude that qualifies as an actionable pulse.
ALERTS
The indicator includes four alert conditions:
Bull Burst: Detects upside liquidity pulses
Bear Burst: Detects downside liquidity pulses
Bull Divergence: Flags bullish delta divergence
Bear Divergence: Flags bearish delta divergence
LIMITATIONS
This indicator is designed for liquid futures and equity markets. Performance may degrade in low-volume or highly illiquid instruments. The adaptive threshold system works best on timeframes where sufficient volatility history exists (typically 15-minute charts and above). Divergence signals are probabilistic and should be confirmed with price action.
INSERT_CHART_SNAPSHOT_URL_HERE
---
## RangeLattice Mapper
RangeLattice Mapper constructs a higher-timeframe scaffolding on any intraday chart, locking in structural highs/lows, mid/quarter grids, VWAP confluence, and live acceptance/break analytics. It provides a non-repainting overlay that turns range management into a disciplined process.
HOW IT WORKS
Structure Harvesting – Using request.security() , the script samples highs/lows from a user-selected timeframe (default 240 minutes) over a configurable lookback to establish the dominant range.
Grid Construction – Midpoint and quarter levels are derived mathematically, mirroring how institutional traders map distribution/accumulation zones.
Acceptance Detection – Consecutive closes inside the range flip an acceptance flag and darken the cloud, signaling balanced auction conditions.
Break Confirmation – Multi-bar closes outside the structure raise break labels and alerts, filtering the countless fake-outs that plague breakout traders.
VWAP Fan Overlay – Session VWAP plus ATR-based bands provide a live measure of flow centering relative to the lattice.
HOW TO USE IT
Range Plays : Fade taps of the outer rails only when acceptance is active and VWAP sits inside the grid—this is where mean-reversion works best.
Breakout Plays : Wait for confirmed break labels before entering expansion trades; the dashboard's Width/ATR metric tells you if the expansion has enough fuel.
Market Prep : Carry the same lattice from pre-market into regular trading hours by keeping the structure timeframe fixed; alerts keep you notified even when managing multiple tickers.
VISUAL FEATURES
Range Tap and Mid Pivot markers provide a tape-reading breadcrumb trail for journaling.
Cloud fill opacity tightens when acceptance persists, visually signaling balance compressions ready to break.
Dashboard displays absolute width, ATR-normalized width, and current state (Balanced vs Transitional) so you can glance across charts quickly.
Acceptance Flag toggle: Keep the repeated acceptance squares hidden until you need to audit balance.
PARAMETERS
Structure Timeframe (default: 240): Choose the timeframe whose ranges matter most (4H for indices, Daily for stocks).
Structure Lookback (default: 60): Bars sampled on the structure timeframe.
Acceptance Bars (default: 8): How many consecutive bars inside the range confirm balance.
Break Confirmation Bars (default: 3): Bars required outside the range to validate a breakout.
ATR Reference (default: 14): ATR period for width normalization.
Show Midpoint Grid (default: enabled): Display the midpoint and quarter levels.
Show Adaptive VWAP Fan (default: enabled): Toggle the VWAP channel for assets where volume distribution matters most.
Show Acceptance Flags (default: disabled): Turn the acceptance markers on/off for maximum visual control.
Show Range Dashboard (default: enabled): Disable if screen space is limited, re-enable during prep sessions.
ALERTS
The indicator includes five alert conditions:
Range High Tap: Price interacted with the RangeLattice high
Range Low Tap: Price interacted with the RangeLattice low
Range Mid Tap: Price interacted with the RangeLattice mid
Range Break Up: Confirmed upside breakout
Range Break Down: Confirmed downside breakout
LIMITATIONS
This indicator works best on liquid instruments with clear structural levels. On very low timeframes (1-minute and below), the structure may update too frequently to be useful. The acceptance/break confirmation system requires patience—faster traders may find the multi-bar confirmation too slow for scalping. The VWAP fan is session-based and resets daily, which may not suit all trading styles.
---
