📈 ETH/USD — 4H MARKET OUTLOOK
- ETH has broken out of its short-term rising structure and is now pulling back into a high-probability retest zone, creating a clean bullish continuation setup. Market structure has shifted from bearish to bullish with higher highs, higher lows, and strong volume support.
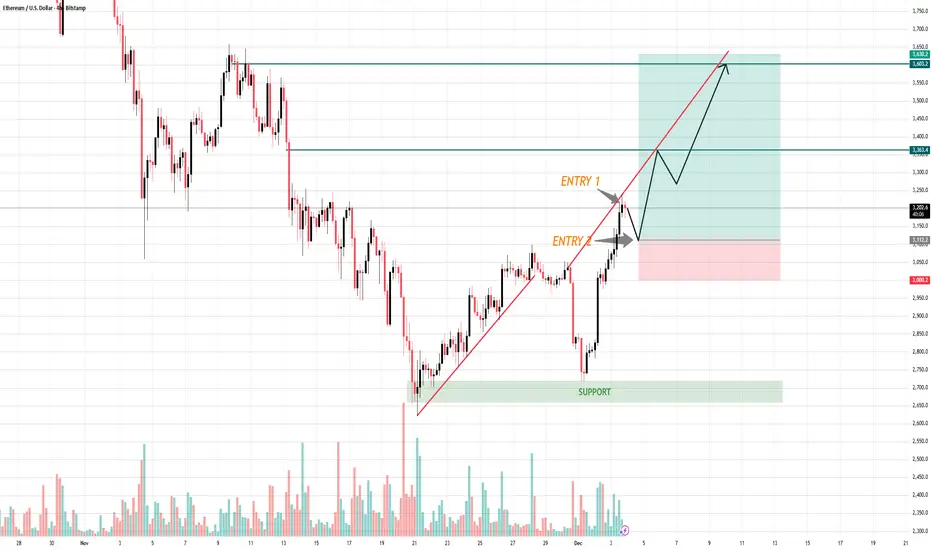
- Your chart shows two potential long entries both valid depending on the aggressiveness of the trader.
1️⃣ Break of Structure + Trendline Retest
ETH successfully broke above the rising trendline and is now forming a corrective pullback.
This is exactly what we want to see before entering a continuation move.
- Impulse up = strong, clean candles
- Pullback = controlled, low volatility
- Trendline retest = confirmation of demand
This is textbook bullish market behavior.
2️⃣ Entry Zones
🔶 ENTRY 1 (Aggressive Entry)
- Positioned right at the trendline retest
- For traders who want early entry with more risk
- Expect volatility but strong R:R if the bounce holds
🔷 ENTRY 2
- Wait for price to retrace deeper into minor structure support
- Higher confirmation, lower risk
- Ideal for swing traders
Both entries target the same bullish continuation structure.
3️⃣ Target Zone
Your take-profit zone is correctly placed at $3,600–$3,650, aligned with:
- Previous major supply zone
- Strong historical rejection area
- Completion of the next liquidity sweep
If ETH maintains structure, this zone will be tested.
4️⃣ Stop-Loss Placement
A stop below $3,060 – $3,100 is ideal because:
- It sits under the retest zone
- Below previous higher low
- Below liquidity pockets that market makers typically manipulate
If this level breaks, bullish structure collapses so the SL is perfect.
➡️ Primary Scenario
ETH pulls back → creates a higher low → bounces from Entry 1 or Entry 2 → continuation into $3,600+.
Market structure is bullish and favors long setups.
⚠️ Risk Scenario
If price breaks and closes below $3,060, the bullish setup fails and ETH may revisit the major support zone near $2,750 – $2,800.
Your edge isn’t in predicting the market — it’s in being patient enough to wait for the setup that others ignore.
- ETH has broken out of its short-term rising structure and is now pulling back into a high-probability retest zone, creating a clean bullish continuation setup. Market structure has shifted from bearish to bullish with higher highs, higher lows, and strong volume support.
- Your chart shows two potential long entries both valid depending on the aggressiveness of the trader.
1️⃣ Break of Structure + Trendline Retest
ETH successfully broke above the rising trendline and is now forming a corrective pullback.
This is exactly what we want to see before entering a continuation move.
- Impulse up = strong, clean candles
- Pullback = controlled, low volatility
- Trendline retest = confirmation of demand
This is textbook bullish market behavior.
2️⃣ Entry Zones
🔶 ENTRY 1 (Aggressive Entry)
- Positioned right at the trendline retest
- For traders who want early entry with more risk
- Expect volatility but strong R:R if the bounce holds
🔷 ENTRY 2
- Wait for price to retrace deeper into minor structure support
- Higher confirmation, lower risk
- Ideal for swing traders
Both entries target the same bullish continuation structure.
3️⃣ Target Zone
Your take-profit zone is correctly placed at $3,600–$3,650, aligned with:
- Previous major supply zone
- Strong historical rejection area
- Completion of the next liquidity sweep
If ETH maintains structure, this zone will be tested.
4️⃣ Stop-Loss Placement
A stop below $3,060 – $3,100 is ideal because:
- It sits under the retest zone
- Below previous higher low
- Below liquidity pockets that market makers typically manipulate
If this level breaks, bullish structure collapses so the SL is perfect.
➡️ Primary Scenario
ETH pulls back → creates a higher low → bounces from Entry 1 or Entry 2 → continuation into $3,600+.
Market structure is bullish and favors long setups.
⚠️ Risk Scenario
If price breaks and closes below $3,060, the bullish setup fails and ETH may revisit the major support zone near $2,750 – $2,800.
Your edge isn’t in predicting the market — it’s in being patient enough to wait for the setup that others ignore.
MY COMMUNITY GROUP GET FREE SIGNAL
✅ 100% Free — I don’t take a penny from anyone
✅ Free Signal: 4 - 6 signals
✅ Trading Idea / Setup / Technical
✅ JOIN MY COMMUNITY GROUP IN Telegram:
t.me/+vxDQ4bhDfsw3MGU1
✅ 100% Free — I don’t take a penny from anyone
✅ Free Signal: 4 - 6 signals
✅ Trading Idea / Setup / Technical
✅ JOIN MY COMMUNITY GROUP IN Telegram:
t.me/+vxDQ4bhDfsw3MGU1
相關出版品
免責聲明
這些資訊和出版物並非旨在提供,也不構成TradingView提供或認可的任何形式的財務、投資、交易或其他類型的建議或推薦。請閱讀使用條款以了解更多資訊。