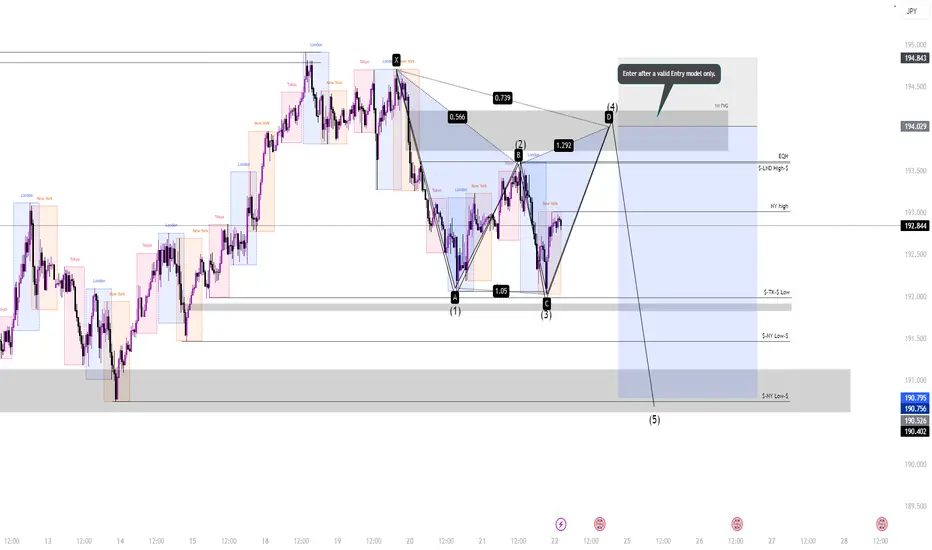
This lower timeframe analysis aligns with the broader bearish Elliott Wave structure from the previous chart. Here’s what we can see:
1. Harmonic Pattern Completion at Key Resistance
The market is forming a Bearish Gartley (or Bat) pattern, with D-leg completion near 194.843.
XA, AB, BC, and CD legs align with Fibonacci levels:
B retracement ~0.566
C extension ~1.292
D completion ~0.739
This confluence suggests a high-probability reversal zone in the 194.000 - 194.800 range.
2. Liquidity & Supply Zones Align with Short Setup
1H Fair Value Gap (FVG) at 194.029 - 194.843 acts as a strong resistance.
Equal Highs (EQH) near 194.029, meaning potential liquidity grab before reversal.
S-LND High-S & NY High (~193.5 - 194.0) are liquidity pools where price may induce buyers before dumping.
3. Lower Timeframe Confirmation for Entry
The label "Enter after a valid entry model only" suggests waiting for:
Break of structure (BOS) on a lower timeframe (M5/M15).
Rejection wicks / bearish engulfing pattern at the supply zone (~194.8).
Failure to hold above 194.8 would invalidate the setup.
4. Targets for Wave (5) Down
First target: 192.000 (S-TK-S Low)
Second target: 191.000 (S-NY Low-S)
Final target: 190.400 - 190.500 (Major liquidity zone)
5. Trade Execution Plan
📉 Sell Entry: After price reaches 194.0 - 194.8 and shows rejection.
🎯 Take Profits:
TP1: 192.000
TP2: 191.000
TP3: 190.400
❌ Stop Loss: Above 195.000 (invalidates the setup).
Conclusion
This harmonic + Elliott Wave confluence strengthens the bearish outlook.
Patience is key—wait for price action confirmation before shorting.
The target zone of 190.400 aligns with the larger timeframe bearish bias.
交易進行
免責聲明
這些資訊和出版物並不意味著也不構成TradingView提供或認可的金融、投資、交易或其他類型的意見或建議。請在使用條款閱讀更多資訊。