OPEN-SOURCE SCRIPT
已更新 Volume Profile [ActiveQuants]
The Volume Profile indicator visualizes the distribution of trading volume across price levels over a user-defined historical period. It identifies key liquidity zones, including the Point of Control (POC) (price level with the highest volume) and the Value Area (price range containing a specified percentage of total volume). This tool is ideal for traders analyzing support/resistance levels, market sentiment, and potential price reversals.
█ CORE METHODOLOGY
█ KEY FEATURES
- Customizable Lookback & Resolution
- Configurable Profile Width & Horizontal Offset
- Value Area & POC Highlighting
- Flexible Display Options
- Gradient Coloring
- Real-Time Adjustments
█ USAGE EXAMPLES
Example 1: Basic Volume Profile with Value Area
Settings:
Image Context:
The profile appears on the right side of the chart. The POC (orange line) marks the highest volume row. Value Area rows (green/red) extend above/below the POC, containing 70% of total volume.

Example 2: Total Volume with Gradient Colors
Settings:
Image Context:
Rows display total volume in a single color with gradient transparency. Darker rows indicate higher volume concentration.

Example 3: Left-Aligned Profile with Narrow Value Area
Settings:
Image Context:
The profile shifts to the left, with a tighter Value Area (50%).

█ USER INPUTS
Calculation Settings
Appearance
█ CONCLUSION
The Volume Profile indicator provides a dynamic, customizable view of market liquidity. By highlighting the POC and Value Area, traders can identify high-probability reversal zones, gauge market sentiment, and align entries/exits with key volume levels.
█ IMPORTANT NOTES
⚠ Lookback Period: Shorter lookbacks prioritize recent activity but may omit critical levels.
⚠ Horizontal Offset Limitation: Avoid excessively high offsets (e.g., close to ±300). TradingView restricts plotting indicators more than 500 bars into the future, which may truncate or hide the profile.
⚠ Risk Management: While the indicator highlights areas of concentrated volume, always use it in combination with other technical analysis tools and proper risk management techniques.
█ RISK DISCLAIMER
Trading involves substantial risk. The Volume Profile highlights historical liquidity but does not predict future price movements. Always use stop-loss orders and confirm signals with additional analysis. Past performance is not indicative of future results.
📊 Happy trading! 🚀
█ CORE METHODOLOGY
- Vertical Price Rows: Divides the price range of the selected lookback period into equal-height rows.
- Volume Aggregation: Accumulates bullish/bearish or total volume within each price row.
- POC: The row with the highest total volume.
- Value Area: Expands from the POC until cumulative volume meets the user-defined threshold (e.g., 70%).
- Dynamic Visualization: Rows are plotted as horizontal boxes with widths proportional to their volume.
█ KEY FEATURES
- Customizable Lookback & Resolution
- Adjust the historical period (Lookback) and granularity (Number of Rows) for precise analysis.
- Configurable Profile Width & Horizontal Offset
- Control the relative horizontal length of the profile rows, and set the distance from the current bar to the POC row’s anchor.
Important: Do not set the horizontal offset too high. Indicators cannot be plotted more than 500 bars into the future.
- Value Area & POC Highlighting
- Set the percentage of total volume required to form the Value Area, ensuring that key volume levels are clearly identified.
- Value Area rows are colored distinctly, while the POC is marked with a bold line.
- Flexible Display Options
- Show bullish/bearish volume splits or total volume.
- Place the profile on the right or left of the chart.
- Gradient Coloring
- Rows fade in color intensity based on their relative volume strength.
- Real-Time Adjustments
- Modify horizontal offset, profile width, and appearance without reloading.
█ USAGE EXAMPLES
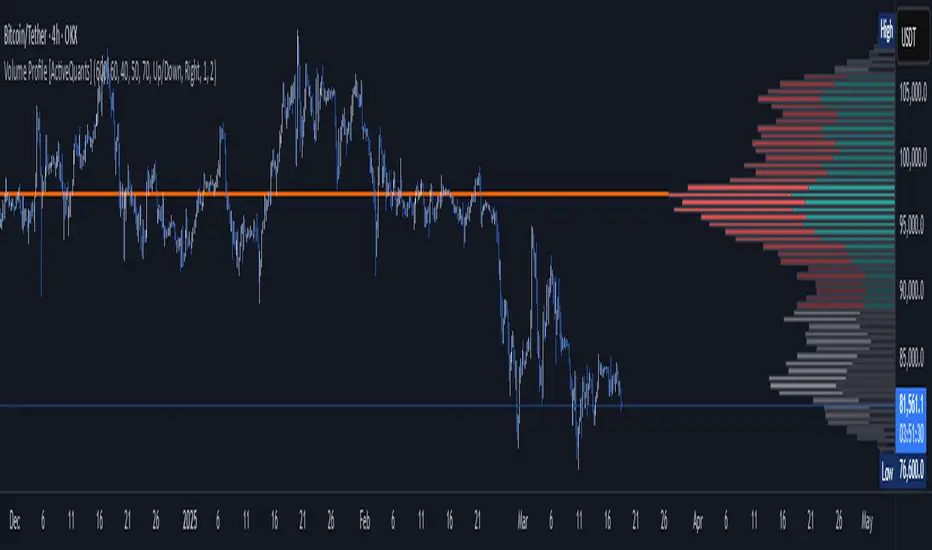
Example 1: Basic Volume Profile with Value Area
Settings:
- Lookback: 500 bars
- Number of Rows: 100
- Value Area: 70%
- Display Type: Up/Down
- Placement: Right
Image Context:
The profile appears on the right side of the chart. The POC (orange line) marks the highest volume row. Value Area rows (green/red) extend above/below the POC, containing 70% of total volume.
Example 2: Total Volume with Gradient Colors
Settings:
- Lookback: 800 bars
- Number of Rows: 100
- Profile Width: 60
- Horizontal Offset: 20
- Display Type: Total
- Gradient Colors: Enabled
Image Context:
Rows display total volume in a single color with gradient transparency. Darker rows indicate higher volume concentration.
Example 3: Left-Aligned Profile with Narrow Value Area
Settings:
- Lookback: 600 bars
- Number of Rows: 100
- Profile Width: 45
- Horizontal Offset: 500
- Value Area: 50%
- Profile Placement: Left
Image Context:
The profile shifts to the left, with a tighter Value Area (50%).
█ USER INPUTS
Calculation Settings
- Lookback: Historical bars analyzed (default: 500).
- Number of Rows: Vertical resolution of the profile (default: 100).
- Profile Width: Horizontal length of rows (default: 50).
- Horizontal Offset: Distance from the current bar to the POC (default: 50).
- Value Area (%): Cumulative volume threshold for the Value Area (default: 70%).
- Volume Display: Toggle between Up/Down (bullish/bearish) or Total volume.
- Profile Placement: Align profile to the Right or Left of the chart.
Appearance
- Rows Border: Customize border width/color.
- Gradient Colors: Enable fading color effects.
- Value Area Colors: Set distinct colors for bullish and bearish Value Area rows.
- POC Line: Adjust color, width, and visibility.
█ CONCLUSION
The Volume Profile indicator provides a dynamic, customizable view of market liquidity. By highlighting the POC and Value Area, traders can identify high-probability reversal zones, gauge market sentiment, and align entries/exits with key volume levels.
█ IMPORTANT NOTES
⚠ Lookback Period: Shorter lookbacks prioritize recent activity but may omit critical levels.
⚠ Horizontal Offset Limitation: Avoid excessively high offsets (e.g., close to ±300). TradingView restricts plotting indicators more than 500 bars into the future, which may truncate or hide the profile.
⚠ Risk Management: While the indicator highlights areas of concentrated volume, always use it in combination with other technical analysis tools and proper risk management techniques.
█ RISK DISCLAIMER
Trading involves substantial risk. The Volume Profile highlights historical liquidity but does not predict future price movements. Always use stop-loss orders and confirm signals with additional analysis. Past performance is not indicative of future results.
📊 Happy trading! 🚀
發行說明
Updates:
Updated row volume calculation method
開源腳本
本著TradingView的真正精神,此腳本的創建者將其開源,以便交易者可以查看和驗證其功能。向作者致敬!雖然您可以免費使用它,但請記住,重新發佈程式碼必須遵守我們的網站規則。
免責聲明
這些資訊和出版物並不意味著也不構成TradingView提供或認可的金融、投資、交易或其他類型的意見或建議。請在使用條款閱讀更多資訊。
開源腳本
本著TradingView的真正精神,此腳本的創建者將其開源,以便交易者可以查看和驗證其功能。向作者致敬!雖然您可以免費使用它,但請記住,重新發佈程式碼必須遵守我們的網站規則。
免責聲明
這些資訊和出版物並不意味著也不構成TradingView提供或認可的金融、投資、交易或其他類型的意見或建議。請在使用條款閱讀更多資訊。