PROTECTED SOURCE SCRIPT
Reversal Entries [akshaykiriti1443]
Reversal Entries [akshaykiriti1443]: An In-Depth Guide
This indicator is designed to identify high-probability trend reversal points. Its primary goal is to pinpoint moments where the price attempts to break a key level, fails, and then snaps back with force. These "fakeouts" or "liquidity grabs" are often powerful signals that the market is about to reverse course.
The indicator provides two clear signals:
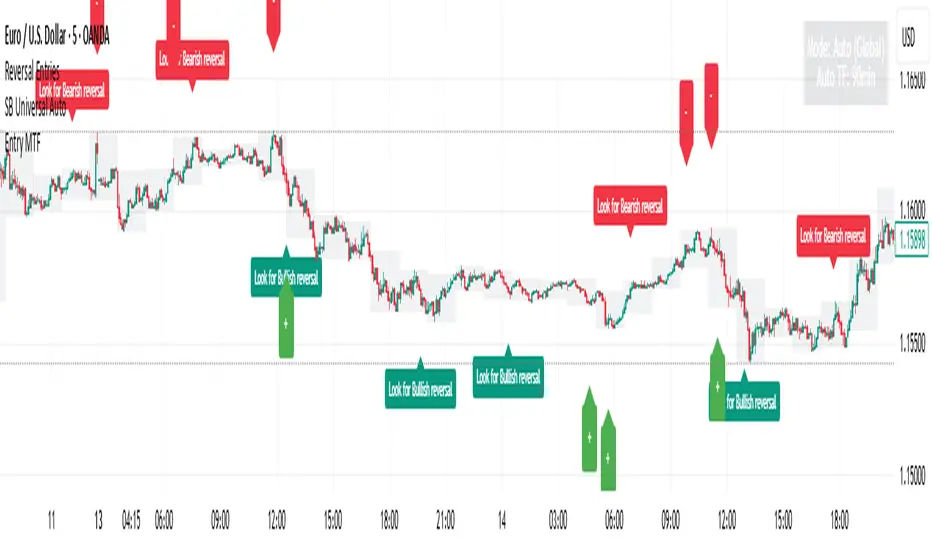
* 🟢 **A Bullish "Bounce Point"**: A potential buy signal after price dips below support and recovers.
* 🔴 **A Bearish "Rejection Point"**: A potential sell signal after price spikes above resistance and is pushed back down.
---
## The Core Logic: What Makes a Signal?
The indicator doesn't just look at one factor. Instead, it requires **three key conditions** to be met simultaneously before it generates a signal. This multi-layered approach helps filter out noise and identify only the most promising setups.
### 1. The Price Action "Fakeout" 🕵️♂️
This is the foundation of the signal. The indicator first identifies a short-term support or resistance level.
* **Support:** The lowest price over the `Lookback` period.
* **Resistance:** The highest price over the `Lookback` period.
It then waits for a specific pattern:
* For a **Bullish Bounce**, the current candle's low must dip **below** the support level, but its closing price must be **above** that same support level. This shows that sellers tried to push the price down but buyers stepped in with overwhelming force.
* For a **Bearish Rejection**, the current candle's high must poke **above** the resistance level, but its closing price must be **below** that same resistance level. This shows that buyers tried to break out, but sellers took control and slammed the price back down.
### 2. Volume Confirmation 🔊
A true reversal is almost always accompanied by a surge in trading activity. The indicator confirms the price action by checking for a **volume spike**.
It calculates the recent average volume and only accepts the signal if the volume on the reversal candle is significantly higher than that average (the default is 1.5 times higher). This confirms that there is real conviction and money behind the move, making it much more reliable.
### 3. Recovery Strength & Probability Score 💯
This is the indicator's "secret sauce." It doesn't just see a reversal; it measures *how strong* that reversal is.
* **Measuring the Recovery:** It uses the Average True Range (ATR) to measure the size of the price's recovery. For a bullish bounce, it measures the distance from the candle's low to its close. For a bearish rejection, it measures the distance from the high to the close. A long wick in the direction of the reversal signifies a powerful rejection of lower or higher prices.
* **Calculating a Probability Score:** The indicator takes the volume spike confirmation and the recovery strength and feeds them into a mathematical formula (a sigmoid function) to generate a "probability score" between 0 and 1. Think of this as a confidence score.
* **Applying the Threshold:** A signal is only plotted on your chart if this confidence score is above the `Probability Threshold` (default is 0.7, or 70%). This is the final filter that ensures only high-conviction setups are shown.
---
## How to Use the Indicator in Your Trading
This indicator provides entry signals, but it should be used as part of a complete trading plan.
### Understanding the Signals
* **Green `+` (Bounce Point):** When you see this signal below a candle, it's a potential **BUY entry**. It suggests that the downward momentum has been rejected and the price may be ready to move higher.
* **Red `-` (Rejection Point):** When you see this signal above a candle, it's a potential **SELL entry**. It suggests that the upward momentum has failed and the price may be ready to fall.
### Example Trading Strategy
1. **Entry:** Enter a trade when a signal appears. For a green `+`, place a buy order. For a red `-`, place a sell order.
2. **Stop Loss:** A logical stop loss is crucial.
* For a **buy trade**, place your stop loss just below the low of the signal candle. If the price breaks this low, the reversal idea is invalidated.
* For a **sell trade**, place your stop loss just above the high of the signal candle. If the price breaks this high, the setup has failed.
3. **Take Profit:** Your take profit should be based on your own strategy. A common approach is to target the next significant support or resistance level or use a fixed risk-to-reward ratio (e.g., 1:1.5 or 1:2).
**Important:** Always consider the overall market context. These signals tend to be more powerful when they align with the broader trend or occur at major, higher-timeframe support and resistance zones.
---
## Customizing the Settings
You can fine-tune the indicator's sensitivity in the settings menu to match your trading style and the asset you are trading.
* **`Support/Resistance Lookback`**: Controls how far back the indicator looks to find support and resistance. A **smaller number** makes it more sensitive to very recent price action. A **larger number** will focus on more significant, longer-term levels.
* **`Volume Spike Multiplier`**: Defines what counts as a "spike." Increasing this value (e.g., to 2.0) will demand a much larger volume surge, leading to fewer but potentially more reliable signals.
* **`ATR for Recovery`**: This sets the period for the ATR calculation, which is used to measure the recovery strength. It's generally best to leave this at its default unless you are an advanced user.
* **`Probability Threshold`**: This is the most important sensitivity setting.
* **Increase it** (e.g., to 0.85) for fewer, very high-quality signals.
* **Decrease it** (e.g., to 0.60) to see more potential setups, though some may be less reliable.
This indicator is designed to identify high-probability trend reversal points. Its primary goal is to pinpoint moments where the price attempts to break a key level, fails, and then snaps back with force. These "fakeouts" or "liquidity grabs" are often powerful signals that the market is about to reverse course.
The indicator provides two clear signals:
* 🟢 **A Bullish "Bounce Point"**: A potential buy signal after price dips below support and recovers.
* 🔴 **A Bearish "Rejection Point"**: A potential sell signal after price spikes above resistance and is pushed back down.
---
## The Core Logic: What Makes a Signal?
The indicator doesn't just look at one factor. Instead, it requires **three key conditions** to be met simultaneously before it generates a signal. This multi-layered approach helps filter out noise and identify only the most promising setups.
### 1. The Price Action "Fakeout" 🕵️♂️
This is the foundation of the signal. The indicator first identifies a short-term support or resistance level.
* **Support:** The lowest price over the `Lookback` period.
* **Resistance:** The highest price over the `Lookback` period.
It then waits for a specific pattern:
* For a **Bullish Bounce**, the current candle's low must dip **below** the support level, but its closing price must be **above** that same support level. This shows that sellers tried to push the price down but buyers stepped in with overwhelming force.
* For a **Bearish Rejection**, the current candle's high must poke **above** the resistance level, but its closing price must be **below** that same resistance level. This shows that buyers tried to break out, but sellers took control and slammed the price back down.
### 2. Volume Confirmation 🔊
A true reversal is almost always accompanied by a surge in trading activity. The indicator confirms the price action by checking for a **volume spike**.
It calculates the recent average volume and only accepts the signal if the volume on the reversal candle is significantly higher than that average (the default is 1.5 times higher). This confirms that there is real conviction and money behind the move, making it much more reliable.
### 3. Recovery Strength & Probability Score 💯
This is the indicator's "secret sauce." It doesn't just see a reversal; it measures *how strong* that reversal is.
* **Measuring the Recovery:** It uses the Average True Range (ATR) to measure the size of the price's recovery. For a bullish bounce, it measures the distance from the candle's low to its close. For a bearish rejection, it measures the distance from the high to the close. A long wick in the direction of the reversal signifies a powerful rejection of lower or higher prices.
* **Calculating a Probability Score:** The indicator takes the volume spike confirmation and the recovery strength and feeds them into a mathematical formula (a sigmoid function) to generate a "probability score" between 0 and 1. Think of this as a confidence score.
* **Applying the Threshold:** A signal is only plotted on your chart if this confidence score is above the `Probability Threshold` (default is 0.7, or 70%). This is the final filter that ensures only high-conviction setups are shown.
---
## How to Use the Indicator in Your Trading
This indicator provides entry signals, but it should be used as part of a complete trading plan.
### Understanding the Signals
* **Green `+` (Bounce Point):** When you see this signal below a candle, it's a potential **BUY entry**. It suggests that the downward momentum has been rejected and the price may be ready to move higher.
* **Red `-` (Rejection Point):** When you see this signal above a candle, it's a potential **SELL entry**. It suggests that the upward momentum has failed and the price may be ready to fall.
### Example Trading Strategy
1. **Entry:** Enter a trade when a signal appears. For a green `+`, place a buy order. For a red `-`, place a sell order.
2. **Stop Loss:** A logical stop loss is crucial.
* For a **buy trade**, place your stop loss just below the low of the signal candle. If the price breaks this low, the reversal idea is invalidated.
* For a **sell trade**, place your stop loss just above the high of the signal candle. If the price breaks this high, the setup has failed.
3. **Take Profit:** Your take profit should be based on your own strategy. A common approach is to target the next significant support or resistance level or use a fixed risk-to-reward ratio (e.g., 1:1.5 or 1:2).
**Important:** Always consider the overall market context. These signals tend to be more powerful when they align with the broader trend or occur at major, higher-timeframe support and resistance zones.
---
## Customizing the Settings
You can fine-tune the indicator's sensitivity in the settings menu to match your trading style and the asset you are trading.
* **`Support/Resistance Lookback`**: Controls how far back the indicator looks to find support and resistance. A **smaller number** makes it more sensitive to very recent price action. A **larger number** will focus on more significant, longer-term levels.
* **`Volume Spike Multiplier`**: Defines what counts as a "spike." Increasing this value (e.g., to 2.0) will demand a much larger volume surge, leading to fewer but potentially more reliable signals.
* **`ATR for Recovery`**: This sets the period for the ATR calculation, which is used to measure the recovery strength. It's generally best to leave this at its default unless you are an advanced user.
* **`Probability Threshold`**: This is the most important sensitivity setting.
* **Increase it** (e.g., to 0.85) for fewer, very high-quality signals.
* **Decrease it** (e.g., to 0.60) to see more potential setups, though some may be less reliable.
受保護腳本
此腳本以閉源形式發佈。 不過,您可以自由使用,沒有任何限制 — 點擊此處了解更多。
免責聲明
這些資訊和出版物並非旨在提供,也不構成TradingView提供或認可的任何形式的財務、投資、交易或其他類型的建議或推薦。請閱讀使用條款以了解更多資訊。
受保護腳本
此腳本以閉源形式發佈。 不過,您可以自由使用,沒有任何限制 — 點擊此處了解更多。
免責聲明
這些資訊和出版物並非旨在提供,也不構成TradingView提供或認可的任何形式的財務、投資、交易或其他類型的建議或推薦。請閱讀使用條款以了解更多資訊。