PROTECTED SOURCE SCRIPT
Range Breakout with Persistent Zone Bar Colors
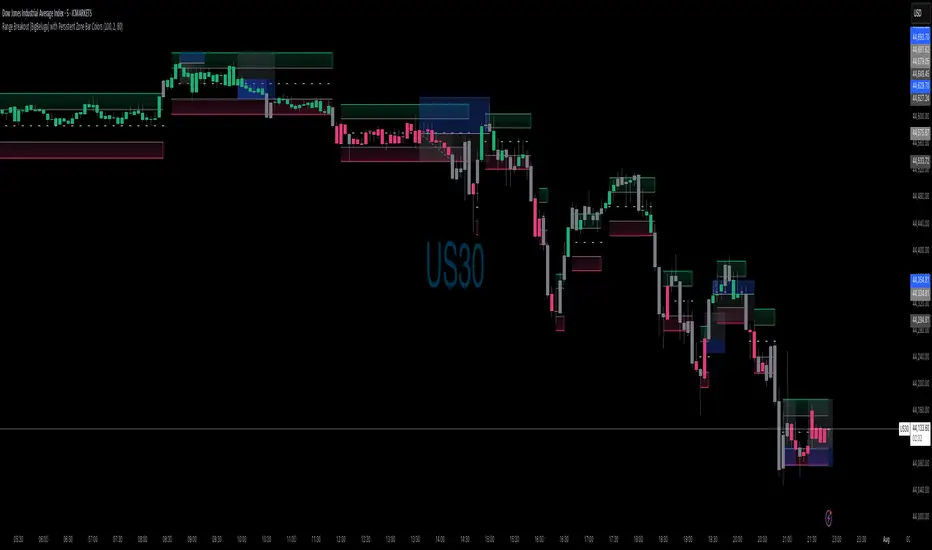
// DESCRIPTION:
// The "Range Breakout [BigBeluga] with Persistent Zone Bar Colors" indicator identifies and visualizes
// periods of consolidation (boxes or channels) based on an ATR‑driven range and highlights
// directional breakouts, zone entries, and persistent zone trends.
//
// KEY FEATURES:
// 1. ATR‑Based Channel Construction:
// • Computes a rolling channel around the midpoint (HL2) using a historical ATR length,
// scaled by the "Channel Width" multiplier. This channel represents the box or range.
// • Automatically resets when price closes beyond the upper or lower boundary, or after
// a user‑defined maximum number of bars (Length) inside the range.
//
// 2. Persistent Zone Bar Coloring:
// • Colors bars within the current box uniformly—green for bullish zones after an
// upward breakout, red for bearish zones after a downward breakout—based on the last
// breakout direction (trend). Bars outside the box use a neutral color.
// • Provides an at‑a‑glance view of whether price remains in a bullish or bearish box.
//
// 3. Zone Entry & Breakout Signals:
// • "New Bull Box" / "New Bear Box" labels mark each new zone formation at the reset bar.
// • "Enter Bull Zone" and "Enter Bear Zone" tiny labels flag when price first crosses into
// the lower or upper half of the box, spotlighting momentum within the range.
// • Classic breakout symbols (▲ for buys, ▼ for sells) appear when price decisively crosses
// the box mid‑lines, with optional filtering by trend.
// • Optional X markers identify potential fakeout attempts beyond the box boundaries.
//
// 4. Customizable Inputs:
// • LENGTH: Maximum bars before auto‑reset if no breakout occurs.
// • CHANNEL WIDTH: ATR multiplier controlling box height.
// • Color settings for channel lines, fills, labels, and both inside/outside bar coloring.
// • Options to show fakeouts (X signals) and filter ▲/▼ by breakout trend.
//
// USE CASES:
// • Consolidation & Breakout Strategy: Clearly visualize ranges where price consolidates
// and prepare for directional entries on breakout or zone entry.
// • Trend Detection: Persistent bar colors provide quick confirmation of current zone bias.
// • Momentum Assessment: Mid‑zone entry labels highlight shifts in momentum within boxes.
// • Risk Management: Time‑based resets ensure the channel does not become stale if no
// breakout occurs.
//
// HOW TO READ:
// 1. Watch for the channel box formation (colored fills between upper and lower lines).
// 2. A label "New Bull Box" or "New Bear Box" indicates the start of a fresh zone.
// 3. Bars inside that zone remain uniformly colored until a new breakout resets the box.
// 4. "Enter Bull Zone" / "Enter Bear Zone" marks when price first enters each half.
// 5. ▲ / ▼ symbols on mid‑line crossovers signal potential entries.
// 6. Outside the box, bars turn neutral, highlighting no‑trade or transition periods.
// 7. Adjust inputs to fit the time frame and volatility of your market.
//
// By leveraging both visual zone coloring and precise labels, this indicator streamlines
// range analysis, breakout timing, and bias confirmation into a single, intuitive tool.
受保護腳本
此腳本以閉源形式發佈。 不過,您可以自由使用,沒有任何限制 — 點擊此處了解更多。
免責聲明
這些資訊和出版物並非旨在提供,也不構成TradingView提供或認可的任何形式的財務、投資、交易或其他類型的建議或推薦。請閱讀使用條款以了解更多資訊。
受保護腳本
此腳本以閉源形式發佈。 不過,您可以自由使用,沒有任何限制 — 點擊此處了解更多。
免責聲明
這些資訊和出版物並非旨在提供,也不構成TradingView提供或認可的任何形式的財務、投資、交易或其他類型的建議或推薦。請閱讀使用條款以了解更多資訊。