Crypto Breadth | AlphaNatt\ Crypto Breadth | AlphaNatt\
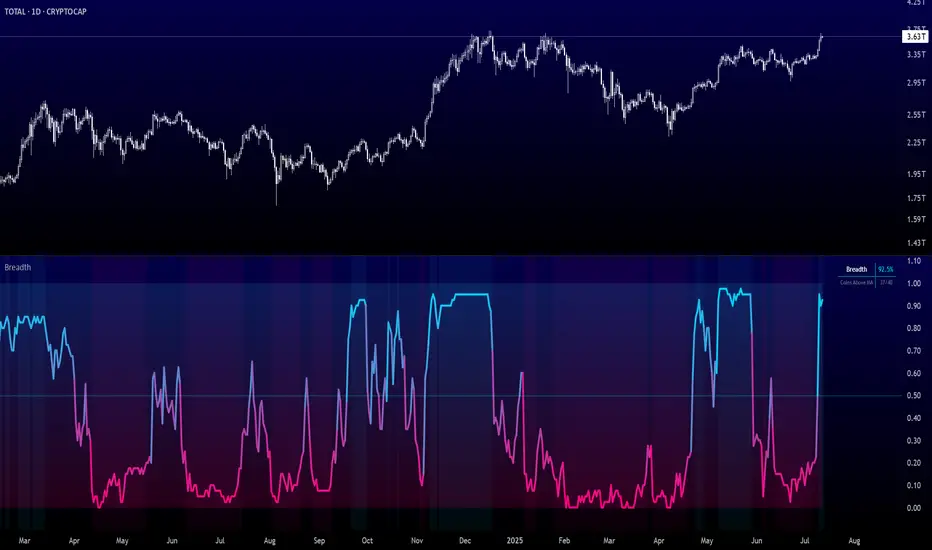
A dynamic, visually modern market breadth indicator designed to track the strength of the top 40 cryptocurrencies by measuring how many are trading above their respective 50-day moving averages. Built with precision, branding consistency, and UI enhancements for fast interpretation.
\ 📊 What This Script Does\
* Aggregates the performance of \ 40 major cryptocurrencies\ on Binance
* Calculates a \ breadth score (0.00–1.00)\ based on how many tokens are above their moving averages
* Smooths the breadth with optional averaging
* Displays the result as a \ dynamic, color-coded line\ with aesthetic glow and gradient fill
* Provides automatic \ background zones\ for extreme bullish/bearish conditions
* Includes \ alerts\ for key threshold crossovers
* Highlights current values in an \ information panel\
\ 🧠 How It Works\
* Pulls real-time `close` prices for 40 coins (e.g., XRP, BNB, SOL, DOGE, PEPE, RENDER, etc.)
* Compares each coin's price to its 50-day SMA (adjustable)
* Assigns a binary score:
• 1 if the coin is above its MA
• 0 if it’s below
* Aggregates all results and divides by 40 to produce a normalized \ breadth percentage\
\ 🎨 Visual Design Features\
* Smooth blue-to-pink \ color gradient\ matching the AlphaNatt brand
* Soft \ glow effects\ on the main line for enhanced legibility
* Beautiful \ multi-stop fill gradient\ with 16 transition zones
* Optional \ background shading\ when extreme sentiment is detected:
• Bullish zone if breadth > 80%
• Bearish zone if breadth < 20%
\ ⚙️ User Inputs\
* \ Moving Average Length\ – Number of periods to calculate each coin’s SMA
* \ Smoothing Length\ – Smooths the final breadth value
* \ Show Background Zones\ – Toggle extreme sentiment overlays
* \ Show Gradient Fill\ – Toggle the modern multicolor area fill
\ 🛠️ Utility Table (Top Right)\
* Displays live breadth percentage
* Shows how many coins (e.g., 27/40) are currently above their MA
\ 🔔 Alerts Included\
* \ Breadth crosses above 50%\ → Bullish signal
* \ Breadth crosses below 50%\ → Bearish signal
* \ Breadth > 80%\ → Strong bullish trend
* \ Breadth < 20%\ → Strong bearish trend
\ 📈 Best Used For\
* Gauging overall market strength or weakness
* Timing trend transitions in the crypto market
* Confirming trend-based strategies with broad market support
* Visual dashboard in macro dashboards or strategy overlays
\ ✅ Designed For\
* Swing traders
* Quantitative investors
* Market structure analysts
* Anyone seeking a macro view of crypto performance
Note: Not financial advise
廣量指標
Universal Trade Levels & Signal Classifierscript has been enhanced and generalized for all instruments — not just ES or SPX.
You now get the following classifications:
💎 Perfect Trade – trend confirmed, strong signal, ATR + VWAP + volume aligned
🚀 Sure Shot Trade – very high volume + ATR breakout + directional bias
⚡ Quick Call/Put – fast actionable setups
❌ No Trade – avoid/no confirmation
The logic works across any timeframe and any ticker.
You can now test this live on any instrument in TradingView. Let me know if you’d like to add things like:
Multi-timeframe confirmation
Re-entry logic
Heatmap table of confidence levels
Signal filtering based on RSI, OBV, etc.

Trend Impulse Channels (Zeiierman)█ Overview
Trend Impulse Channels (Zeiierman) is a precision-engineered trend-following system that visualizes discrete trend progression using volatility-scaled step logic. It replaces traditional slope-based tracking with clearly defined “trend steps,” capturing directional momentum only when price action decisively confirms a shift through an ATR-based trigger.
This tool is ideal for traders who prefer structured, stair-step progression over fluid curves, and value the clarity of momentum-based bands that reveal breakout conviction, pullback retests, and consolidation zones. The channel width adapts automatically to market volatility, while the step logic filters out noise and false flips.
⚪ The Structural Assumption
This indicator is built on a core market structure observation:
After each strong trend impulse, the market typically enters a “cooling-off” phase as profit-taking occurs and counter-trend participants enter. This often results in a shallow pullback or stall, creating a slight negative slope in an uptrend (or a positive slope in a downtrend).
These “cooling-off” phases don’t reverse the trend — they signal temporary pressure before the next leg continues. By tracking trend steps discretely and filtering for this behavior, Trend Impulse Channels helps traders align with the rhythm of impulse → pause → impulse.
⚪ Step-Based Trend Engine
At the heart of this tool is a dynamic step engine that progresses only when price crosses a predefined ATR-scaled trigger level:
Trigger Threshold (× ATR) – Defines how far price must break beyond the current trend state to register a new trend step.
Step Size (Volatility-Guided) – Each trend continuation moves the trend line in discrete units, scaling with ATR and trend persistence.
Trend Direction State – Maintains a +1/-1 internal bias to support directional filters and step tracking.
⚪ Volatility-Adaptive Channel
Each step is wrapped inside a dynamic envelope scaled to current volatility:
Upper and Lower Bands – Derived from ATR and band multipliers to expand/contract as volatility changes.
⚪ Retest Signal System
Optional signal markers show when price re-tests the upper or lower band:
Upper Retest → Pullback into resistance during a bearish trend.
Lower Retest → Pullback into support during a bullish trend.
⚪ Trend Step Signals
Circular markers can be shown to mark each time the trend steps forward, making it easy to identify structurally significant moments of continuation within a larger trend.
█ How to Use
⚪ Trend Alignment
Use the Trend Line and Step Markers to visually confirm the direction of momentum. If multiple trend steps occur in sequence without reversal, this typically signals strong conviction and trend persistence.
snapshot
⚪ Retest-Based Entries
Wait for pullbacks into the channel and monitor for triangle retest signals. When used in confluence with trend direction, these offer high-quality continuation setups.
snapshot
⚪ Breakouts
Look for breakouts beyond the upper or lower band after a longer period of pause. For higher likelihood of success, look for breakouts in the direction of the trend.
snapshot
█ Settings
Trigger Threshold (× ATR) - Defines how far price must move to register a new trend step. Controls sensitivity to trend flips.
Max Step Size (× ATR) - Caps how far each trend step can extend. Prevents runaway step expansion in high volatility.
Band Multiplier (× ATR) - Expands the upper and lower channels. Controls how much breathing room the bands allow.
Trend Hold (bars) - Minimum number of bars the trend must remain active before allowing a flip. Helps reduce noise.
Filter by Trend - Restrict retest signals to those aligned with the current trend direction.
-----------------
Disclaimer
The content provided in my scripts, indicators, ideas, algorithms, and systems is for educational and informational purposes only. It does not constitute financial advice, investment recommendations, or a solicitation to buy or sell any financial instruments. I will not accept liability for any loss or damage, including without limitation any loss of profit, which may arise directly or indirectly from the use of or reliance on such information.
All investments involve risk, and the past performance of a security, industry, sector, market, financial product, trading strategy, backtest, or individual's trading does not guarantee future results or returns. Investors are fully responsible for any investment decisions they make. Such decisions should be based solely on an evaluation of their financial circumstances, investment objectives, risk tolerance, and liquidity needs.

Trend Impulse Channels (Zeiierman)Jun 8
Support & Resistance Aries
This indicator automatically identifies support and resistance levels based on the highest and lowest closing prices within a configurable period.
How it works:
The user sets a calculation period (default is 20 candles).
The indicator plots:
Green line = Support: lowest closing price within the period.
Red line = Resistance: highest closing price within the period.
Adjustable parameter:
Calculation Period (1 to 200): defines how many candles are used to find the price extremes.
Purpose:
Helps users quickly visualize dynamic support and resistance zones that adjust as price evolves, making it easier to identify areas for potential entries, exits, and stop placements.
Important:
This indicator should not be used as a standalone buy or sell signal, nor as a trend confirmation tool on its own.
It is recommended to use it in combination with other technical analysis tools such as MACD, RSI, Volume, Moving Averages, among others, for a more complete market view.
Disclaimer:
Investing involves financial risk. Be cautious with both profits and losses. Always define a stop loss to avoid larger losses if the trend reverses.
One of the golden rules in trading is: a trader should not lose more than 3% to 5% of their capital per trade. Protecting your capital should always be the priority.

Today High/Low Lines [tzuriamos]Displays the current day's highs and lows that exist in the market.
Once a high or low is taken, it is updated.

جدول تقاطع المتوسطات وموقع المتوسط بالنسبة للسعر (دقيق)A moving average for the average and a varied and consolidated average in different formats, determining the direction of all moving and good averages.

Market Breadth TableDisplay overall market condition, can select different trading market NYSE or NASDAQ, if declining stock number is more than advancing same day is not good for heavy traded long position
You can adjust the table position in the chart as well

Smart Volatility Squeeze + Trend Filter
Smart Volatility Squeeze + Trend Filter
This advanced indicator detects low-volatility squeeze conditions and plots breakout signals, helping you spot strong price moves before they happen.
How it works
This script combines Bollinger Bands (BB) and the Keltner Channel (KC) — two popular volatility tools — to identify squeeze setups:
A squeeze occurs when the Bollinger Bands contract and move completely inside the Keltner Channel. This means the market is quiet and volatility is low — often right before a significant breakout.
When the squeeze condition is active, the background highlights the chart area with a soft color that gradually intensifies the longer the squeeze lasts. This gives a clear visual cue that pressure is building.
A breakout signal triggers when price crosses above the upper Bollinger Band (bullish) or below the lower Bollinger Band (bearish) — confirming that the squeeze has ended and a new impulse is likely starting.
To reduce false breakouts, you can enable the built-in trend filter. By default, it uses a simple EMA: breakouts are confirmed only if the price action aligns with the overall trend direction.
Key features
🔹 Bollinger Bands + Keltner Channel squeeze detection
🔹 Automatic squeeze marker and background shading
🔹 Breakout arrows for up and down signals
🔹 Optional trend filter with adjustable EMA length
🔹 Works on any market: crypto, stocks, forex, indices
🔹 Fully adjustable inputs for BB, KC and trend filter
🔹 Built-in ready-to-use alerts for breakouts
How to use
Watch for areas where the squeeze condition appears — the background will highlight them.
Wait for a breakout arrow to appear outside the bands.
Use the trend filter to focus only on breakouts in the dominant trend direction.
Combine with your existing risk management and confirmation tools.
Inputs
BB Length & StdDev: Control the Bollinger Bands settings.
KC EMA Length & ATR Multiplier: Control the Keltner Channel width.
Trend Filter Length: Adjust how smooth or sensitive the trend filter is.
Use Trend Filter: Enable or disable confirmation by trend direction.
Disclaimer
⚠️ This script is for educational purposes only and does not constitute financial advice. Always test any strategy thoroughly and trade at your own risk.

6868//@version=5
indicator(title='6868', shorttitle='ICHI', overlay=true)
// Version 1.1
// Created by NgheTrader
TS_D1 = input.int(9, minval=1, title='Tenkan-sen')
KS_D1 = input.int(17, minval=1, title='Kijun-sen')
TS_D2 = input.int(65, minval=1, title='Tenkan-sen')
KS_D2 = input.int(129, minval=1, title='Kijun-sen')
Chikou_Displacement = input.int(25, minval=1, title='Chikou-span')
SB = input.int(26, minval=1, title='Senko Span B')
donchian(len) =>
math.avg(ta.lowest(len), ta.highest(len))
Tenkan = donchian(TS_D1)
Kijun = donchian(KS_D1)
KumoA = math.avg(Tenkan, Kijun)
KumoB = donchian(SB)
DG65 = donchian(TS_D2)
DG129 = donchian(KS_D2)
plot(Tenkan, color=color.new(#0fc7db, 10), title='Tenkan-sen', linewidth=2)
plot(Kijun, color=color.new(#f00f0f, 10), title='Kijun-sen', linewidth=2)
plot(DG65, color=color.new(#f8e804e6, 10), title='dg65', linewidth=2)
plot(DG129, color=color.new(#f99b04, 10), title='DG129', linewidth=2)
plot(close, offset=-Chikou_Displacement, color=color.new(#9c27b0, 10), title='Chikou-span', linewidth=2)
p1 = plot(KumoA, offset=Chikou_Displacement, color=color.new(#0cb71a, 0), linewidth=1, title='Span A')
p2 = plot(KumoB, offset=Chikou_Displacement, color=color.new(#afaaaac5,0), linewidth=1, title='Span B')
fill(p1, p2, color=KumoA > KumoB ? color.new(#106323,80) : color.new(#e4e1e1,0), title='Kumo Cloud')
// Plot Future Lines
Midpoint_future1(len) =>
math.avg(ta.highest(len - 1), ta.lowest(len - 1))
Midpoint_future2(len) =>
math.avg(ta.highest(len - 2), ta.lowest(len - 2))
Midpoint_future3(len) =>
math.avg(ta.highest(len - 3), ta.lowest(len - 3))
Midpoint_future4(len) =>
math.avg(ta.highest(len - 4), ta.lowest(len - 4))
Midpoint_future5(len) =>
math.avg(ta.highest(len - 5), ta.lowest(len - 5))
Midpoint_future6(len) =>
math.avg(ta.highest(len - 6), ta.lowest(len - 6))
Midpoint_future7(len) =>
math.avg(ta.highest(len - 7), ta.lowest(len - 7))
Midpoint_future8(len) =>
math.avg(ta.highest(len - 8), ta.lowest(len - 8))
Midpoint_future9(len) =>
math.avg(ta.highest(len - 9), ta.lowest(len - 9))
Midpoint_future10(len) =>
math.avg(ta.highest(len - 10), ta.lowest(len - 10))
Midpoint_future11(len) =>
math.avg(ta.highest(len - 11), ta.lowest(len - 11))
Midpoint_future12(len) =>
math.avg(ta.highest(len - 12), ta.lowest(len - 12))
Midpoint_future13(len) =>
math.avg(ta.highest(len - 13), ta.lowest(len - 13))
Midpoint_future14(len) =>
math.avg(ta.highest(len - 14), ta.lowest(len - 14))
// Plot Future Daily Kijun
KJ_Next_1 = Midpoint_future1(KS_D1)
KJ_Next_2 = Midpoint_future2(KS_D1)
KJ_Next_3 = Midpoint_future3(KS_D1)
KJ_Next_4 = Midpoint_future4(KS_D1)
KJ_Next_5 = Midpoint_future5(KS_D1)
KJ_Next_6 = Midpoint_future6(KS_D1)
KJ_Next_7 = Midpoint_future7(KS_D1)
KJ_Next_8 = Midpoint_future8(KS_D1)
KJ_Next_9 = Midpoint_future9(KS_D1)
KJ_Next_10 = Midpoint_future10(KS_D1)
plot(KJ_Next_1, color=color.new(#f00f0f, 10), linewidth=1, offset=1, show_last=1, style=plot.style_circles)
plot(KJ_Next_2, color=color.new(#f00f0f, 10), linewidth=1, offset=2, show_last=1, style=plot.style_circles)
plot(KJ_Next_3, color=color.new(#f00f0f, 10), linewidth=1, offset=3, show_last=1, style=plot.style_circles)
plot(KJ_Next_4, color=color.new(#f00f0f, 10), linewidth=1, offset=4, show_last=1, style=plot.style_circles)
plot(KJ_Next_5, color=color.new(#f00f0f, 10), linewidth=1, offset=5, show_last=1, style=plot.style_circles)
plot(KJ_Next_6, color=color.new(#f00f0f, 10), linewidth=1, offset=6, show_last=1, style=plot.style_circles)
plot(KJ_Next_7, color=color.new(#f00f0f, 10), linewidth=1, offset=7, show_last=1, style=plot.style_circles)
plot(KJ_Next_8, color=color.new(#f00f0f, 10), linewidth=1, offset=8, show_last=1, style=plot.style_circles)
plot(KJ_Next_9, color=color.new(#f00f0f, 10), linewidth=1, offset=9, show_last=1, style=plot.style_circles)
plot(KJ_Next_10,color=color.new(#f00f0f, 10), linewidth=1, offset=10, show_last=1, style=plot.style_circles)
// Plot Future Daily Tenkan
TS_Next_1 = Midpoint_future1(TS_D1)
TS_Next_2 = Midpoint_future2(TS_D1)
TS_Next_3 = Midpoint_future3(TS_D1)
TS_Next_4 = Midpoint_future4(TS_D1)
TS_Next_5 = Midpoint_future5(TS_D1)
TS_Next_6 = Midpoint_future6(TS_D1)
TS_Next_7 = Midpoint_future7(TS_D1)
TS_Next_8 = Midpoint_future8(TS_D1)
plot(TS_Next_1, color=color.new(#0fc7db, 10), linewidth=1, offset=1, show_last=1, style=plot.style_circles)
plot(TS_Next_2, color=color.new(#0fc7db, 10), linewidth=1, offset=2, show_last=1, style=plot.style_circles)
plot(TS_Next_3, color=color.new(#0fc7db, 10), linewidth=1, offset=3, show_last=1, style=plot.style_circles)
plot(TS_Next_4, color=color.new(#0fc7db, 10), linewidth=1, offset=4, show_last=1, style=plot.style_circles)
plot(TS_Next_5, color=color.new(#0fc7db, 10), linewidth=1, offset=5, show_last=1, style=plot.style_circles)
plot(TS_Next_6, color=color.new(#0fc7db, 10), linewidth=1, offset=6, show_last=1, style=plot.style_circles)
plot(TS_Next_7, color=color.new(#0fc7db, 10), linewidth=1, offset=7, show_last=1, style=plot.style_circles)
plot(TS_Next_8, color=color.new(#0fc7db, 10), linewidth=1, offset=8, show_last=1, style=plot.style_circles)
// Plot Future Kumo A
Next_KumoA_1 = Midpoint_future1(TS_D2)
Next_KumoA_2 = Midpoint_future2(TS_D2)
Next_KumoA_3 = Midpoint_future3(TS_D2)
Next_KumoA_4 = Midpoint_future4(TS_D2)
Next_KumoA_5 = Midpoint_future5(TS_D2)
Next_KumoA_6 = Midpoint_future6(TS_D2)
Next_KumoA_7 = Midpoint_future7(TS_D2)
Next_KumoA_8 = Midpoint_future8(TS_D2)
Next_KumoA_9 = Midpoint_future9(TS_D2)
plot(Next_KumoA_1, color=color.new(#f8e804e6, 10), linewidth=1, offset=1, show_last=1, style=plot.style_circles)
plot(Next_KumoA_2, color=color.new(#f8e804e6, 10), linewidth=1, offset=2, show_last=1, style=plot.style_circles)
plot(Next_KumoA_3, color=color.new(#f8e804e6, 10), linewidth=1, offset=3, show_last=1, style=plot.style_circles)
plot(Next_KumoA_4, color=color.new(#f8e804e6, 10), linewidth=1, offset=4, show_last=1, style=plot.style_circles)
plot(Next_KumoA_5, color=color.new(#f8e804e6, 10), linewidth=1, offset=5, show_last=1, style=plot.style_circles)
plot(Next_KumoA_6, color=color.new(#f8e804e6, 10), linewidth=1, offset=6, show_last=1, style=plot.style_circles)
plot(Next_KumoA_7, color=color.new(#f8e804e6, 10), linewidth=1, offset=7, show_last=1, style=plot.style_circles)
plot(Next_KumoA_8, color=color.new(#f8e804e6, 10), linewidth=1, offset=8, show_last=1, style=plot.style_circles)
plot(Next_KumoA_9, color=color.new(#f8e804e6, 10), linewidth=1, offset=9, show_last=1, style=plot.style_circles)
// Plot Future Kumo B
KB_Next_1 = Midpoint_future1(KS_D2)
KB_Next_2 = Midpoint_future2(KS_D2)
KB_Next_3 = Midpoint_future3(KS_D2)
KB_Next_4 = Midpoint_future4(KS_D2)
KB_Next_5 = Midpoint_future5(KS_D2)
KB_Next_6 = Midpoint_future6(KS_D2)
KB_Next_7 = Midpoint_future7(KS_D2)
KB_Next_8 = Midpoint_future8(KS_D2)
KB_Next_9 = Midpoint_future9(KS_D2)
KB_Next_10 = Midpoint_future10(KS_D2)
KB_Next_11 = Midpoint_future11(KS_D2)
KB_Next_12 = Midpoint_future12(KS_D2)
KB_Next_13 = Midpoint_future13(KS_D2)
KB_Next_14 = Midpoint_future14(KS_D2)
plot(KB_Next_1, color=color.rgb(253, 173, 0), linewidth=1, offset=1, show_last=1, style=plot.style_circles)
plot(KB_Next_2, color=color.rgb(253, 173, 0), linewidth=1, offset=2, show_last=1, style=plot.style_circles)
plot(KB_Next_3, color=color.rgb(253, 173, 0), linewidth=1, offset=3, show_last=1, style=plot.style_circles)
plot(KB_Next_4, color=color.rgb(253, 173, 0), linewidth=1, offset=4, show_last=1, style=plot.style_circles)
plot(KB_Next_5, color=color.rgb(253, 173, 0), linewidth=1, offset=5, show_last=1, style=plot.style_circles)
plot(KB_Next_6, color=color.rgb(253, 173, 0), linewidth=1, offset=6, show_last=1, style=plot.style_circles)
plot(KB_Next_7, color=color.rgb(253, 173, 0), linewidth=1, offset=7, show_last=1, style=plot.style_circles)
plot(KB_Next_8, color=color.rgb(253, 173, 0), linewidth=1, offset=8, show_last=1, style=plot.style_circles)
plot(KB_Next_9, color=color.rgb(253, 173, 0), linewidth=1, offset=9, show_last=1, style=plot.style_circles)
plot(KB_Next_10, color=color.rgb(253, 173, 0), linewidth=1, offset=10, show_last=1, style=plot.style_circles)
plot(KB_Next_11, color=color.rgb(253, 173, 0), linewidth=1, offset=11, show_last=1, style=plot.style_circles)
plot(KB_Next_12, color=color.rgb(253, 173, 0), linewidth=1, offset=12, show_last=1, style=plot.style_circles)
plot(KB_Next_13, color=color.rgb(253, 173, 0), linewidth=1, offset=13, show_last=1, style=plot.style_circles)
plot(KB_Next_14, color=color.rgb(253, 173, 0), linewidth=1, offset=14, show_last=1, style=plot.style_circles)
var line greenLine = na
var line redLine = na
xGreen = bar_index - 8
xRed = bar_index - 16
// Dùng khoảng 100 nến gần nhất để lấy phạm vi giá hiện hành
lookback = 100
top = ta.highest(high, lookback)
bottom = ta.lowest(low, lookback)
if bar_index > 17
line.delete(greenLine)
line.delete(redLine)
greenLine := line.new( x1 = xGreen, y1 = top, x2 = xGreen, y2 = bottom, color=color.new(#0fc7db, 85), width = 4)
redLine := line.new( x1 = xRed, y1 = top, x2 = xRed, y2 = bottom,color =color.new(#f00f0f, 85), width = 4 )


EMA Slope FilterEMA SLOPE FILTER....50EMA....You’ll see a line oscillating around zero; when it’s within ±0.1, treat the market as “flat.”

智能货币概念 [LuxAlgo]Designed to seamlessly integrate the complex "Smart Money Concepts" (SMC) directly onto your TradingView charts. It's more than just a single indicator; it's a complete analytical framework that automates the identification and visualization of key price action patterns used by institutional traders, helping you to decode the market like a professional.
Whether you are a newcomer to the world of SMC or a seasoned trader seeking to enhance your efficiency, this tool offers unparalleled insight.
Core Feature Highlights:
Dual Market Structure Analysis:
Automatically plots Breaks of Structure (BOS) and Changes of Character (CHoCH).
Uniquely differentiates between Internal Structure and Swing Structure, allowing you to grasp both short-term dynamics and the overarching trend for a more holistic market view.
Order Blocks (OB):
Precisely identifies both bullish and bearish Internal and Swing Order Blocks, highlighting key potential reversal zones.
Includes a built-in volatility filter (ATR or Cumulative Average Range) to effectively screen out insignificant blocks and automatically tracks if they have been "mitigated."
Liquidity Identification:
Automatically marks Equal Highs (EQH) and Equal Lows (EQL), clearly revealing the liquidity pools targeted by smart money.
Market Imbalances (FVG):
Intelligently detects and draws Fair Value Gaps (FVG), representing areas of imbalance where price is likely to return. It supports custom timeframes and an automatic threshold filter.
Premium & Discount Zones:
Based on the major swing structure, it automatically delineates Premium, Discount, and Equilibrium zones, helping you identify optimal locations for entries.
Multi-Timeframe (MTF) Confluence:
With a single click, you can overlay key high/low levels from the Previous Day, Week, and Month onto your current chart, providing powerful, higher-timeframe context for your trading decisions.
Unique Advantages:
Highly Customizable: From colors and styles to display modes (Historical vs. Present), nearly every element can be tailored to your personal preference, creating a bespoke analysis interface.
Real-time Alert System: Comprehensive alerts are built-in for all key events (BOS/CHoCH formation, Order Block mitigation, FVG appearance, etc.), ensuring you never miss a trading opportunity.
Clear Visual Presentation: It transforms abstract theories into intuitive on-chart markers and zones, significantly simplifying the learning curve and the daily analysis workflow.

GMMG BB50 and Signals with BTC Dominance & USD//@version=5
indicator("GMMG BB50 and Signals with BTC Dominance & USD", overlay=true)
// Define Bollinger Bands
length = 50
deviations = 0.2
basis = ta.sma(close, length)
dev = deviations * ta.stdev(close, length)
upperBand = basis + dev
lowerBand = basis - dev
// Plotting Bollinger Bands
plot(basis, color=color.blue, title="BB Basis")
p1 = plot(upperBand, color=color.blue, title="Upper Band")
p2 = plot(lowerBand, color=color.blue, title="Lower Band")
// Fill between the bands
fill(p1, p2, color=color.rgb(173, 216, 230, 90), title="BB Fill")
// Determine Bullish or Bearish conditions
bullish = close > upperBand
bearish = close < lowerBand
// Calculate RSI
rsiLength = 30
rsiValue = ta.rsi(close, rsiLength)
rsiAbove50 = rsiValue > 50
// Volume calculation
lookback = input(20, "Lookback Period", tooltip="The number of previous candles to check for volume")
highestVolume = ta.highest(volume, lookback)
currentVolume = volume
bullishVolumeCond = (currentVolume >= highestVolume) and (close >= open)
bearishVolumeCond = (currentVolume >= highestVolume) and (close < open)
// Volume Status
var string volumeStatusText = "Neutral"
var color volumeBgColor = color.new(color.white, 90)
if bullishVolumeCond
volumeStatusText := "Bullish Volume"
volumeBgColor := color.new(color.green, 80)
else if bearishVolumeCond
volumeStatusText := "Bearish Volume"
volumeBgColor := color.new(color.red, 80)
else
volumeStatusText := "Neutral"
volumeBgColor := color.new(color.white, 90)
// MACD calculation
= ta.macd(close, 12, 26, 9)
macdCrossAbove = ta.crossover(macdLine, signalLine)
macdCrossBelow = ta.crossunder(macdLine, signalLine)
var string macdStatusText = "Neutral"
var color macdBgColor = color.new(color.white, 90)
var string macdCrossoverStatus = "No Crossover"
if macdCrossAbove
macdStatusText := "MACD Bullish"
macdBgColor := color.new(color.green, 80)
macdCrossoverStatus := "Bullish Cross"
else if macdCrossBelow
macdStatusText := "MACD Bearish"
macdBgColor := color.new(color.red, 80)
macdCrossoverStatus := "Bearish Cross"
// Daily and 4H candles
= request.security(syminfo.tickerid, "D", )
isDailyBullish = dayClose > dayOpen
dailyCandleColor = isDailyBullish ? "Green" : "Red"
= request.security(syminfo.tickerid, "240", )
isHourlyBullish = hourClose > hourOpen
hourlyCandleColor = isHourlyBullish ? "Green" : "Red"
// Bitcoin Dominance and USD Index
btcDom = request.security("CRYPTOCAP:BTC.D", "D", close)
dxy = request.security("TVCD:DXY", "D", close)
plot(btcDom, title="BTC Dominance", color=color.orange)
plot(dxy, title="USD Index (DXY)", color=color.purple)
// Combined table setup and update will go here... (you can continue merging the remaining table code as needed)

حساب الأرباح والخسائر بالدولار مع رأس المال - Waseem elessiحساب الارباح وخسائر بكل سهولة ولا تحتاج الي فهمها سواء كان فهمها معقد او بسيط انا اقدم لك هذا كي يسهل عليك حساب الارباح وخسائر بسهولة بكل سهولة هذا لوجه الله تعالي واتمنى الدعاء لي بالتوفيق والسداد في جميع اموري القادمة.
Calculating profits and other things with ease. If you need to understand them, whether understanding them is complex or simple, I present this to you so that you can easily calculate profits and other things with ease. This is for the sake of God Almighty, and I hope you will pray for me to succeed and be guided in all my future affairs.


Turtle Trading System + ATRTurtle Trading System + ATR
This Pine Script v5 indicator implements a Turtle Trading System with ATR integration.
It plots a 20-day high (red), 20-day low (blue), and an ATR-based level (orange) shifted upward by a user-defined percentage (default 5%).
Customizable inputs include lookback period (default 20), ATR period (default 14), and ATR offset.
Dynamic labels show the 20-day high, low, and ATR values at the current bar, updating with price.
Suitable for trend-following strategies, it highlights breakout and volatility levels.

Check List RSI Đồng Thuận Liền Kề + Gợi ý + Âm thanh + Vùngvào lệnh khung m15 Vợi sự đồng thuận của RSI ở các khung lớn hơn và nhỏ hơn liền kề : m5, m15,h1,h4

3% Price RangeThe simplest way to track a 3% range is to calculate it directly:
Upper Limit: Current Spot Price * 1.03
Lower Limit: Current Spot Price * 0.97

Trendline Breakouts With Targets [ Chartprime ]The Trendline Breakouts With Targets indicator is meticulously crafted to improve trading decision-making by pinpointing trendline breakouts and breakdowns through pivot point analysis.
Here's a comprehensive look at its primary functionalities:
Upon the occurrence of a breakout or breakdown, a signal is meticulously assessed against a false signal condition/filter, after which the indicator promptly generates a trading signal. Additionally, it conducts precise calculations to determine potential target levels and then exhibits them graphically on the price chart.

MP AMS (100 bars)Indicator Name: ICT Nested Pivots: Advanced Structure with Color Control
Description:
This indicator identifies and labels nested pivot points across three levels of market structure:
Short-Term Pivots (STH/STL)
Intermediate-Term Pivots (ITH/ITL)
Long-Term Pivots (LTH/LTL)
It detects local highs and lows using a user-defined lookback period and categorizes them into short, intermediate, and long-term pivots based on their relative strength compared to surrounding pivots.
Key Features:
Multi-level pivot detection: Nested identification of short, intermediate, and long-term highs and lows.
Customizable display: Toggle visibility of each pivot level independently for both highs and lows.
Color control: Customize colors for high and low pivot labels and text for enhanced chart readability.
Clear labeling: Each pivot is marked with intuitive labels ("STH", "ITH", "LTH" for highs and "STL", "ITL", "LTL" for lows) placed above or below bars accordingly.
Safe plotting: Avoids errors by validating data and only plotting labels within the lookback range.
This tool helps traders visually analyze market structure and identify key turning points at different time scales directly on their price charts.

Elliott Wave Helper//@version=5
indicator("Elliott Wave Helper", overlay=true)
// Settings
pivotLength = input.int(5, "Pivot Length")
showLabels = input.bool(true, "Show Wave Labels")
zigzagColor = input.color(color.orange, "Zigzag Line Color")
// Find Pivot Highs and Lows
pivotHigh = ta.pivothigh(high, pivotLength, pivotLength)
pivotLow = ta.pivotlow(low, pivotLength, pivotLength)
// Store pivots
var float pivotPrices = array.new_float()
var int pivotBars = array.new_int()
if not na(pivotHigh)
array.push(pivotPrices, pivotHigh)
array.push(pivotBars, bar_index - pivotLength)
if not na(pivotLow)
array.push(pivotPrices, pivotLow)
array.push(pivotBars, bar_index - pivotLength)
// Draw zigzag line between pivots
for i = 1 to array.size(pivotBars) - 1
x1 = array.get(pivotBars, i - 1)
y1 = array.get(pivotPrices, i - 1)
x2 = array.get(pivotBars, i)
y2 = array.get(pivotPrices, i)
line.new(x1, y1, x2, y2, width=2, color=zigzagColor)
// Label waves as 1-5 or A-C (manual cycling)
if showLabels
waveLabels = array.from("1", "2", "3", "4", "5", "A", "B", "C")
labelText = array.get(waveLabels, (i - 1) % array.size(waveLabels))
label.new(x2, y2, text=labelText, style=label.style_label_up, textcolor=color.white, size=size.small, color=color.blue)

Hybrid Cumulative DeltaWhat does this indicator show?
This script displays two types of CVD (Cumulative Volume Delta):
1. Simple Cumulative Delta Volume:
This is the basic method:
pinescript
Kopiraj
Uredi
deltaVolume = volume * (close > close ? 1 : close < close ? -1 : 0)
➡️ It increases cumulative volume if the candle closes higher, and decreases it if it closes lower.
It's a simple assumption:
If the candle is bullish → more buying.
If bearish → more selling.
Then it's accumulated with:
pinescript
Kopiraj
Uredi
cumulativeDeltaVolume = ta.cum(deltaVolume)
It's plotted as candlesticks, rising or falling based on delta volume.
2. Monster Cumulative Delta (advanced method):
Uses a more complex formula, taking into account:
Candle range (high - low),
Relationship between open, close, and wicks,
Distribution of volume inside the candle.
pinescript
Kopiraj
Uredi
U1 = (close >= open ...) ? ...
D1 = (close < open ...) ? ...
Delta = close >= open ? U1 : -D1
cumDelta := nz(cumDelta ) + Delta
➡️ Purpose: to more realistically estimate aggressive buyers/sellers.
This is a refined CVD, ideal for markets without real order book data (like forex).
📍 What does the indicator tell us?
➕ If cumulative delta is rising:
Buyers are in control (more aggressive market buys).
➖ If cumulative delta is falling:
Sellers dominate (more aggressive market sells).
📈 How to read it on the chart:
You’ll see 2 candlestick plots:
One for the simple delta (green/red delta volume candles),
One for the monster delta, which is often smoother.
👉 The key is to watch for divergence between price and CVD:
If price goes up but CVD goes down → buyers are weak = potential reversal.
If price drops and CVD rises → selling pressure is weak = potential bounce.
🕐 Best timeframe (interval) for forex?
Timeframe Purpose Recommendation
1m–15m Scalping / short-term flow ✅ Works well, but needs high-volume pairs (e.g., EUR/USD, GBP/USD)
1H–4H Swing trading / intraday ✅ Best balance – reveals smart money movements
1D Macro overview, long-term volume Usable, but less granular info
🔹 Recommendation for forex: 4H interval
Enough volume data to detect shifts in real pressure.
Less noise than lower timeframes.
Great for spotting swing setups (e.g., divergences at support/resistance).

DIVAP RSI by:TMThe DIVAP RSI by:TM is a precision-focused RSI-based indicator designed to identify high-confidence entry and exit points. It uses a faster RSI (length 7) combined with extended levels (20 and 80) to capture momentum reversals at extreme zones.
✅ Green arrows signal entries when RSI crosses above 20 (exit from oversold)
✅ Red arrows signal exits when RSI crosses below 80 (exit from overbought)
This minimalist tool is ideal for traders who prefer clean chart setups with clear, timely alerts.
🔧 This is a test version and is actively being improved. Feedback is welcome!
