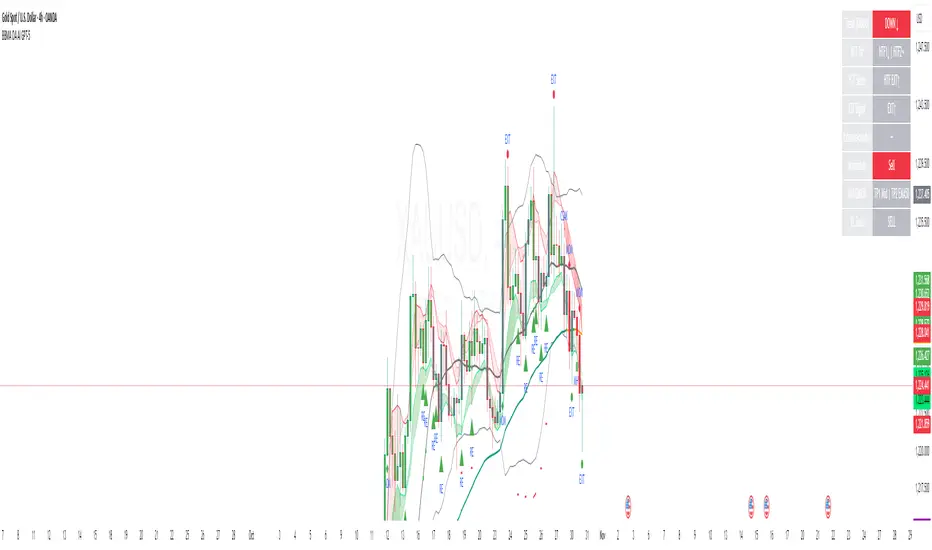
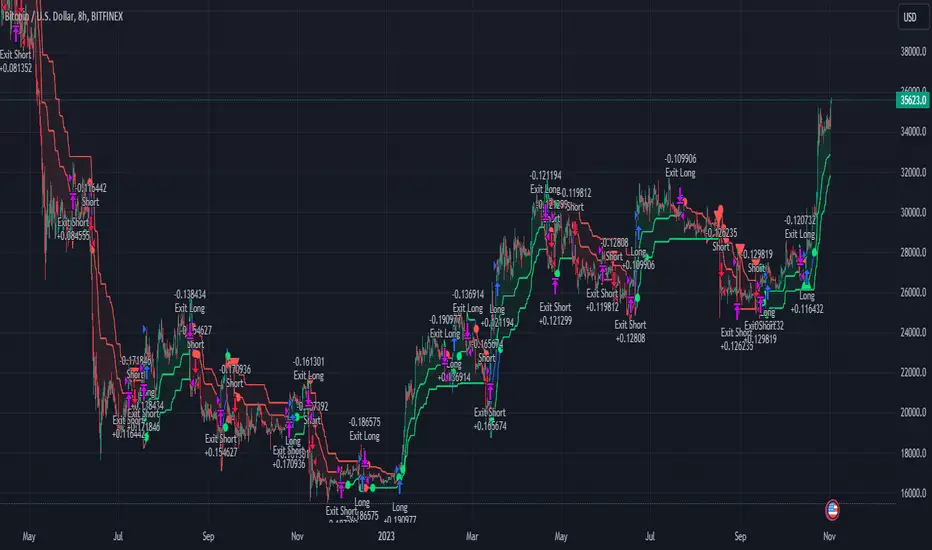
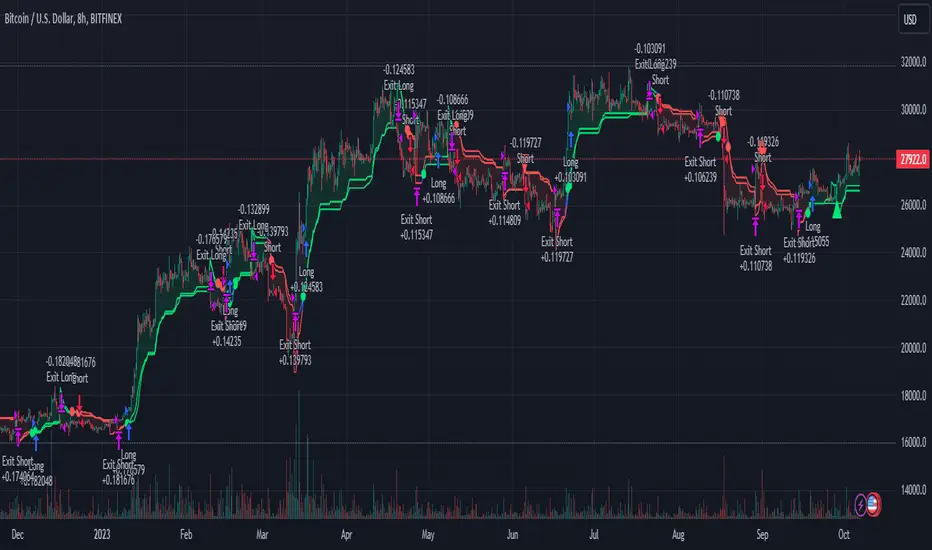
@InvInst AT - Probability Panel📌 @InvInst AT INDICATOR
📊 OVERVIEW
The AT Indicator uses ZGs to evaluate trends through probability-based calculations of bullish, sideways, or bearish outcomes. It works best with the ZG Indicator, which identifies Reversal Zones (ZG), trigger levels, and dynamic Fibonacci retracements across any timeframe and asset, offering an unbiased analysis. The accompanying chart demonstrates the AT Indicator as a below panel.
📊 VALUE OF THE INDICATOR…
No matter if you are a discretionary or a systematic trader, the result of this approach is game changer, since ensuring a single valid interpretation of asset trends, supported by key price and time points (ZG), (1) is crucial for robust analysis; (2) minimizes degrees of freedom for machine learning or AI algorithms applied to market data; (3) helps separate order from noise/chaos in a fully consistent and internally coherent manner.
For discretionary traders, having a single valid interpretation of a trend (1) minimizes emotional fatigue caused by constant reinterpretation and subjective data selection, (2) establishes a foundation for objective pattern recognition, and (3) provides a layer of information such as the real time probability that perfectly complements any other indicator or approach.
📊 FIRST THINGS FIRST: A BIT OF THEORY…
Definition of ZG
A ZG signifies a consolidation or inflection point where the previous trend might conclude. These formations are instrumental in the trend analysis of any asset, irrespective of the asset or timeframe. Formally, we define ZG_tf = (timestamp_zg, price_zg), indicating a ZG is represented as a pair consisting of its timestamp and price within a specified timeframe.
Types of ZGs
We categorize ZGs based on their directional implications:
✅ Bullish Reversal Zone (ZGA) – Regions where prices may rebound upward or consolidate following a downtrend.
✅ Bearish Reversal Zone (ZGB) – Regions where prices may reverse downward after an uptrend.
Furthermore, three distinct statuses are assigned to each ZG:
• Potential ZGs (ZGAPot and ZGBPot on the chart) – Zones anticipated to develop in the future, aiding in forecasting potential future trends.
• Current or Last Identified ZGs – The latest reversal zones detected for each timeframe.
• Confirmed ZGs – Validated zones that serve as static reference points delineating historical trends unequivocally.
📊 FUNCTIONALITY: WHAT IT DOES…
The AT Indicator provides detailed information on trend changes over time, potential future trends based on Potential ZGs, and a visual analysis of trend probabilities in two timeframes. The panel uses colors to represent trend directions: 🟢 green for bullish, 🔴 red for bearish, and 🔵 blue for sideways (color chosen based on feedback from visually impaired users).
The indicator structures the information as follows:
Upper half of the panel refers to the larger timeframe, and provides contextual information in terms of trend and trend probability, while the lower half of the panel corresponds to the chart’s timeframe (usually, the timeframe chosen by the user to trade).
The information for each timeframe is equally structured:
✅ It shows as a footprint the Current Trend for candle-by-candle, in what constitutes a clear and consistent map of the asset’s trip in terms of an objective and continuous trend.
✅ Additionally, it shows the potentially Future Trend using the information coming from Potential ZGs that could be identified next.
✅ The indicator also shows by default, candle-by-candle, the evolution of Net Probabilites —i.e., the difference between the probability of a Bullish trend and of a Bearish trend—. It usually helps the trader understand what the most likely direction is, and if the probability is gaining or losing momentum.
✅ Distribution of Trend Scenarios – The user can choose an alternative representation where the indicator shows in a visual way the probability assigned to either Bullish, Sideways and Bearish trend scenarios.
📊 KEY FEATURES: HOW IT DOES IT…
The AT Indicator is 100% original, devoid of public domain code, and operates independently of changeable parameters for individual assets. The calculation of the probability assigned to each scenario is based on the Euclidean distance of the price and the trigger levels that would alter the trend. Key features include:
🔹100% Objective Approach for the identification of ZGs based on mathematical equation systems.
🔹No Repainting – Use of available information at the time, avoiding reinterpretation of past data.
🔹Early Detection – Since it is a price action indicator, there is no delay in the identification of a change in the trend. The use of highs and lows, instead of ZGs have practical limitations and lagging effects that can also be avoided with ZGs.
🔹Dual Timeframe Analysis – Integrates smaller and larger timeframes for enhanced trend context.
🔹Based on Trend Definition – higher ZGBs and higher ZGAs for bullish trend, lower ZGBs and lower ZGAs for bearish, and all other cases classified as sideways trend.
📊 HOW TO USE IT…
The AT Indicator is 100% self-explanatory, its outcome is directly usable, as it provides an objective identification of the current and future asset’s trends, and the calculation of the probability as an unequivocal representation that any trader can understand right away . It only represents half of our comprehensive trend analysis, since our ZG Indicator complements and augments the AT Indicator's insights, providing historical ZGs as well as next Potential ZGs that could form in the future, and the trigger levels that would alter the trend. The combination of both indicators is recommended.
When the sign (color) of the Net Probabilities are the same in both timeframes, it is when the most directional deep moves take place. This can be used by any trader to determine the most likely direction of the next moves, as well as a simple yet efficient way to filter out non-directional moves.
📊 AVAILABLE SETTINGS
The AT Indicator offers a comprehensive settings window for full control of displayed information:
🔹 Number of ZGs for chart’s timeframe (optimizable for TradingView performance)
🔹 Larger Timeframe Selection (options vary per TradingView plan)
🔹 Number of ZGs for larger timeframes (optimizable for TradingView performance)
🔹 Enable/Disable Net Probablities (when disabled, the indicator shows the distribution of probabilities for each trend scenario)
📊 ADDITIONAL CONSIDERATIONS
As stated before, it only represents half of our comprehensive trend analysis, since our ZG Indicator complements and augments the AT Indicator's insights, providing historical ZGs as well as the next Potential ZGs that could form in the future, and the trigger levels that would alter the trend. The combination of both indicators is recommended.
Recommended timeframe combinations:
🔹 1-minute and 5-minutes - Suitable for scalpers
🔹 5-minutes and 15-minutes - Ideal for scalping and fine-tuning swing trades
🔹 1-hour and 4-hours - Beneficial for swing traders and long-term position adjustments
🔹 1-day and 1-week - Optimal for long-term investors
⚠️ Disclaimer: This indicator does not generate buy or sell signals. It is advised to use it alongside the AT Indicator and integrate it with additional technical analysis tools and risk management strategies.
在腳本中搜尋"ai"
@InvInst - ZG📌 ZG INDICATOR
📊 OVERVIEW
The ZG Indicator is a comprehensive tool for identifying Reversal Zones (ZG) across any timeframe and asset. Designed to support objective trend analysis, it does not depend on adjustable parameters for each asset and assists in discerning potential trend shifts and dynamic Fibonacci retracements without subjective user bias. It is most effective when used alongside the AT Indicator, which provides complementary insights by evaluating both current and future trends through probability-based calculations of bullish, sideways, or bearish outcomes. The accompanying chart demonstrates the ZG Indicator overlaid on price data.
📊 VALUE OF THE INDICATOR…
No matter if you are a discretionary or a systematic trader, the result of this approach is game changer, since ensuring a single valid interpretation of asset trends, supported by key price and time points (ZG), (1) is crucial for robust analysis; (2) minimizes degrees of freedom for machine learning or AI algorithms applied to market data; (3) helps separate order from noise/chaos in a fully consistent and internally coherent manner.
For discretionary traders, having a single valid interpretation of a trend (1) minimizes emotional fatigue caused by constant reinterpretation and subjective data selection, (2) establishes a foundation for objective pattern recognition, and (3) provides a layer of information such as the real time probability that perfectly complements any other indicator or approach.
📊 FIRST THINGS FIRST: A BIT OF THEORY…
Definition of ZG
A ZG signifies a consolidation or inflection point where the previous directional move might conclude. These formations are instrumental in the trend analysis of any asset, irrespective of the asset or timeframe. Formally, we define ZG_tf = (timestamp_zg, price_zg), indicating a ZG is represented as a pair consisting of its timestamp and price within a specified timeframe.
Types of ZGs
We categorize ZGs based on their directional implications:
✅ Bullish Reversal Zone (ZGA) – Regions where prices may rebound upward or consolidate following a downtrend.
✅ Bearish Reversal Zone (ZGB) – Regions where prices may reverse downward after an uptrend.
Furthermore, three distinct statuses are assigned to each ZG:
• Potential ZGs (ZGAPot and ZGBPot on the chart) – Zones anticipated to develop in the future, aiding in forecasting potential future trends.
• Current or Last Identified ZGs – The latest reversal zones detected for each timeframe.
• Confirmed ZGs – Validated zones that serve as static reference points delineating historical trends unequivocally.
📊 FUNCTIONALITY: WHAT IT DOES…
The ZG indicator is meant to be analyze objectively the trend of any asset. In order to do that, it needs to find the inflexion points in the time series that form the zig-zag shape of the trend. The ZG Indicator promptly identifies new ZGs without delay, illustrating both confirmed and identified ZGs, along with ranges for future Potential ZGs. Red labels indicate either confirmed or identified ZGBs, whereas green labels denote confirmed and identified ZGAs. The right side of the chart reveals the price ranges where future ZGs might materialize.
The indicator synthesizes data from two timeframes—the chart's timeframe and a larger one selected by the user—enabling a contextual comprehension of the asset's trend. Differentiated colors and labeling styles facilitate clear interpretation of the asset’s status.
Trigger levels altering the current trend…
Additionally, the ZG Indicator highlights trigger prices with dashed blue lines, signifying potential shifts in the trend for each selected timeframe in case they are passed.
Dynamic Fibonacci retracements utilized objectively and systematically…
The ZG Indicator leverages ZGAs and ZGBs to compute Fibonacci retracement areas (38.2%-61.8%) objectively for each timeframe, eliminating subjective selection of highs and lows typically seen in trading practices. Different colors help the user identify whether the Fibonacci retracements correspond to upward movements or downward movements.
Objective commentary interpreting the trend…
The trend analysis based on ZGs is entirely mathematical/objective, permitting only one valid interpretation. Users can enable comments, available in English or Spanish, detailing the current trend, trigger levels for trend changes, prospective ZG formation ranges, and the probability for each trend scenario of the last available candle.
📊 KEY FEATURES: HOW IT DOES IT…
The identification of either ZGA or ZGB -pivot points in a typically zig-zag shaped trend-, and future ZGAs and ZGBs relies on three foundational principles:
✅ Historical behavior... is examined to recognize price conditions that have usually met repeatedly in the past.
✅ Temporal dislocation... between trends of different magnitudes —such as short-term exhaustion within a still-intact longer-term trend— which often precedes a shift in market direction.
✅ Balance or imbalance between buying and selling pressure... when one side begins to weaken noticeably, it can signal an impending change in control, thereby increasing the likelihood of a reversal.
It uses the 4-ZG theorem, mathematically proven, in order to determine the trigger points that would unequivocally provoke a shift of the current trend into something different, as well as for the calculation of the probability attributable to each trend scenario —either bullish, sideways or bearish for each candle—, providing a real-time outcome as a readable comment that the user can leverage on to understand the strength of the trend.
The ZG Indicator is 100% original, as it uses our own proprietary algorithms protected by international intellectual property laws, devoid of public domain code. It operates independently of changeable parameters for individual assets. Key features include:
🔹100% Objective Approach for the identification of ZGs based on mathematical equation systems.
🔹No Repainting – Use of available information at the time, avoiding reinterpretation of past data.
🔹Early Detection – Since it is a price action indicator, there is no delay in the identification of new ZG. The use of highs and lows, instead of ZGs have practical limitations and lagging effects that can also be avoided with ZGs.
🔹Dual Timeframe Analysis – Integrates smaller and larger timeframes for enhanced trend context.
🔹Based on Trend Definition – higher ZGBs and higher ZGAs for bullish trend, lower ZGBs and lower ZGAs for bearish, and all other cases classified as sideways trend.
📊 HOW TO USE IT…
The user has only to read the comments provided for each timeframe to understand all the information provided by this indicator. The ZG Indicator is 100% self-explanatory, its outcome is directly usable, as it provides an objective interpretation as an unequivocal comment that any trader can understand and use right away. It is important to note that it only represents half of our comprehensive trend analysis, since our AT Indicator complements and augments the ZG Indicator's insights, providing the distribution of the probability assigned to bullish, sideways, and bearish trends over time, along with real-time assessments of current and future trends based on ZGs and potential ZGs. The combination of both indicators is recommended.
📊 AVAILABLE SETTINGS
The ZG Indicator offers a comprehensive settings window for full control of displayed information:
🔹 Number of ZGs for smaller timeframes (optimizable for TradingView performance)
🔹 Customizable colors for smaller timeframe ZG lines
🔹 Enable/Disable Fibonacci retracements for smaller timeframes
🔹 Larger Timeframe Selection (options vary per TradingView plan)
🔹 Number of ZGs for larger timeframes (optimizable for TradingView performance)
🔹 Customizable colors for larger timeframe ZG lines
🔹 Enable/Disable Fibonacci retracements for larger timeframes
🔹 Enable/Disable Lines Connecting ZGs
🔹 Activate/Deactivate Trigger Conditions for Trend Shifts (blue dashed lines indicating shift levels for each timeframe)
🔹 Show Trend Comment per Timeframe (only one correct interpretation due to 100% objective methodology)
🔹 Select Trend Comment Language (English or Spanish)
📊 ADDITIONAL CONSIDERATIONS
The ZG Indicator represents half of a comprehensive trend analysis. Our AT Indicator complements and augments the ZG Indicator's insights, providing the distribution of the probability assigned to bullish, sideways, and bearish trends, along with real-time assessments of current and future trends based on ZGs and potential ZGs. The combination of both indicators is recommended.
Recommended timeframe combinations:
🔹 1-minute and 5-minutes - Suitable for scalpers
🔹 5-minutes and 15-minutes - Ideal for scalping and fine-tuning swing trades
🔹 1-hour and 4-hours - Beneficial for swing traders and long-term position adjustments
🔹 1-day and 1-week - Optimal for long-term investors
⚠️ Disclaimer: This indicator does not generate buy or sell signals. It is advised to use it alongside the AT Indicator and integrate it with additional technical analysis tools and risk management strategies.
ETH Growth | AlchimistOfCrypto⚠️ DISCLAIMER: This indicator's source code is kept private as it represents a first-of-its-kind innovation in algorithmic cycle detection and visualization for Ethereum. The mathematical models and proprietary algorithms powering this indicator are the result of extensive research and development.
🌈 ETH Growth Rainbow – Unveiling Ethereum's Logarithmic Growth Fields 🌈
"The ETH Growth Rainbow, engineered through advanced logarithmic mathematics, visualizes the probabilistic distribution of Ethereum's price evolution within a multi-cycle growth paradigm. This indicator employs principles from logarithmic regression where coefficients p001, p002, and p003 create mathematical boundaries that define Ethereum's long-term value progression. Our implementation features algorithmically enhanced rainbow visualization derived from Fast Fourier Transform (FFT) spectral analysis, creating a dynamic representation of Ethereum's logarithmic growth with adaptive color gradients that highlight critical cycle-based phase transitions in the asset's monetary evolution."
📊 Professional Trading Application
The ETH Growth Rainbow transcends traditional price prediction models with a sophisticated multi-band illumination system that reveals the underlying structure of Ethereum's monetary evolution. Scientifically calibrated across multiple 85-week cycles (detected through spectral analysis) and featuring seamless rainbow visualization, it enables investors to perceive Ethereum's position within its macro growth trajectory with unprecedented clarity.
- Cycle Detection Methodology 🔬
The 85-week Ethereum cycle was discovered through sophisticated Fast Fourier Transform (FFT) analysis:
- Logarithmic price returns extracted from historical Ethereum data
- FFT decomposition identifies dominant frequency components in price movements
- Signal amplitude analysis reveals the 85-week cycle as the most statistically significant periodicity
- Adaptive frequency filtering validates cycle consistency across multiple market phases
- Cycle duration rounded to nearest week for practical application
- Visual Theming 🎨
Scientifically designed rainbow gradient optimized for cycle pattern recognition:
- Violet-Blue: Lower value accumulation zones with highest mathematical growth potential
- Green: Fair value equilibrium zone representing the regression mean
- Yellow-Orange: Moderate overvaluation regions indicating potential resistance
- Red: Statistical extreme zones indicating mathematical cycle peaks
- Deep Red: New euphoria band (+6) capturing exceptional market extremes
- Cycle Visualization 🔍
- Precise cycle boundaries demarcating Ethereum's fundamental cycle events
- Adaptive band spacing based on mathematical cycle progression (p003 = 0.858)
- Multiple sub-cycle markers revealing the probabilistic nature of Ethereum's trajectory
- Initial cycle starting from 0.1639 (August 3, 2015) to preserve historical accuracy
🚀 How to Use
1. Identify Macro Position ⏰: Locate Ethereum's current price relative to regression bands
2. Understand Cycle Context 🎚️: Note position within the current 85-week cycle for time-based analysis
3. Assess Mathematical Value 🌈: Determine potential over/undervaluation based on band location
4. Adjust Investment Strategy 🔎: Modulate position sizing based on mathematical value assessment
5. Identify Cycle Phases ✅: Monitor band transitions to detect accumulation and distribution zones
6. Invest with Precision 🛡️: Utilize lower bands for strategic accumulation, upper bands for strategic reduction
7. Manage Risk Dynamically 🔐: Scale investment allocations based on mathematical cycle positioning
#ethereum #ETH #cryptocurrency #tradingview #technicalanalysis #logarithmicregression #rainbowchart #cryptotrading #tradingstrategy #priceaction #cryptoinvesting #ethanalysis #tradingbands #cryptoresearch #FFTanalysis #cyclicalanalysis #ethinvestment #ethusd #buyandsell #accumulation #macroindicator #valueanalysis #priceprediction #ethgrowth #cryptosignals #cyclicpatterns #mathematicaltrading #AI #smartmoney #cryptowhales
Machine Learning | Adaptive Trend Signals [Bitwardex]⚙️🧠Machine Learning | Adaptive Trend Signals
🔷Overview
Machine Learning | Adaptive Trend Signals is a Pine Script™ v6 indicator designed to visualize market trends and generate signals through a combination of volatility clustering, Gaussian smoothing, and adaptive trend calculations. Built as an overlay indicator, it integrates advanced techniques inspired by machine learning concepts, such as K-Means clustering, to adapt to changing market conditions. The script is highly customizable, includes a backtesting module, and supports alert conditions, making it suitable for traders exploring trend-based strategies and developers studying volatility-driven indicator design.
🔷Functionality
The indicator performs the following core functions:
• Volatility Clustering: Uses K-Means clustering to categorize market volatility into high, medium, and low states, adjusting trend sensitivity accordingly.
• Trend Calculation: Computes adaptive trend lines (SmartTrend) based on volatility-adjusted standard deviation, smoothed RSI, and ADX filters.
• Signal Generation: Identifies potential buy and sell points through trend line crossovers and directional confirmation.
• Backtesting Module: Tracks trade outcomes based on the SmartTrend3 value, displaying win rate and total trades.
• Visualization: Plots trend lines with gradient colors and optional signal markers (bullish 🐮 and bearish 🐻).
• Alerts: Provides configurable alerts for trend shifts and volatility state changes.
🔷Technical Methodology
Volatility Clustering with K-Means
The indicator employs a K-Means clustering algorithm to classify market volatility, measured via the Average True Range (ATR), into three distinct clusters:
• Data Collection: Gathers ATR values over a user-defined training period (default: 100 bars).
• Centroid Initialization: Sets initial centroids at the highest, lowest, and midpoint ATR values within the training period.
• Iterative Clustering: Assigns ATR data points to the nearest centroid, recalculates centroid means, and repeats until convergence.
• Dynamic Adjustment: Assigns a volatility state (high, medium, or low) based on the closest centroid, adjusting the trend factor (e.g., tighter for high volatility, wider for low volatility).
This approach allows the indicator to adapt its sensitivity to varying market conditions, providing a data-driven foundation for trend calculations.
🔷Gaussian Smoothing
To enhance signal clarity and reduce noise, the indicator applies Gaussian kernel smoothing to:
• RSI: Smooths the Relative Strength Index (calculated from OHLC4) to filter short-term fluctuations.
• SmartTrend: Smooths the primary trend line for a more stable output.
The Gaussian kernel uses a sigma value derived from the user-defined smoothing length, ensuring mathematically consistent noise reduction.
🔷SmartTrend Calculation
The pineSmartTrend function is the core of the indicator, producing three trend lines:
• SmartTrend: The primary trend line, calculated using a volatility-adjusted standard deviation, smoothed RSI, and ADX conditions.
• SmartTrend2: A secondary trend line with a wider factor (base factor * 1.382) for signal confirmation.
SmartTrend3: The average of SmartTrend and SmartTrend2, used for plotting and backtesting.
Key components of the calculation include:
• Dynamic Standard Deviation: Scales based on ATR relative to its 50-period smoothed average, with multipliers (1.0 to 1.4) applied according to volatility thresholds.
• RSI and ADX Filters: Requires RSI > 50 for bullish trends or < 50 for bearish trends, alongside ADX > 15 and rising to confirm trend strength.
Volatility-Adjusted Bands: Constructs upper and lower bands around price action, adjusted by the volatility cluster’s dynamic factor.
🔷Signal Generation
The generate_signals function generates signals as follows:
• Buy Signal: Triggered when SmartTrend crosses above SmartTrend2 and the price is above SmartTrend, with directional confirmation.
• Sell Signal: Triggered when SmartTrend crosses below SmartTrend2 and the price is below SmartTrend, with directional confirmation.
Directional Logic: Tracks trend direction to filter out conflicting signals, ensuring alignment with the broader market context.
Signals are visualized as small circles with bullish (🐮) or bearish (🐻) emojis, with an option to toggle visibility.
🔷Backtesting
The get_backtest function evaluates signal outcomes using the SmartTrend3 value (rather than closing prices) to align with the trend-based methodology.
It tracks:
• Total Trades: Counts completed long and short trades.
• Win Rate: Calculates the percentage of trades where SmartTrend3 moves favorably (higher for longs, lower for shorts).
Position Management: Closes opposite positions before opening new ones, simulating a single-position trading system.
Results are displayed in a table at the top-right of the chart, showing win rate and total trades. Note that backtest results reflect the indicator’s internal logic and should not be interpreted as predictive of real-world performance.
🔷Visualization and Alerts
• Trend Lines: SmartTrend3 is plotted with gradient colors reflecting trend direction and volatility cluster, accompanied by a secondary line for visual clarity.
• Signal Markers: Optional buy/sell signals are plotted as small circles with customizable colors.
• Alerts: Supports alerts for:
• Bullish and bearish trend shifts (confirmed on bar close).
Transitions to high, medium, or low volatility states.
🔷Input Parameters
• ATR Length (default: 14): Period for ATR calculation, used in volatility clustering.
• Period (default: 21): Common period for RSI, ADX, and standard deviation calculations.
• Base SmartTrend Factor (default: 2.0): Base multiplier for volatility-adjusted bands.
• SmartTrend Smoothing Length (default: 10): Length for Gaussian smoothing of the trend line.
• Show Buy/Sell Signals? (default: true): Enables/disables signal markers.
• Bullish/Bearish Color: Customizable colors for trend lines and signals.
🔷Usage Instructions
• Apply to Chart: Add the indicator to any TradingView chart.
• Configure Inputs: Adjust parameters to align with your trading style or market conditions (e.g., shorter ATR length for faster markets).
• Interpret Output:
• Trend Lines: Use SmartTrend3’s direction and color to gauge market bias.
• Signals: Monitor bullish (🐮) and bearish (🐻) markers for potential entry/exit points.
• Backtest Table: Review win rate and total trades to understand the indicator’s behavior in historical data.
• Set Alerts: Configure alerts for trend shifts or volatility changes to support manual or automated trading workflows.
• Combine with Analysis: Use the indicator alongside other tools or market context, as it is designed to complement, not replace, comprehensive analysis.
🔷Technical Notes
• Data Requirements: Requires at least 100 bars for accurate volatility clustering. Ensure sufficient historical data is loaded.
• Market Suitability: The indicator is designed for trend detection and may perform differently in ranging or volatile markets due to its reliance on RSI and ADX filters.
• Backtesting Scope: The backtest module uses SmartTrend3 values, which may differ from price-based outcomes. Results are for informational purposes only.
• Computational Intensity: The K-Means clustering and Gaussian smoothing may increase processing time on lower timeframes or with large datasets.
🔷For Developers
The script is modular, well-commented, encouraging reuse and modification with proper attribution.
Key functions include:
• gaussianSmooth: Applies Gaussian kernel smoothing to any data series.
• pineSmartTrend: Computes adaptive trend lines with volatility and momentum filters.
• getDynamicFactor: Adjusts trend sensitivity based on volatility clusters.
• get_backtest: Evaluates signal performance using SmartTrend3.
Developers can extend these functions for custom indicators or strategies, leveraging the volatility clustering and smoothing methodologies. The K-Means implementation is particularly useful for adaptive volatility analysis.
🔷Limitations
• The indicator is not predictive and should be used as part of a broader trading strategy.
• Performance varies by market, timeframe, and parameter settings, requiring user experimentation.
• Backtest results are based on historical data and internal logic, not real-world trading conditions.
• Volatility clustering assumes sufficient historical data; incomplete data may affect accuracy.
🔷Acknowledgments
Developed by Bitwardex, inspired by machine learning concepts and adaptive trading methodologies. Community feedback is welcome via TradingView’s platform.
🔷 Risk Disclaimer
Trading involves significant risks, and most traders may incur losses. Bitwardex AI Algo is provided for informational and educational purposes only and does not constitute financial advice or a recommendation to buy or sell any financial instrument . The signals, metrics, and features are tools for analysis and do not guarantee profits or specific outcomes. Past performance is not indicative of future results. Always conduct your own due diligence and consult a financial advisor before making trading decisions.
EMA Oscillating Trend📈 EMA Oscillating Trend by AI-123
The EMA Oscillating Trend indicator is a dynamic trend visualizer that enhances traditional EMA behavior by offsetting the line based on trend direction, providing a more intuitive and visually distinct representation of market momentum.
🔍 Key Features:
🔵 Bullish Color Customization – Define your preferred color for bullish trends
🔴 Bearish Color Customization – Set a different tone for bearish phases
🪄 Adjustable Line Thickness – Tailor the EMA's appearance to your chart style
📐 Offset Multiplier Input – Automatically pushes the EMA above price in a downtrend and below price in an uptrend for enhanced clarity
⚙️ User-Friendly Inputs – No coding knowledge required; full customization in the settings panel
🧠 How It Works:
Calculates a primary EMA line (OV) and a sub-component to compare against (OV2)
Determines the trend based on whether OV is above or below OV2
Shifts the EMA line above price during bearish trends and below price during bullish trends
The offset is percentage-based and scales dynamically with the price for optimal readability
✅ Ideal For:
Trend-followers seeking visual clarity
Discretionary traders who want less clutter and more signal
Anyone who likes their EMAs with a little more flair and insight
🛠️ Author: @alphainvestor123
This tool was crafted with simplicity and clarity in mind. If you enjoy the indicator, consider dropping feedback or sharing your use case!
NexAlgo AI with Dynamic TP/SLThe NexAlgo Indicator combines a Gaussian kernel regression engine with adaptive volatility thresholds to generate clear, data‑driven trade signals and built‑in risk levels. It predicts the next bar’s price relative to a simple moving average, then measures the average deviation between actual and forecasted values to form dynamic bands. Breakouts beyond these bands, aligned with the prediction’s direction, produce buy or sell signals directly on your chart.
How It Works & What You’ll See
Kernel Regression Forecast: A rolling “lookback” window builds a Gaussian similarity matrix of recent prices. This matrix is used to project the next price, smoothing around a moving average.
Adaptive Volatility Bands: The indicator computes the mean absolute error between actual and predicted prices, multiplies it by your chosen volatility factor, and plots upper and lower bands.
Signal Triggers: When price closes above the upper band while the prediction is rising, a green “BUY” label appears; when price closes below the lower band as the forecast falls, a red “SELL” label is shown.
Automatic SL/TP Levels: After each signal, the script scans recent swing highs/lows and applies an ATR buffer. Stop‑loss is set conservatively at the more protective of these levels, while take‑profit is calculated by your reward‑to‑risk ratio and capped near the opposite swing extreme.
Customizable Inputs
Lookback Period & Smoothing: Adjust how many bars the regression and volatility calculations use, and tune the noise regularization to suit fast or slow markets.
Volatility Multiplier: Widen or tighten the adaptive bands to control signal frequency and confidence.
Swing Lookback & ATR Options: Define how far back the indicator searches for swing points, and choose between ATR calculation methods.
Reward‑to‑Risk Ratio: Set your preferred multiple of stop‑loss distance for take‑profit targets.
What Makes NexAlgo Different
Hybrid Statistical Approach: Unlike fixed‑period moving averages or standard regression, the Gaussian kernel adapts locally to evolving price patterns and regimes.
Self‑Adjusting Thresholds: Volatility bands derive from prediction errors—so they expand in choppy markets and contract in trending conditions.
Integrated Risk Controls: Automatically calculated stop‑loss and take‑profit levels remove manual guesswork, yet remain grounded in both ATR and price structure.
Trader‑Driven Flexibility: Every parameter—from lookback length to risk ratio—can be dialed in for scalping, swing trading, or longer‑term strategies.
Getting Started
• Apply NexAlgo to your preferred timeframe (5–15 min for intraday scalps, 1 h–4 h for swings, daily for position plays).
• Begin with default settings and gradually adjust lookback and smoothing to balance responsiveness versus noise.
• Experiment with volatility multipliers: tighten in strong trends, widen when markets churn.
• Backtest different ATR buffers and reward ratios to discover your ideal risk‑reward profile.
RSI Forecast [Titans_Invest]RSI Forecast
Introducing one of the most impressive RSI indicators ever created – arguably the best on TradingView, and potentially the best in the world.
RSI Forecast is a visionary evolution of the classic RSI, merging powerful customization with groundbreaking predictive capabilities. While preserving the core principles of traditional RSI, it takes analysis to the next level by allowing users to anticipate potential future RSI movements.
Real-Time RSI Forecasting:
For the first time ever, an RSI indicator integrates linear regression using the least squares method to accurately forecast the future behavior of the RSI. This innovation empowers traders to stay one step ahead of the market with forward-looking insight.
Highly Customizable:
Easily adapt the indicator to your personal trading style. Fine-tune a variety of parameters to generate signals perfectly aligned with your strategy.
Innovative, Unique, and Powerful:
This is the world’s first RSI Forecast to apply this predictive approach using least squares linear regression. A truly elite-level tool designed for traders who want a real edge in the market.
⯁ SCIENTIFIC BASIS LINEAR REGRESSION
Linear Regression is a fundamental method of statistics and machine learning, used to model the relationship between a dependent variable y and one or more independent variables 𝑥.
The general formula for a simple linear regression is given by:
y = β₀ + β₁x + ε
Where:
y = is the predicted variable (e.g. future value of RSI)
x = is the explanatory variable (e.g. time or bar index)
β0 = is the intercept (value of 𝑦 when 𝑥 = 0)
𝛽1 = is the slope of the line (rate of change)
ε = is the random error term
The goal is to estimate the coefficients 𝛽0 and 𝛽1 so as to minimize the sum of the squared errors — the so-called Random Error Method Least Squares.
⯁ LEAST SQUARES ESTIMATION
To minimize the error between predicted and observed values, we use the following formulas:
β₁ = /
β₀ = ȳ - β₁x̄
Where:
∑ = sum
x̄ = mean of x
ȳ = mean of y
x_i, y_i = individual values of the variables.
Where:
x_i and y_i are the means of the independent and dependent variables, respectively.
i ranges from 1 to n, the number of observations.
These equations guarantee the best linear unbiased estimator, according to the Gauss-Markov theorem, assuming homoscedasticity and linearity.
⯁ LINEAR REGRESSION IN MACHINE LEARNING
Linear regression is one of the cornerstones of supervised learning. Its simplicity and ability to generate accurate quantitative predictions make it essential in AI systems, predictive algorithms, time series analysis, and automated trading strategies.
By applying this model to the RSI, you are literally putting artificial intelligence at the heart of a classic indicator, bringing a new dimension to technical analysis.
⯁ VISUAL INTERPRETATION
Imagine an RSI time series like this:
Time →
RSI →
The regression line will smooth these values and extend them n periods into the future, creating a predicted trajectory based on the historical moment. This line becomes the predicted RSI, which can be crossed with the actual RSI to generate more intelligent signals.
⯁ SUMMARY OF SCIENTIFIC CONCEPTS USED
Linear Regression Models the relationship between variables using a straight line.
Least Squares Minimizes the sum of squared errors between prediction and reality.
Time Series Forecasting Estimates future values based on historical data.
Supervised Learning Trains models to predict outputs from known inputs.
Statistical Smoothing Reduces noise and reveals underlying trends.
⯁ WHY THIS INDICATOR IS REVOLUTIONARY
Scientifically-based: Based on statistical theory and mathematical inference.
Unprecedented: First public RSI with least squares predictive modeling.
Intelligent: Built with machine learning logic.
Practical: Generates forward-thinking signals.
Customizable: Flexible for any trading strategy.
⯁ CONCLUSION
By combining RSI with linear regression, this indicator allows a trader to predict market momentum, not just follow it.
RSI Forecast is not just an indicator — it is a scientific breakthrough in technical analysis technology.
⯁ Example of simple linear regression, which has one independent variable:
⯁ In linear regression, observations ( red ) are considered to be the result of random deviations ( green ) from an underlying relationship ( blue ) between a dependent variable ( y ) and an independent variable ( x ).
⯁ Visualizing heteroscedasticity in a scatterplot against 100 random fitted values using Matlab:
⯁ The data sets in the Anscombe's quartet are designed to have approximately the same linear regression line (as well as nearly identical means, standard deviations, and correlations) but are graphically very different. This illustrates the pitfalls of relying solely on a fitted model to understand the relationship between variables.
⯁ The result of fitting a set of data points with a quadratic function:
_______________________________________________________________________
🥇 This is the world’s first RSI indicator with: Linear Regression for Forecasting 🥇_______________________________________________________________________
_________________________________________________
🔮 Linear Regression: PineScript Technical Parameters 🔮
_________________________________________________
Forecast Types:
• Flat: Assumes prices will remain the same.
• Linreg: Makes a 'Linear Regression' forecast for n periods.
Technical Information:
ta.linreg (built-in function)
Linear regression curve. A line that best fits the specified prices over a user-defined time period. It is calculated using the least squares method. The result of this function is calculated using the formula: linreg = intercept + slope * (length - 1 - offset), where intercept and slope are the values calculated using the least squares method on the source series.
Syntax:
• Function: ta.linreg()
Parameters:
• source: Source price series.
• length: Number of bars (period).
• offset: Offset.
• return: Linear regression curve.
This function has been cleverly applied to the RSI, making it capable of projecting future values based on past statistical trends.
______________________________________________________
______________________________________________________
⯁ WHAT IS THE RSI❓
The Relative Strength Index (RSI) is a technical analysis indicator developed by J. Welles Wilder. It measures the magnitude of recent price movements to evaluate overbought or oversold conditions in a market. The RSI is an oscillator that ranges from 0 to 100 and is commonly used to identify potential reversal points, as well as the strength of a trend.
⯁ HOW TO USE THE RSI❓
The RSI is calculated based on average gains and losses over a specified period (usually 14 periods). It is plotted on a scale from 0 to 100 and includes three main zones:
• Overbought: When the RSI is above 70, indicating that the asset may be overbought.
• Oversold: When the RSI is below 30, indicating that the asset may be oversold.
• Neutral Zone: Between 30 and 70, where there is no clear signal of overbought or oversold conditions.
______________________________________________________
______________________________________________________
⯁ ENTRY CONDITIONS
The conditions below are fully flexible and allow for complete customization of the signal.
______________________________________________________
______________________________________________________
🔹 CONDITIONS TO BUY 📈
______________________________________________________
• Signal Validity: The signal will remain valid for X bars .
• Signal Sequence: Configurable as AND or OR .
📈 RSI Conditions:
🔹 RSI > Upper
🔹 RSI < Upper
🔹 RSI > Lower
🔹 RSI < Lower
🔹 RSI > Middle
🔹 RSI < Middle
🔹 RSI > MA
🔹 RSI < MA
📈 MA Conditions:
🔹 MA > Upper
🔹 MA < Upper
🔹 MA > Lower
🔹 MA < Lower
📈 Crossovers:
🔹 RSI (Crossover) Upper
🔹 RSI (Crossunder) Upper
🔹 RSI (Crossover) Lower
🔹 RSI (Crossunder) Lower
🔹 RSI (Crossover) Middle
🔹 RSI (Crossunder) Middle
🔹 RSI (Crossover) MA
🔹 RSI (Crossunder) MA
🔹 MA (Crossover) Upper
🔹 MA (Crossunder) Upper
🔹 MA (Crossover) Lower
🔹 MA (Crossunder) Lower
📈 RSI Divergences:
🔹 RSI Divergence Bull
🔹 RSI Divergence Bear
📈 RSI Forecast:
🔮 RSI (Crossover) MA Forecast
🔮 RSI (Crossunder) MA Forecast
______________________________________________________
______________________________________________________
🔸 CONDITIONS TO SELL 📉
______________________________________________________
• Signal Validity: The signal will remain valid for X bars .
• Signal Sequence: Configurable as AND or OR .
📉 RSI Conditions:
🔸 RSI > Upper
🔸 RSI < Upper
🔸 RSI > Lower
🔸 RSI < Lower
🔸 RSI > Middle
🔸 RSI < Middle
🔸 RSI > MA
🔸 RSI < MA
📉 MA Conditions:
🔸 MA > Upper
🔸 MA < Upper
🔸 MA > Lower
🔸 MA < Lower
📉 Crossovers:
🔸 RSI (Crossover) Upper
🔸 RSI (Crossunder) Upper
🔸 RSI (Crossover) Lower
🔸 RSI (Crossunder) Lower
🔸 RSI (Crossover) Middle
🔸 RSI (Crossunder) Middle
🔸 RSI (Crossover) MA
🔸 RSI (Crossunder) MA
🔸 MA (Crossover) Upper
🔸 MA (Crossunder) Upper
🔸 MA (Crossover) Lower
🔸 MA (Crossunder) Lower
📉 RSI Divergences:
🔸 RSI Divergence Bull
🔸 RSI Divergence Bear
📉 RSI Forecast:
🔮 RSI (Crossover) MA Forecast
🔮 RSI (Crossunder) MA Forecast
______________________________________________________
______________________________________________________
🤖 AUTOMATION 🤖
• You can automate the BUY and SELL signals of this indicator.
______________________________________________________
______________________________________________________
⯁ UNIQUE FEATURES
______________________________________________________
Linear Regression: (Forecast)
Signal Validity: The signal will remain valid for X bars
Signal Sequence: Configurable as AND/OR
Condition Table: BUY/SELL
Condition Labels: BUY/SELL
Plot Labels in the Graph Above: BUY/SELL
Automate and Monitor Signals/Alerts: BUY/SELL
Linear Regression (Forecast)
Signal Validity: The signal will remain valid for X bars
Signal Sequence: Configurable as AND/OR
Condition Table: BUY/SELL
Condition Labels: BUY/SELL
Plot Labels in the Graph Above: BUY/SELL
Automate and Monitor Signals/Alerts: BUY/SELL
______________________________________________________
📜 SCRIPT : RSI Forecast
🎴 Art by : @Titans_Invest & @DiFlip
👨💻 Dev by : @Titans_Invest & @DiFlip
🎑 Titans Invest — The Wizards Without Gloves 🧤
✨ Enjoy!
______________________________________________________
o Mission 🗺
• Inspire Traders to manifest Magic in the Market.
o Vision 𐓏
• To elevate collective Energy 𐓷𐓏
GranDoc - Week, Day, Month, and Session Separator5Indicator Name: GranDoc's - Week, Day, Month, and Session Separator
Version: Pine Script v5
Author: Jonpaul Nnamdi Opara (GranDoc )
Description
The "GranDoc - Week, Day, Month, and Session Separator" is a highly customizable TradingView indicator designed to enhance chart analysis by visually marking critical time-based transitions. Developed by Jonpaul Nnamdi Opara, this tool plots vertical lines with labels or background highlights to denote the start and end of weeks, days, months, and major trading sessions (Frankfurt, London, NY Morning, NY Afternoon, Sydney, and Tokyo). Traders can tailor colors, line styles, widths, transparency, and session times to align with their strategies and timezones.
Ideal for forex, stocks, futures, and crypto traders, this indicator simplifies the identification of key market periods—such as session openings/closings or new weeks—that often signal increased volatility or trend shifts. It’s optimized for intraday timeframes for session separators but supports all timeframes for week, day, and month markers, making it a versatile addition to any trader’s toolkit.
Features
Week Separators: Marks Monday starts with customizable lines and "Week Start" labels.
Day Separators: Highlights daily openings with lines and "Day Start" labels.
Month Separators: Indicates new months with lines and "Month Start" labels.
Session Separators: Plots lines and labels for major trading sessions’ start and end:
Frankfurt (default: 07:00–15:00 UTC)
London (default: 08:00–16:00 UTC)
NY Morning (default: 13:00–16:00 UTC)
NY Afternoon (default: 16:00–21:00 UTC)
Sydney (default: 22:00–06:00 UTC)
Tokyo (default: 00:00–08:00 UTC)
Timezone Support: Adjusts session times with a UTC offset (±12 hours).
Display Flexibility : Toggle between labeled vertical lines or background highlights.
Customization: Fine-tune colors, line styles (solid, dashed, dotted), widths, and transparency.
Background Mode: Highlights periods with translucent backgrounds for cleaner charts.
[ i]Labeled Lines: Each line includes descriptive labels (e.g., "London Open", "Tokyo Closed") when not in background mode.
How to Use
Add to Chart:
Copy the script into TradingView’s Pine Editor.
Click "Add to Chart" to apply the indicator.
Customize Settings:
Open settings via double-click or the "Settings" gear icon.
Timezone Offset: Set your UTC offset (e.g., -5 for EST) to align sessions.
Toggles: Enable/disable week, day, month, or session separators.
Appearance: Adjust colors, line styles, widths, and transparency for each separator.
Session Times: Modify start/end hours and minutes if defaults don’t suit your market.
Background Mode: Enable "Show as Background" for colored backgrounds instead of lines, and tweak "Session Background Transparency."
Labels: Labeled lines (e.g., "Sydney Open") appear automatically unless background mode is active.
Chart Compatibility:
Session separators require intraday timeframes (e.g., 1-minute to 4-hour).
Week, day, and month separators work across all timeframes.
Confirm your chart’s timezone aligns with your analysis.
Analyze:
Use separators to pinpoint session transitions, daily openings, or weekly shifts for trade planning.
Labels make it easy to spot key periods on busy charts.
Pair with indicators like RSI, volume, or support/resistance for deeper insights.
Example Use Cases
Forex Trading: Highlight London and NY session opens/closes for high-liquidity entries.
Day Trading: Reset strategies at daily separators and monitor intraday volatility.
Swing Trading: Use week/month separators to track longer-term trends.
Session Focus: Isolate sessions like Tokyo for regional market analysis.
Chart Clarity: Background mode declutters charts while marking key times.
Notes
Session separators are disabled on daily+ timeframes to prevent clutter.
Verify timezone offset for accurate session alignment.
Background mode suits lower timeframes for readability.
Labels are visible only when background mode is disabled.
Feedback
Share your thoughts or suggestions to make this indicator even better! Reach out via TradingView or connect with the author for insights. Happy trading!
About the Author
Dr. Jonpaul Nnamdi Opara, a PhD graduate from Ehime University, Japan, is a researcher and developer specializing in AI and machine learning. His work on automated landslide mapping and defect detection, published in journals like GEOMATE, showcases his precision-driven approach. With the "GranDoc" indicator, Jonpaul brings intuitive, data-driven clarity to financial markets, reflecting his expertise in creating impactful tools.
Tetris with Auto-PlayThis indicator is implemented in Pine Script™ v6 and serves as a demonstration of TradingView's capabilities. The core concept is to simulate a classic Tetris game by creating a grid-based environment and managing game state entirely within Pine Script.
Key Technical Aspects:
Grid Representation:
The script defines a custom grid structure using a user-defined type that holds the grid’s dimensions and a one-dimensional array to simulate a two-dimensional board. This structure is used to track occupied cells, clear full rows, and determine stack height.
Piece Management:
A second custom type is used to represent the state of a tetromino piece, including its type, rotation, and position. The code includes functions to calculate the block offsets for each tetromino based on its rotation state.
Collision Detection and Piece Locking:
Dedicated functions check for collisions against the grid borders and existing blocks. When a collision is detected during a downward move, the piece is locked into the grid, and any complete lines are cleared.
AIgo-Driven Placement:
The script incorporates a simple heuristic to determine the best placement for the next tetromino. It simulates different rotations and horizontal positions, evaluating each based on aggregated column height, cleared lines, holes, and bumpiness. This decision-making process is encapsulated in an AI-like function that returns the optimal rotation and placement.
Rendering Using Tables:
The visual representation is managed via TradingView’s table objects. The game board is rendered with a bordered layout, while a separate preview table displays the next piece and the current score. Each cell is updated with text and background colors that correspond to the state of the game.
Execution Flow and Timing:
The main execution loop handles real-time updates by dropping pieces at set intervals and checking for game-over conditions. The code leverages persistent variables and time comparisons to control game speed and manage transitions between piece drops.
Executing:
Add the indicator to the chart
It starts playing itself till game over
There are no parameters to change in this version but the grid in the code directly
p.s. Sadly we have no interactive buttons in the current pinescript versions to play ourself, but its about the possibilitys what we could do ;-)
Maybe in a future version there is more possible, if i find time to enhance and expand the idea
Have fun :-)
AlphaSignal | MindMarketAlphaSignal — Smart Indicator for Precise Entries
What does AlphaSignal do?
AlphaSignal looks for moments when the price moves too far from its average, volume spikes, and overall market activity increases. When these things line up, it gives you a clean, high-quality trading signal — either to buy or sell.
How it works :
Activity & Volume Detection
It monitors for sudden bursts in trading volume and volatility — clear signs that something important is happening in the market.
Price Deviation with Nadaraya-Watson Envelope
The indicator uses a smooth curve (called the Nadaraya-Watson estimate) to track the average price. When price drifts too far from this curve, it might be ready to snap back. That’s where AlphaSignal starts paying attention.
Signal Rating System
Each potential trade gets a score based on:
Market activity
Volume deviation
How far price is from the NW envelope
(Optionally) Trend strength and momentum via ADX, RSI, MACD
Only if the total score is high enough — a signal is fired.
Advanced Filters (Optional)
Want more confirmation? Turn on ADX, RSI, and MACD checks to avoid weak setups during choppy, low-trend periods.
Cooldown Logic
To avoid overtrading, AlphaSignal waits a set number of bars between signals — you can customize this.
Trading Suggestions (Signal Panel)
AlphaSignal gives you real-time trading guidance with a simple suggestion box:
BUY NOW / SELL NOW
All conditions are met, rating is strong — take action.
PREPARE BUY / PREPARE SELL
No full confirmation yet, but the price is very close to key levels (within 1.5% of the NW envelope). Get ready — a signal might appear soon.
AWAIT BUY / AWAIT SELL
The market is leaning toward a buy or sell, but price isn’t in a good spot yet. Be patient and watch for better positioning.
Multi-Signal Trading Indicator (MSTI)Multi-Signal Trading Indicator (MSTI)
Overview
The Multi-Signal Trading Indicator (MSTI) is a comprehensive technical analysis tool that combines eight powerful indicators into a single, unified system. Designed to identify high-probability trading opportunities, MSTI generates precise buy and sell signals by analyzing multiple market factors simultaneously. The indicator excels at detecting potential reversals and trend continuations while filtering out market noise.
Key Features
8 Core Technical Components
MACD: Identifies momentum changes and potential trend reversals
RSI: Detects overbought and oversold conditions
Bollinger Bands: Analyzes price volatility and extreme conditions
Stochastic Oscillator: Identifies potential turning points in price
Moving Averages: Confirms trend direction using dual SMAs
Volume Analysis: Validates price movements with volume confirmation
Fibonacci Levels: Identifies key support/resistance areas
Divergence Detection: Spots divergences between price and momentum
Advanced Predictive Capabilities
Volume Surge Detection: Identifies significant volume increases that often precede major price movements
Enhanced Divergence Analysis: Detects both regular and hidden divergences for early reversal signals
Support/Resistance Tests: Identifies successful tests of key support/resistance zones
Momentum Change Detection: Spots early shifts in price momentum using Rate of Change
Order Flow Analysis: Tracks buying/selling pressure through On-Balance Volume
Signal Quality Management
Adjustable Signal Thresholds: Customize the number of conditions required for signal generation
Multiple Quality Levels: Choose between Normal, High, and Maximum quality settings
Strength Measurement: Displays signal strength as a percentage for better decision-making
Repeat Signal Prevention: Eliminates duplicate signals to reduce noise
Visual Features
Clear Chart Markers: Buy/sell signals displayed directly on price chart
Comprehensive Info Panel: Shows status of all components and overall signal information
Customizable Colors: Adjust visual elements to match your chart theme
Practical Applications
For Day Traders
Identify short-term reversal points with high accuracy
Validate entries with multiple confirmations
Filter out false signals during choppy market conditions
For Swing Traders
Spot early trend changes before they become obvious
Enter positions with higher confidence and precision
Hold positions through noise by following true trend signals
For Position Traders
Identify major trend reversals with multiple confirmations
Filter out minor retracements from significant trend changes
Time entries and exits with greater precision
Customization Options
MSTI is highly customizable with over 30 adjustable parameters allowing you to:
Fine-tune each technical component
Adjust signal quality and filtering
Enable/disable specific components
Customize visual appearance
Usage Tips
Start with the Normal quality setting to understand signal frequency
Progress to High or Maximum settings for fewer but higher quality signals
Adjust minimum conditions based on market volatility
Enable trend filter in trending markets for better signal accuracy
Enable volatility filter to avoid signals during low-volatility periods
GTC Breakout ScannerIntroducing the GTC Breakout Scanner – Your Ultimate Market Radar!
Stay ahead of market moves with the GTC Breakout Scanner, a powerful TradingView indicator designed to detect momentum shifts, identify breakouts, and optimize your entries and exits like never before.
🔹 Multi-Coin Screener – Get real-time rate-of-change (ROC) alerts across multiple assets in one view.
🔹 AI-Enhanced Analysis – Adaptive K-means clustering fine-tunes overbought and oversold levels dynamically.
🔹 Precision Alerts – Detect bullish and bearish breakouts with customizable thresholds.
🔹 Over-Extended Integration – Visualize price movements with dynamic upper and lower bands for added confirmation.
Whether you're a scalper, swing trader, or long-term investor, the GTC Breakout Scanner empowers you with instant insights to catch high probability opportunities before the crowd.
🚀 Upgrade your trading strategy today with the GTC Breakout Scanner! 🚀
The GTC Breakout Scanner indicator is ideal for traders who rely on momentum, trend shifts, and volatility-based strategies. Here are the key types of traders who would benefit the most:
🔥 1. Momentum Traders
The indicator tracks the Rate of Change (ROC) and alerts when an asset’s price momentum is shifting.
Traders looking for explosive price movements can spot early bullish or bearish signals before major trends develop.
⚡ 2. Swing Traders
The scanner tracks multiple cryptocurrencies and flags high-probability reversals based on historical price action.
The adjustable overbought/oversold zones adapt dynamically using K-means clustering, making it useful for precision entry and exit points.
🚀 3. Trend-Following Traders
The inclusion of Bollinger Bands with dynamic thresholds allows traders to identify trend continuation or breakdowns.
The adaptive OB/OS levels help in recognizing trend exhaustion or potential breakout setups.
🎯 4. Mean Reversion Traders
Traders who capitalize on price deviations from the mean will benefit from the indicator’s multi-timeframe analysis and ability to detect extreme price movements.
Alerts on overbought/oversold conditions help traders enter at ideal pullback levels.
⏳ 5. Crypto Scalpers & Day Traders
The bullish and bearish momentum shifts make it a great tool for short-term traders looking to capitalize on fast moves.
The multi-coin screener lets traders monitor several assets at once, ensuring they don’t miss high-volatility setups.
This indicator is a powerful all-in-one scanner that helps traders spot momentum shifts, trend reversals, and breakout opportunities across multiple cryptocurrencies. Whether you're a swing trader, trend follower, scalper, or momentum trader, the GTC Breakout Scanner indicator provides precision market insights. 🚀🔥
⚠️ Disclaimer:
The GTC Breakout Scanner is a powerful tool designed to enhance your market analysis by providing real-time insights on market shifts. However, it is not a replacement for comprehensive market analysis or prudent risk management. Always combine this tool with thorough research, technical analysis, and a well-structured trading plan. Past performance is not indicative of future results. Trade responsibly.
Machine Learning Trendlines Cluster [LuxAlgo]The ML Trendlines Cluster indicator allows traders to automatically identify trendlines using a machine learning algorithm based on k-means clustering and linear regression, highlighting trendlines from clustered prices.
For trader's convenience, trendlines can be filtered based on their slope, allowing them to filter out trendlines that are too horizontal, or instead keep them depending on the user-selected settings.
🔶 USAGE
Traders only need to set the number of trendlines (clusters) they want the tool to detect and the algorithm will do the rest.
By default the tool is set to detect 4 clusters over the last 500 bars, in the image above it is set to detect 10 clusters over the same period.
This approach only focuses on drawing trendlines from prices that share a common trading range, offering a unique perspective to traditional trendlines. Trendlines with a significant slope can highlight higher dispersion within its cluster.
🔹 Trendline Slope Filtering
Traders can filter trendlines by their slope to display only steep or flat trendlines relative to a user-defined threshold.
The image above shows the three different configurations of this feature:
Filtering disabled
Filter slopes above threshold
Filter slopes below threshold
🔶 DETAILS
K-means clustering is a popular machine-learning algorithm that finds observations in a data set that are similar to each other and places them in a group.
The process starts by randomly assigning each data point to an initial group and calculating the centroid for each. A centroid is the center of the group. K-means clustering forms the groups in such a way that the variances between the data points and the centroid of the cluster are minimized.
The trendlines are displayed according to the linear regression function calculated for each cluster.
🔶 SETTINGS
Window Size: Maximum number of bars to get data from
Clusters: Maximum number of clusters (trendlines) to detect
🔹 Optimization
Maximum Iteration Steps: Maximum loop iterations for cluster computation
🔹 Slope Filter
Threshold Multiplier: Multiplier applied to a volatility measure, higher multiplier equals higher threshold
Filter Slopes: Enable/Disable Trendline Slope Filtering, select to filter trendlines with slopes ABOVE or BELOW the threshold
🔹 Style
Upper Zone: Color to display in the top zone
Lower Zone: Color to display in the bottom zone
Lines: Style for the lines
Size: Line size
MMM MARKET CHAOS TO CLARITY INTELLIGENCE @MaxMaserati# MMM MARKET CHAOS TO CLARITY INTELLIGENCE
## Overview
The MMM MARKET CHAOS TO CLARITY INTELLIGENCE (MMM AI Pro) by MaxMaserati is a sophisticated multi-factor analysis tool that provides comprehensive market insights through a unified dashboard. This system integrates several proprietary components to detect market conditions, trends, and potential reversals.
At its core, this indicator is designed to bring clarity to market complexity by identifying meaningful patterns and establishing order within what often appears as random market chaos
The MMM Intelligence Matrix accomplishes this through its multi-layered approach:
- The MMPD system quantifies market conditions on a clear 0-100 scale, transforming complex price movements into actionable premium/discount levels
- The proprietary candle analysis (MMMC Bias) identifies specific patterns with predictive value
- The integration of volume, momentum, and multi-timeframe analysis creates a comprehensive market context
- The Hot/Cold classification system helps traders distinguish between sustainable moves and overextended conditions
What makes this indicator particularly valuable is how it synthesizes multiple technical factors into clear visual signals and classifications. Instead of leaving traders to interpret numerous conflicting indicators, it presents an organized dashboard of market conditions with straightforward action zones.
## Core Components
### MMPD (Max Maserati Premium and Discount)
- Normalizes price movement on a 0-100 scale:
- **Premium (>50)**: Bullish conditions
- **Discount (<50)**: Bearish conditions
- **Extreme values (>90 or <10)**: Potential reversal zones
### MMMC (Max Maserati Model Candle) Bias
- Analyzes candle patterns to predict behavior:
- **Bullish/Bearish Body Close**: Price closes beyond previous candle's high/low
- **Bullish/Bearish Affinity**: Shows tendency toward continuation
- **Seek & Destroy**: Tests previous levels then breaks in new direction
- **Close Inside**: Closes within previous candle's range with directional bias
- **Plus/Minus**: Indicates slight tendency toward bulls/bears
### PC Strength (Previous Candle Strength)
- Measures percentage power of recent candlesticks
- Analyzes strength across multiple previous candles (PC1, PC2, PC3)
### MVM (Market Volatility Momentum)
- Adaptive moving averages system analyzing multiple timeframes:
- **Short context (8 bars)**: Immediate direction
- **Medium context (21 bars)**: Intermediate validation
- **Long context (55 bars)**: Primary trend confirmation
- **Higher timeframe**: Additional confirmation
### Volume Intelligence System
- Adaptive algorithm comparing current volume to 20-period average
- Identifies significant volume events and thresholds
### Hot/Cold Momentum Classification
- **Strong Bullish/Bearish (Hot)**: Potentially overextended
- **Strong Bullish/Bearish (Cold)**: Strong with room to continue
- **Bullish/Bearish Momentum**: Clear directional bias
- **Mild Bullish/Bearish**: Weak directional bias
### HVC (Highest Volume Candles) Detection
- Triangle markers and sequential stars indicate significant volume-confirmed movements
- Signals potential trend changes and continuation setups
## Dashboard Interface
The customizable dashboard displays:
1. **MMMC Bias**: Candle pattern analysis and direction
2. **Delta MA**: Buy/sell pressure with directional arrows
3. **PC Strength**: Percentage strength of previous candles
4. **Current Trend**: Overall market bias state
5. **MMPD Bias**: Premium/discount context
6. **Short/Medium/Long Term**: Price change percentages
7. **Trend Quality**: Reliability rating
8. **Volume Strength**: Classification (High/Medium/Low)
9. **MMPD Values**: Current level with direction indicator
10. **HTF Trend**: Higher timeframe confirmation
11. **Trend Strength**: Overall momentum measurement
12. **Action Zone**: Trading zone classification
13. **Momentum Strength**: Hot/Cold status
## MMPD Value Classifications
- **EXTREME PREMIUM (>90) ⚠️**: Extremely overbought
- **HIGH PREMIUM (80-90) ↗**: Strong bullish (caution)
- **PREMIUM (65-80) ↗**: Healthy bullish zone
- **LIGHT PREMIUM (50-65) →**: Mild bullish territory
- **LIGHT DISCOUNT (35-50) →**: Mild bearish territory
- **DISCOUNT (20-35) ↘**: Healthy bearish zone
- **HIGH DISCOUNT (10-20) ↘**: Strong bearish (caution)
- **EXTREME DISCOUNT (<10) ⚠️**: Extremely oversold
## Action Zone Classifications
- **MASSIVE BUY/SELL ZONE ★★★**: Very strong bias (Strength >5.0)
- **STRONG BUY/SELL ZONE ★★**: Strong bias (Strength >3.0)
- **MEDIUM BUY/SELL ZONE ★**: Moderate bias (Strength >2.0)
- **LIGHT BUY/SELL ZONE ⋆**: Mild bias (Strength >1.0)
- **SUPER LIGHT BUY/SELL ZONE ·**: Weak bias (Strength <1.0)
- **NEUTRAL ZONE**: No clear directional bias
## Visual Signals
1. **Triangle Markers**: HVC system directional signals (up/down)
2. **Sequential Stars (★)**: Advanced confirmation signals following trend changes
3. **High Volume Highlighting**: Optional candle emphasis for volume events
## Entry Conditions
### Strong Buy Setup
- MMPD Values: PREMIUM or LIGHT PREMIUM
- Hot/Cold Status: "⚠️ Strong Bullish (Cold)" or "↗️ Bullish Momentum"
- Action Zone: MASSIVE or STRONG BUY ZONE
- Volume Strength: High or Medium
- Current Trend: Strong Bullish or Bullish
### Strong Sell Setup
- MMPD Values: DISCOUNT or LIGHT DISCOUNT
- Hot/Cold Status: "⚠️ Strong Bearish (Cold)" or "↘️ Bearish Momentum"
- Action Zone: MASSIVE or STRONG SELL ZONE
- Volume Strength: High or Medium
- Current Trend: Strong Bearish or Bearish
## Exit Conditions
### Exit Long Positions When
- Hot/Cold Status changes to "⚠️ Strong Bullish (Hot)" or "↘️ Bearish Momentum"
- MMPD Values shows EXTREME PREMIUM or HIGH PREMIUM
- Action Zone changes to NEUTRAL ZONE or any SELL ZONE
- Current Trend shows "Bearish Reversal" or "Exiting Overbought"
### Exit Short Positions When
- Hot/Cold Status changes to "⚠️ Strong Bearish (Hot)" or "↗️ Bullish Momentum"
- MMPD Values shows EXTREME DISCOUNT or HIGH DISCOUNT
- Action Zone changes to NEUTRAL ZONE or any BUY ZONE
- Current Trend shows "Bullish Reversal" or "Exiting Oversold"
## Position Sizing Guidelines
- **Full Position (100%)**: Action Zone ★★★/★★, normal momentum, High volume
- **Reduced Position (50-75%)**: "Cold" signal, Action Zone ★, Medium volume
- **Small Position (25-50%)**: Action Zone ⋆, Medium/Low volume, mixed signals
- **No Position**: "Hot" signal, NEUTRAL zone, Low volume
## Special Trade Setups
### Reversal Setups
- **Bullish Reversal**: Transition from EXTREME DISCOUNT, Hot→Cold change, emerging buy signal, high volume
- **Bearish Reversal**: Transition from EXTREME PREMIUM, Hot→Cold change, emerging sell signal, high volume
### Continuation Setups
- **Bullish Continuation**: PREMIUM range, "Cold" signal, strong volume, timeframe alignment, clear Action Zone
- **Bearish Continuation**: DISCOUNT range, "Cold" signal, strong volume, timeframe alignment, clear Action Zone
## Sequential Stars System
- **Sequential Buy Signal**: Bullish star after bearish trend, volume confirmation
- **Sequential Sell Signal**: Bearish star after bullish trend, volume confirmation
## Best Practices
- Check multiple timeframes (prioritize when all align)
- Validate with volume (High >2.5x, Medium >1.2x)
- Assess trend quality (Strong ★★★, Confirmed ★★, Warning ⚠, Transition ↕)
- Handle inside bars/consolidation with additional confirmation
## Technical Considerations
- Based on closed candles for calculations
- Requires reliable volume data
- Higher sensitivity settings may produce more frequent signals
- Extreme readings indicate potential turning points
- Sequential stars require proper trend changes for activation
## Indicator Applicability
- **Markets**: Forex, Crypto, Stocks, Futures, Commodities
- **Timeframes**: 1H+ recommended, 4H/Daily for primary analysis
*Intended for use with the full MMM system. Trading decisions require proper knowledge and risk management.*
aivance_Multi-Index Performance Comparison# Multi-Index Performance Comparison
This indicator allows traders and investors to easily compare the performance of multiple global market and sector indexes from a user-defined start date. All indexes are normalized to 100% at the specified start date, making relative performance comparisons straightforward.
## Features:
- Customizable start date for performance comparison
- Toggleable global market indexes (S&P 500, MSCI World, DAX, Nasdaq 100, EURO STOXX 50, Japan, Hong Kong)
- Toggleable sector indexes (Materials, Health Care, Financial, Technology, AI & Robotics)
- Clear visualization with distinct colors for each index
- Reference line at 100% for easy benchmark comparison
## How to Use:
1. Set your desired start date for normalizing performance
2. Toggle indexes on/off under the "Inputs" tab
3. Compare relative performance across different markets and sectors
Perfect for identifying relative strength, sector rotation, or global market correlations over your specific timeframe of interest.
Zen ABR### **Average Bar Range (ABR) Levels** – A Simple Yet Powerful Scalping Tool
The **ABR Levels** indicator dynamically calculates the **average bar range** and plots three key levels on your chart:
✅ **0.5x ABR** – Half the average bar range
✅ **1x ABR** – The full average bar range
✅ **2x ABR** – Double the average bar range
This provides an **instant volatility gauge**, helping traders adjust position size, stop losses, and targets **based on current market conditions** rather than arbitrary numbers.
### **How It Works**
- The indicator calculates **the average range of the last 8 bars** (default setting, adjustable).
- The **ABR levels update in real time**, appearing in the **top-right corner of your chart** for easy reference.
- Works across **any instrument and timeframe** – great for scalpers and intraday traders.
### **Why Use ABR Levels?**
🚀 **Avoid oversized losses** – Trade dynamically instead of using fixed stops and targets.
📉 **Recognize shifts in market conditions** – Identify when volatility is expanding or contracting.
🎯 **Refine your entries & exits** – Use ABR levels to **scale** your positions intelligently.
### **Pro Tip:**
Never enter a trade **aiming for half-R** profits. If a trade goes badly, **you might manage it to break even or half-R**, but aiming for tiny wins will **wreck your long-term edge**.
🔹 **This script is open-source!** If you're not on TradingView, you can copy the code into any AI tool to generate it for your platform. 🚀
MMM MARKET CHAOS TO CLARITY INTELLIGENCE @MaxMaserati# MMM MARKET CHAOS TO CLARITY INTELLIGENCE
## Overview
The MMM MARKET CHAOS TO CLARITY INTELLIGENCE (MMM AI Pro) by MaxMaserati is a sophisticated multi-factor analysis tool that provides comprehensive market insights through a unified dashboard. This system integrates several proprietary components to detect market conditions, trends, and potential reversals.
At its core, this indicator is designed to bring clarity to market complexity by identifying meaningful patterns and establishing order within what often appears as random market chaos
The MMM Intelligence Matrix accomplishes this through its multi-layered approach:
- The MMPD system quantifies market conditions on a clear 0-100 scale, transforming complex price movements into actionable premium/discount levels
- The proprietary candle analysis (MMMC Bias) identifies specific patterns with predictive value
- The integration of volume, momentum, and multi-timeframe analysis creates a comprehensive market context
- The Hot/Cold classification system helps traders distinguish between sustainable moves and overextended conditions
What makes this indicator particularly valuable is how it synthesizes multiple technical factors into clear visual signals and classifications. Instead of leaving traders to interpret numerous conflicting indicators, it presents an organized dashboard of market conditions with straightforward action zones.
## Core Components
### MMPD (Max Maserati Premium and Discount)
- Normalizes price movement on a 0-100 scale:
- **Premium (>50)**: Bullish conditions
- **Discount (<50)**: Bearish conditions
- **Extreme values (>90 or <10)**: Potential reversal zones
### MMMC (Max Maserati Model Candle) Bias
- Analyzes candle patterns to predict behavior:
- **Bullish/Bearish Body Close**: Price closes beyond previous candle's high/low
- **Bullish/Bearish Affinity**: Shows tendency toward continuation
- **Seek & Destroy**: Tests previous levels then breaks in new direction
- **Close Inside**: Closes within previous candle's range with directional bias
- **Plus/Minus**: Indicates slight tendency toward bulls/bears
### PC Strength (Previous Candle Strength)
- Measures percentage power of recent candlesticks
- Analyzes strength across multiple previous candles (PC1, PC2, PC3)
### MVM (Market Volatility Momentum)
- Adaptive moving averages system analyzing multiple timeframes:
- **Short context (8 bars)**: Immediate direction
- **Medium context (21 bars)**: Intermediate validation
- **Long context (55 bars)**: Primary trend confirmation
- **Higher timeframe**: Additional confirmation
### Volume Intelligence System
- Adaptive algorithm comparing current volume to 20-period average
- Identifies significant volume events and thresholds
### Hot/Cold Momentum Classification
- **Strong Bullish/Bearish (Hot)**: Potentially overextended
- **Strong Bullish/Bearish (Cold)**: Strong with room to continue
- **Bullish/Bearish Momentum**: Clear directional bias
- **Mild Bullish/Bearish**: Weak directional bias
### HVC (Highest Volume Candles) Detection
- Triangle markers and sequential stars indicate significant volume-confirmed movements
- Signals potential trend changes and continuation setups
## Dashboard Interface
The customizable dashboard displays:
1. **MMMC Bias**: Candle pattern analysis and direction
2. **Delta MA**: Buy/sell pressure with directional arrows
3. **PC Strength**: Percentage strength of previous candles
4. **Current Trend**: Overall market bias state
5. **MMPD Bias**: Premium/discount context
6. **Short/Medium/Long Term**: Price change percentages
7. **Trend Quality**: Reliability rating
8. **Volume Strength**: Classification (High/Medium/Low)
9. **MMPD Values**: Current level with direction indicator
10. **HTF Trend**: Higher timeframe confirmation
11. **Trend Strength**: Overall momentum measurement
12. **Action Zone**: Trading zone classification
13. **Momentum Strength**: Hot/Cold status
## MMPD Value Classifications
- **EXTREME PREMIUM (>90) ⚠️**: Extremely overbought
- **HIGH PREMIUM (80-90) ↗**: Strong bullish (caution)
- **PREMIUM (65-80) ↗**: Healthy bullish zone
- **LIGHT PREMIUM (50-65) →**: Mild bullish territory
- **LIGHT DISCOUNT (35-50) →**: Mild bearish territory
- **DISCOUNT (20-35) ↘**: Healthy bearish zone
- **HIGH DISCOUNT (10-20) ↘**: Strong bearish (caution)
- **EXTREME DISCOUNT (<10) ⚠️**: Extremely oversold
## Action Zone Classifications
- **MASSIVE BUY/SELL ZONE ★★★**: Very strong bias (Strength >5.0)
- **STRONG BUY/SELL ZONE ★★**: Strong bias (Strength >3.0)
- **MEDIUM BUY/SELL ZONE ★**: Moderate bias (Strength >2.0)
- **LIGHT BUY/SELL ZONE ⋆**: Mild bias (Strength >1.0)
- **SUPER LIGHT BUY/SELL ZONE ·**: Weak bias (Strength <1.0)
- **NEUTRAL ZONE**: No clear directional bias
## Visual Signals
1. **Triangle Markers**: HVC system directional signals (up/down)
2. **Sequential Stars (★)**: Advanced confirmation signals following trend changes
3. **High Volume Highlighting**: Optional candle emphasis for volume events
## Entry Conditions
### Strong Buy Setup
- MMPD Values: PREMIUM or LIGHT PREMIUM
- Hot/Cold Status: "⚠️ Strong Bullish (Cold)" or "↗️ Bullish Momentum"
- Action Zone: MASSIVE or STRONG BUY ZONE
- Volume Strength: High or Medium
- Current Trend: Strong Bullish or Bullish
### Strong Sell Setup
- MMPD Values: DISCOUNT or LIGHT DISCOUNT
- Hot/Cold Status: "⚠️ Strong Bearish (Cold)" or "↘️ Bearish Momentum"
- Action Zone: MASSIVE or STRONG SELL ZONE
- Volume Strength: High or Medium
- Current Trend: Strong Bearish or Bearish
## Exit Conditions
### Exit Long Positions When
- Hot/Cold Status changes to "⚠️ Strong Bullish (Hot)" or "↘️ Bearish Momentum"
- MMPD Values shows EXTREME PREMIUM or HIGH PREMIUM
- Action Zone changes to NEUTRAL ZONE or any SELL ZONE
- Current Trend shows "Bearish Reversal" or "Exiting Overbought"
### Exit Short Positions When
- Hot/Cold Status changes to "⚠️ Strong Bearish (Hot)" or "↗️ Bullish Momentum"
- MMPD Values shows EXTREME DISCOUNT or HIGH DISCOUNT
- Action Zone changes to NEUTRAL ZONE or any BUY ZONE
- Current Trend shows "Bullish Reversal" or "Exiting Oversold"
## Position Sizing Guidelines
- **Full Position (100%)**: Action Zone ★★★/★★, normal momentum, High volume
- **Reduced Position (50-75%)**: "Cold" signal, Action Zone ★, Medium volume
- **Small Position (25-50%)**: Action Zone ⋆, Medium/Low volume, mixed signals
- **No Position**: "Hot" signal, NEUTRAL zone, Low volume
## Special Trade Setups
### Reversal Setups
- **Bullish Reversal**: Transition from EXTREME DISCOUNT, Hot→Cold change, emerging buy signal, high volume
- **Bearish Reversal**: Transition from EXTREME PREMIUM, Hot→Cold change, emerging sell signal, high volume
### Continuation Setups
- **Bullish Continuation**: PREMIUM range, "Cold" signal, strong volume, timeframe alignment, clear Action Zone
- **Bearish Continuation**: DISCOUNT range, "Cold" signal, strong volume, timeframe alignment, clear Action Zone
## Sequential Stars System
- **Sequential Buy Signal**: Bullish star after bearish trend, volume confirmation
- **Sequential Sell Signal**: Bearish star after bullish trend, volume confirmation
## Best Practices
- Check multiple timeframes (prioritize when all align)
- Validate with volume (High >2.5x, Medium >1.2x)
- Assess trend quality (Strong ★★★, Confirmed ★★, Warning ⚠, Transition ↕)
- Handle inside bars/consolidation with additional confirmation
## Technical Considerations
- Based on closed candles for calculations
- Requires reliable volume data
- Higher sensitivity settings may produce more frequent signals
- Extreme readings indicate potential turning points
- Sequential stars require proper trend changes for activation
## Indicator Applicability
- **Markets**: Forex, Crypto, Stocks, Futures, Commodities
- **Timeframes**: 1H+ recommended, 4H/Daily for primary analysis
*Intended for use with the full MMM system. Trading decisions require proper knowledge and risk management.*
Serum Oscillator [ST]Serum Oscillator is an advanced technical indicator. This indicator combines several techniques and algorithms to provide traders with a robust tool for analyzing and predicting market movements. The indicator is not just an oscillator, but also includes functionalities for detecting divergences, mining flow, custom alerts, and more. Below is a detailed description of its features, components, and functionalities.
Characteristics
1. Oscillator and Signal: the indicator has a moving line that acts as a signal to determine the state of the market, whether bullish or bearish. In addition, this moving line can be switched between different types for greater accuracy, allowing it to better suit the trader's style.
2. Modes: the indicator has three modes to adapt to the market. Fast, Normal and Slow. The user can choose the mode that best suits his strategy. Fast mode generates very early signals, perfect for getting ahead of the market; however, it can also generate a greater number of false crosses. Slow mode generates fewer signals, perfect for filtering range zones.
3. Overbought and Oversold Levels: the indicator generates signals between values 0 and 100, for this reason it can be speculated that values 70 and 30 are overbought and oversold levels respectively; however, these levels can vary according to the modes. For this reason we designed the dynamic bands.
4. Multi Timeframe: Can observe data from a different time frame than the current chart. You will be able to observe the state of the oscillator and the direction.
5. Trend Catcher: tool to detect the market trend according to the indicator. Ideal for filtering false crossovers and trading in favor of the trend.
6. Smart Flow: Money flow optimized with AI to detect the overall money flow. Ideal for detecting trends. Additionally, you will be able to visualize the convergences between smart flow and the oscillator to operate in favor of the price trend. You can also activate thresholds, to detect when there is really a large monetary flow.
7. Divergences: Real-time detection of divergences to identify possible reversal zones. The user can adjust the sensitivity.
8. Alerts: Programmable alerts to automate the detection of various price conditions according to the indicator.
> This indicator is a comprehensive technical tool that provides traders with multiple capabilities to analyze market trends and reversals. Its combination of different types of smoothing and adaptive functions, along with the detection of divergences, trend lines, and custom alerts, makes it a powerful and versatile indicator for trading decision-making. The customization of its parameters and the depth of its calculations offer users a significant advantage in interpreting market data, facilitating more precise understanding and timely action in their trading operations.
Smart Adaptive Signal SystemSmart Adaptive Signal System
Description: The Smart Adaptive Signal System is a sophisticated indicator that generates intelligent buy/sell signals by dynamically adapting to market conditions. It predicts target prices based on momentum and volatility, providing more accurate and reliable trading opportunities.
How It Works:
Dynamic Signal Generation: The system predicts target prices by considering factors such as volatility and momentum. This allows it to react instantly to trend changes and market fluctuations.
Adaptive Thresholds: Buy and sell signals are triggered with adaptive thresholds, adjusting according to market volatility. This ensures flexibility in the face of sudden market changes.
Trend-Based Reset: Users can choose to reset threshold values based on a time interval or trend change. This feature helps the system re-adapt to current market conditions for greater accuracy.
Target Price Prediction: Target prices are calculated using momentum and volatility, helping the system predict future price movements.
How to Use:
Buy/Sell Signals: The indicator generates buy and sell signals based on market conditions. Look for a "down arrow" for a buy signal and an "up arrow" for a sell signal on the chart.
Target Price Lines: Along with buy and sell signals, the system draws target price lines. This helps you visualize potential future price levels.
Flexible Settings: Users can customize analysis periods, minimum change percentages, and other parameters to fit their needs.
Features:
Dynamic buy and sell signals
Target price predictions
Volatility and momentum-based analysis
User-friendly and flexible settings
Trend-based adaptive resetting
Alerts: The Smart Adaptive Signal System responds quickly to sudden market changes, but always use it in conjunction with other indicators like support and resistance levels. Signal accuracy may vary depending on market conditions.
Flux Charts - SFX Automation💎 GENERAL OVERVIEW
The SFX Automation is a powerful and versatile tool designed to help traders rigorously test their trading strategies against historical market data. With various advanced settings, traders can fine-tune their strategies, assess performance, and identify key improvements before deploying in live trading environments. This tool offers a wide range of configurable settings, explained within this write-up.
Features of the new SFX Automation :
Step By Step : Configure your strategy step by step, which will allow you to have OR & AND logic in your strategies.
Highly Configurable : Offers multiple parameters for fine-tuning trade entry and exit conditions.
Multi-Timeframe Analysis : Allows traders to analyze multiple timeframes simultaneously for enhanced accuracy.
Provides advanced stop-loss, take-profit, and break-even settings.
Incorporates Buy & Sell signals, with settings like Signal Sensitivity, Strength, Time Weighting, Dynamic TP & SL Methods and more for refined strategy execution.
🚩 UNIQUENESS
The SFX Automation stands out from conventional backtesting tools due to its unparalleled flexibility, precision, and advanced trading logic integration. Key factors that make it unique include:
✅ Comprehensive Strategy Customization – Unlike traditional backtesters that offer basic entry and exit conditions, SFX Automation provides a highly detailed parameter set, allowing traders to fine-tune their strategies with precision.
✅ Multi-Timeframe Signals – This is the first-ever tool that allows traders to backtest Buy & Sell Signals on multiple timeframes.
✅ Customizable Take-Profit Conditions – Offers various methods to set take-profit exits, including using core features from SFX Algo, and dynamic exits like signal rating upgrades/downgrades, enabling traders to tailor their exit strategies to specific market behaviors.
✅ Customizable Stop-Loss Conditions – Provides several ways to set up stop losses, including using concepts from SFX Algo and trailing stops or dynamic exits like signal rating upgrades/downgrades, allowing for dynamic risk management tailored to individual strategies.
✅ Integration of External Indicators – Allows the inclusion of other indicators or data sources from TradingView for creating strategy conditions, enabling traders to enhance their strategies with additional insights and data points.
By integrating these advanced features, SFX Automation ensures that traders can rigorously test and optimize their strategies with great accuracy and efficiency.
📌 HOW DOES IT WORK ?
The first setting you will want to set it the pyramiding setting. This setting controls the number of simultaneous trades in the same direction allowed in the strategy. For example, if you set it to 1, only one trade can be active in any time, and the second trade will not be entered unless the first one is exited. If it is set to 2, the script will handle both of them at the same time. Note that you should enter the same value to this pyramiding setting, and the pyramiding setting in the "Properties" tab of the script for this to work.
You can enable and set a backtesting window that will limit the entries to between the start date & end date.
Entry Conditions
From the "Long Conditions" or the "Short Conditions" groups, you can set your position entry conditions. For settings like "initial capital" or "order size", you can open the "Properties" tab, where these are handled.
The SFX Algo can use the following conditions for entry conditions :
1. Buy Signal (Any, or 1-5 ☆)
This condition is triggered when a Buy Signal occurs. Other timeframes are supported with this condition.
2. Buy | TP (1, 2 or 3)
This condition is triggered when a TP signal of any Buy signal occurs.
3. Buy | SL
This condition is triggered when a SL signal of any Buy signal occurs.
4. Buy | Rating Upgrade
This condition is triggered when the rating of a buy signal is increased.
5. Buy | Rating Downgrade
This condition is triggered when the rating of a buy signal is decreased.
6. Sell Signal (Any, or 1-5 ☆)
This condition is triggered when a Sell Signal occurs. Other timeframes are supported with this condition.
7. Sell | TP (1, 2 or 3)
This condition is triggered when a TP signal of any Sell signal occurs.
8. Sell | SL
This condition is triggered when a SL signal of any Sell signal occurs.
9. Sell | Rating Upgrade
This condition is triggered when the rating of a sell signal is increased.
10. Sell | Rating Downgrade
This condition is triggered when the rating of a sell signal is decreased.
11. Retracement Wave Retest (Bullish or Bearish)
A retest on the Retracement Wave occurs when the price temporarily moves against the prevailing trend, touching or entering the wave before continuing in the original trend direction. This retest serves as a confirmation that the wave is acting as dynamic support or resistance.
12. Retracement Wave Retracement (Bullish or Bearish)
A retracement on the Retracement Wave occurs when the price touches the wave, the condition is triggered immediately.
13. Volatility Bands Retest (Bullish or Bearish)
A retest of Volatility Bands occurs when the price initially moves beyond the bands, then pulls back to "retest" the band it just broke through before continuing its move. This can provide traders with confirmation of a breakout or signal a potential reversal.
14. Volatility Bands Retracement (Bullish or Bearish)
A retracement on the Volatility Bands occur when the price touches the band, the condition is triggered immediately.
🕒 TIMEFRAME CONDITIONS
The SFX Automation supports Multi-Timeframe (MTF) features for Buy & Sell signals. When setting an entry condition, you can also choose the timeframe.
External Conditions
Users can use external indicators on the chart to set entry conditions.
The second dropdown in the external condition settings allows you to choose a conditional operator to compare external outputs. Available options include:
Less Than or Equal To: <=
Less Than: <
Equal To: =
Greater Than: >
Greater Than or Equal To: >=
The position entry conditions work like this ;
Each side has 3 SFX Algo conditions and 2 Source conditions. Each condition can be enabled or disabled using the checkbox on the left side of them.
You can select which timeframe this condition should work on for Buy & Sell signals. If you select "Chart", the condition will work for the chart's current timeframe.
Lastly select the step of this condition from 1 to 6.
The Source Condition
The last condition on each side is a source condition that is different from the others. Using this condition, you can create your own logic using other indicators' outputs on your chart. For example, suppose that you have an EMA indicator in your chart. You can have the source condition to something like "EMA > high".
The Step System
Each condition has a step number, and conditions are in topological order based on them.
The conditions are executed step by step. This means the condition with step 2 cannot be executed before the condition with step 1 is executed.
Conditions with the same step numbers have "OR" logic. This means that if you have 2 conditions with step 3, the condition with step 4 can trigger after only one of the step 3 conditions is executed.
➕ OTHER ENTRY FEATURES
The SFX Automation allows traders to choose when to execute trades and when not to execute trades.
1. Only Take Trades
This setting lets users specify the time period when their strategy can open or execute trades.
2. Don't Take Trades
This setting lets users specify time periods when their strategy can't open or execute trades.
↩️ EXIT CONDITIONS
1. Exit on Opposite Signal
When enabled, a long position will close when short entry conditions are met, and a short position will close when long entry conditions are met.
2. Exit on Session End
When enabled, positions will be closed at the end of the trading session.
📈 TAKE PROFIT CONDITIONS
There are several methods available for setting take profit exits and conditions.
1. Entry Condition TP
Users can use entry conditions as triggers for take profit exits. This setting can be found under the long and short exit conditions.
2. Fixed TP
Users can set a fixed TP for exits. This setting can be found under the long and short exit conditions. Users can choose between the following:
Price: This method triggers a TP exit when price reaches a specified level. For example, if you set the Price TP to 10 and buy NASDAQ:TSLA at $190, the trade will automatically exit when the price reaches $200 ($190 + $10).
Ticks: This method triggers a TP exit when price moves a specified number of ticks.
Percentage (%): This method triggers a TP exit when price moves a specified percentage.
ATR: This method triggers a TP exit based on a specified multiple of the Average True Range (ATR).
🧩EXIT PERCENTAGES
For each 3 dynamic take-profit conditions, you can set the amount of the position to exit in terms of percentage. It's important to make sure that the total of the exit percentages are 100%.
📉 STOP LOSS CONDITIONS
There are several methods available for setting stop-loss exits and conditions.
1. Entry Condition SL
Users can use entry conditions as triggers for stop-loss exits. This setting can be found under the long and short exit conditions.
2. Fixed SL
Users can set a fixed SL for exits. This setting can be found under the long and short exit conditions. Users can choose between the following:
Price: This method triggers a SL exit when price reaches a specified level. For example, if you set the Price SL to 10 and buy NASDAQ:TSLA at $200, the trade will automatically exit when the price reaches $190 ($200 - $10).
Ticks: This method triggers a SL exit when price moves a specified number of ticks.
Percentage (%): This method triggers a SL exit when price moves a specified percentage.
ATR: This method triggers a SL exit based on a specified multiple of the Average True Range (ATR).
3. Trailing Stop
An explanation & example for the trailing stop feature is present on the write-up within the next section.
Exit conditions have the same logic of constructing conditions like the entry ones. You can construct a Take-Profit Condition & a Stop-Loss Condition. Note that the Take-Profit condition will only work if the position is in profit, regardless of if it's triggered or not. The same applies for the Stop-Loss condition, meaning that it will only work if the position is in loss.
You can also set a Fixed TP & Fixed SL based on the price movement after the position is entered. You have options like "Price", "Ticks", "%", or "Average True Range". For example, you can set a Fixed TP like "5%", and the position will be entered once it moves 5% up in a long position.
Trailing Stop
For the Fixed SL, you also have a "Trailing" stop option, which you can set it's activation level as well. The Trailing stop activation level and it's value are expressed in ticks. Check this scenerio for an example :
We have a ticker with a tick value of $1. Our Trailing Stop is set to 10 ticks, and the activation level is set to 30 ticks.
We buy 1 contract when the price is $100.
When the price becomes $110, we are in $10 (10 ticks) profit and the trailing stop is now activated.
The current price our stop's on is $110 - $30 (30 ticks), which is the level of $80.
The trailing stop will only move if the price moves up the highest high the price has been after we entered the position.
Let's suppose that price moves up $40 right after our trailing stop is activated. The price will now be $150, and our trailing stop will sit on $150 - $30 (30 ticks) = $120.
If the price is down the $120 level, our stop loss will be triggered.
There is also a "Hard SL" option designed for a backup stop-loss when trailing stops are enabled. You can enable & set this option and if the price goes down before our trailing stop even activates, the position will be exited.
You can also move stop-loss to the break-even (entry price of the position) after a certain profit is achieved using the last setting of the exit conditions. Note that for this to work, you will need to have a Fixed SL setup.
➕ OTHER EXIT FEATURES
1. Move Stop Loss to Breakeven
This setting allows the strategy to automatically move the SL to Breakeven (BE) when the position is in profit by a certain amount. Users can choose between the following:
Price: This method moves the SL to BE when price reaches a specified level.
Ticks: This method moves the SL to BE when price moves a specified number of ticks.
Percentage (%): This method moves the SL to BE when price moves a specified percentage.
ATR: This method moves the SL to BE when price moves a specified multiple of the Average True Range (ATR).
Example Entry Scenario
To give an example , check this scenario; out conditions are :
LONG CONDITIONS
Buy Signal Any☆, Step 1
Bullish R. Wave Retest, Step 2
Bullish V. Bands Retest, Step 2
open > close, Step 3
First, the strategy needs to detect a Buy Signal with any star rating in order to start working.
After it's detected, now it's looking for either a Bullish R. Wave Retest, or a Bullish V. Bands Retest to proceed to the next step, the reason for this is that they both have the same step number.
After one of them is detected, the strategy will consistently check candlesticks for the condition open > close. If a bullish candlestick occurs, a long position will be entered.
⏰ ALERTS
This indicator uses TradingView's strategy alert system. All entries and exits will be sent as an alert if configured. It's possible to further customize these alerts to your liking. For more information, check TradingView's strategy alert customization page: www.tradingview.com
⚙️ SETTINGS
1. Backtesting Settings
Pyramiding: Controls the number of simultaneous trades allowed in the strategy. This setting must have the same value that is entered on the script's properties tab on the settings pane.
Enable Custom Backtesting Period: Restricts backtesting to a specific date range.
Start & End Time Configuration: Define precise start and end dates for historical analysis.
2. Algorithm Settings
Sensitivity: The sensitivity setting is a key parameter that influences the number of signals the SFX Algo generates. By adjusting this parameter, you can control the frequency of signals produced by the algorithm.
Signal Strength: The Signal Strength setting filters signals based on their quality, allowing traders to focus on the most reliable opportunities. This feature helps traders balance the quantity and reliability of the algorithm’s signals to suit their trading strategy.
Time Weighting: The Time Weighting setting determines how the SFX Algo evaluates historical market data to generate signals.
a) Recent Trends
Focuses on the most recent movements for short-term analysis. This setting is good for scalpers and intraday traders who need to react quickly to market changes.
b) Mixed Trends
Balances recent and historical price movements for a comprehensive market view. This setting is well-suited for swing traders and those who want to capture medium-term opportunities by combining the benefits of short-term responsiveness with the reliability of long-term trends.
c) Long-term Trends
Relies on extended historical market data to identify broader market trends, making it an excellent choice for traders focused on long-term strategies.
Minimum Star Rating: The Minimum Star Rating setting allows you to filter signals based on their strength, showing only those that meet or exceed your chosen threshold. For instance, setting the minimum star rating to 3 ensures you only receive signals with a rating of 3 stars or higher.
3. Take Profit / Stop Loss Methods
Key Levels
The Key Levels method uses pivot points to set take profit and stop-loss levels. The TP and SL levels are shown when a new signal is generated.
Volatility Bands
This TP/SL method uses the Volatility Bands overlay to set dynamic TP and SL levels. These levels are not predetermined so they will not be shown in advance when a signal is generated.
Signal Rating
Sets take profit and stop-loss levels based on changes in a signal's rating strength. These levels are not predetermined so they will not be shown in advance when a signal is generated.
Auto Stop-Loss
The auto method can only be applied to the SL. The auto method allows the algorithm to detect SL automatically when a momentum shift is detected. You can adjust the risk tolerance of the Auto SL by adjusting the ‘Auto Risk Tolerance’ setting. You can choose between Low, Medium, and High. A high-risk tolerance will result in stop losses being triggered less often.
4. Entry Conditions for Long & Short Trades
Multiple Conditions (1-6): Configure up to six independent conditions per trade direction.
Timeframe Specification: Choose between timeframes for Buy & Sell signals.
Trade Execution Filters: Restrict trades within specific trading sessions.
5. Exit Conditions for Long & Short Trades
Exit on Opposite Signal: Automatically exit trades upon opposite trade conditions.
Exit on Session End: Closes all positions at the end of the trading session.
Multiple Take-Profit (TP) and Stop-Loss (SL) Configurations:
TP/SL based on % move, ATR, Ticks, or Fixed Price.
Hard SL option for additional risk control.
Move SL to BE (Break Even) after a certain profit threshold.
[Excalibur] Advanced Polynomial Regression Trend ChannelIt's been a long time coming... Regression channel enthusiasts, it's 'ultimately' here! Welcome to my Apophis page. But first, let me explain the origins of its attributed name blending both descriptive & engaging content with concise & technical topics...
EGYPTIAN ROOTED TALES:
Apophis (Greek) or Apep (Egyptian) was known by many cultures to be a mighty Egyptian archetype of chaos, darkness, and destruction. In ancient Egyptian mythology, Apophis was often depicted in the form of a fearsome menacing serpent, in those days, with an insatiable appetite for relentless malevolence. This dreaded entity was considered a formidable enemy and was also believed to appear as a giant serpent arising from the underworld.
Forever engaging in eternal battle, according to lore, Apophis' adversarial attributes represented the forces of disorder and anarchy clashing with the forces of order and harmony. This serpent's wickedly described figure was significantly symbolic of the disruptive, treacherous powers that Apophis embodied, those which threatened to plunge the perceivable archaic world into darkness. To the ancients, the legendary cyclical struggles against Apophis served as allegory reflecting on the macrocosm of the larger conflict between good and evil disparities that shaped early ancient civilization, much like the tree serpent.
One of Apophis’ mythological roots was immortally depicted on tomb stone. On one particular hieroglyphic wall tableau, in the second chamber of Inherkau’s tomb at Deir el-Medina, within the Theban Necropolis, portrays a mural of a serpent (Apep) under an edible fruit tree being slain in defeat. The species of snake depicted on various locations of tomb walls appears to me to bear a striking resemblance to the big eyed Echis pyramidum (Egyptian saw-scaled viper) native to regions of North Africa and the Middle East. It's a species of viper notoriously contributing to the most snake bite fatalities in the world still to this day; talk about a true harbinger of chaos incarnate. You do NOT want to cross paths with this asp in the dark of night, ever! Nor the other species of Echis found around Echid trees in the garden.
As we all know, fabled archaic storytelling can be misconstruing. Yet, these archaic serpent narratives still have echoes of significant notions and wisdom to learn from, especially in a modern technological society still rife with miscalculating deep snakes slithering about with intent to specifically plot disorder on national scales, and then profitably capitalize on it. Many deep black snakes are hiding in plain sight and under rocks. They do indeed speak and spell with forked tongues and malfeasance to the masses. I have great news. Tools now exist in the realms of AI combined with fractal programming circles to uncover these venomous viper mesh networks and investigatively monitor their subversive activities, so their days are surely numbered for... GAME OVER. Prepare to meet the doom you vain vipers have sought!
The arrival of the great and powerful international storm of the century has come, clothed in vindication. It's the only just way for the globe to clean house and move forward economically into the evolving herafter unobstructed by rampant evils and corruption. The foundations of future architectures are being established, and these nefarious obstacles MUST NOT hinder that path ahead.
With my former days of serpent wrangling being behind me, I now explore avenues of history, philosophy, programming, and mathematics, weaving them all into my daily routine. Now is the time to make some mathematical history unfold and get to the good and spicy stuff that you as the reader seek...
CALCULATING ON CHAOS:
Perhaps frightful characteristics of serpents (their maneuverability to adapt to any swervy situation) could be harnessed and channeled into a powerful tool for navigating the treacherous waters of data chaos. What if taming a monstrous beast of mayhem was not only possible, but fully achievable? Well, I think I have improved upon an approach to better tackle fractal chaos handling and observation within a modest PSv6 float environment without doubles. Finally, I've successfully turned my pet anaconda, Apophis, into a docile form of mathematical charting resilience beyond anything I have ever visually witnessed before. This novel work clearly deprecates ALL of my prior regression works by performing everything those delivered AND more, but it doesn't necessarily eliminate them into extinction.
INTRODUCTION:
Allow me to introduce Apophis! What you see showcased above is also referred to as 'Advanced Polynomial Regression Trend Channel' (APRTC) for technical minds. I would describe it as an avant-garde trend channel obtaining accurate polynomial approximations on market data with Pine v6.0. APRTC is a fractal following demystifier that I can only describe as being a signal trajectory tracking stalker manifesting as a data devouring demon. My full-fledged 'Excalibur' version of poly-regression swiftly captures undulating patterns present in market data with ease and at warp speed faster than you can blink. Now unchained, this is my rendering of polynomial wrath employing the "Immense Power of Pine".
By pushing techniques of regression to extremes, I am able to trace the serpentine trajectory of chaos up to a 50th order with 100s or 1000s of samples via "advanced polynomial regression" (APR), aka Apophis. This uniquely reactive trend channel method is designed to enhance the way we engage with the complex challenge of observably interpreting chaotic price behavior. While this is the end of the road for my revolutionary trend channel technology, that doesn't imply that future polynomial regression upgrades won't/might occur... There are a number of other supplementary concepts I have in my mind that could potentially prove useful eventually, who knows. However, for the moment, I feel it's wisest to monitor how accommodating APRTC is towards servers for the present time.
HISTORICAL ENDEAVORS:
Having wrangled countless wild serpents in my youth by the handfuls, tackling this was one multi-headed regression challenge temptation I couldn't resist. Besides, serpents in reality are more than often scared of us in the wild, so I assumed this shouldn't be too terribly hard. Wrong! It's been a complex struggle indeed. APRTC gave me many stinging bites for a LONG time. I had unknowingly opened Pandora's box of polynomials unprepared for what was to follow.
Long have I wrestled with Apophis throughout many nights for years with adversity, at last having arrived at a current grand solution and ultimately emerging victorious. Now, does the significance of the entitled name Apophis become more apparent at this point of reading? What you can now witness above is a very powerful blend of precision combined with maneuverability, concluding my dreamy expectations of a maximal experience with polynomial regression in TV charts. With all of my wizardry components finally assembled, Apophis genuinely is the most phenomenal indicator I ever devised in my life... as of yet.
How was this accomplished? By unlocking a deep understanding of the mathematical principles that govern regression, combined with an arsenal of mathemagical trickeries through sheer determination. I also spent an incredible amount of time flexing the unbendable 64bit float numerics to obtain a feasible order/degree of up to 50 polynomials or up to 4000 bars of regression (never simultaneously) on a labyrinth of samples. Lastly, what was needed was a pinch of mathematical pixie dust with a pleasant dose of Pine upgrades (lots of line re-drawings) that millions of other members can also utilize. Thank you so much, Pine developers, for once again turning meager proposed visions into materialized reality by leveraging the "Power of Pine" for the many!
DESCRIBING POLYNOMIAL REGRESSION:
APRTC is a visual guide for navigating noisy markets, providing both trajectory and structure through the power of mathematical modeling. Polynomial regression, especially at higher orders, exhibits obvious sidewinder/serpentine like characteristics. Even the channel extremities, on swift one second charts, resemble scales in motion with a pair of dashed exterior lines. This poly version presently yields the best quality of fit, providing an extreme "visual analysis" of your price action in high noise environments. The greater the order of the polynomial, the more pronounced the meandering regression characteristics become, as the algorithm strives to visually capture the fundamental fractal patterns most effectively.
Polynomial Regression in Action:
The medial line displays the core polynomial regression approximation in similarity to spinal backbones of serpents when following the movements of market data. Encasing the central structure, the channel's skin consists of enveloping lines having upper and lower extremes. To further enhance visualization, background fill colors distinguish the breadth between positive and negative territories of potential movement.
Additional internal dotted variability lines are available with multiple customizable settings to adjust dynamic dispersion, color, etc. One other exciting feature I added is the the ability to see the polynomial values with up to 50 (adjustable) decimal places if available. Witnessing Xⁿ values tapering near to 0.0 may indicate overfitting. Linear regression is available at order=1 and quadratic regression is invoked using order=2.
Information Criterion:
A toggleable label provides a multitude of information such as Bayesian Information Criterion (BIC), order, period, etc. BIC serves as an polynomial regression fit metric, with lesser values indicating a better balance between polynomial order adjustments, reflecting a more accurate fit in relation to the channel's girth. One downside of BIC values is their often large numerical values, making visual comparisons challenging, and then also their rare occurrence as negative values.
Furthermore, I formulated my own "EXPERIMENTAL" Simpler Information Criterion (SIC) fit metric, which seems to offer better visual interpretability when adjusting order settings on a selected regression period, especially on minuscule price numerics. Positive valued SIC numerics with lesser digits also reflect a preferred better fit during order adjustment, same as applying BIC principles of the minimum having a superior calulation tendency. I'll let members be the judge of deciding whether my SIC is actually a superior information criterion compared to BIC.
TECHNICAL INTERPRETATION and APPLICATION:
The Apophis indicator utilizes high-order polynomial regression, up to a maximum 50th order ability to deliver a nuanced, visual representation of complex market dynamics. I would caution against using upwards toward a 50th order, because opting for a 50th order polynomial is categorically speaking "wildly unsane" in real-world practice. As the polynomial degree increases from lesser orders, the regression line exhibits more pronounced curvature and undulations.
Visually analyzing the regression curve can provide insights into prevailing trends, as well as volatility regimes. For example, a gently sloping line may signal a steady directional trend, while a tightly curled oscillating curve may indicate heightened volatility and range-bound trading. Settings are rather straight forward, and comparable to my former "Quadratic Regression Trend Channel" efforts, although one torturous feature from QRTC is omitted due too computational complexity concerns.
Notice: Trial invite only access will not be granted for this indicator. Those who are familiar with recognizing what APRTC is, you will either want it or not, to add to your arsenal of trading approaches.
When available time provides itself, I will consider your inquiries, thoughts, and concepts presented below in the comments section, should you have any questions or comments regarding this indicator. When my indicators achieve more prevalent use by TV members , I may implement more ideas when they present themselves as worthy additions. Have a profitable future everyone!
RISK DISCLAIMER:
My scripts and indicators are specifically intended for informational and educational use only. This script uses historical data points to perform calculations to derive real-time calculations. They do not infer, indicate, or guarantee future results or performance.
By utilizing this script/indicator or any portion of it, you agree to accept 100% responsibly and liability for your investment or financial decisions, and I will not be held liable for your subjective analytic interpretations incurring sustained monetary losses. The opinions and information visual or otherwise provided by this script/indicator is not investment advice, nor does it constitute recommendation.
Machine Learning SupertrendThe Machine Learning Supertrend is an advanced trend-following indicator that enhances the traditional Supertrend with Gaussian Process Regression (GPR) and kernel-based learning. Unlike conventional methods that rely purely on historical ATR values, this indicator integrates machine learning techniques to dynamically estimate volatility and forecast future price movements, resulting in a more adaptive and robust trend detection system.
At the core of this indicator lies Gaussian Process Regression (GPR), which utilizes a Radial Basis Function (RBF) kernel to model price distributions and anticipate future trends. Instead of simply looking at past price action, it constructs a kernel matrix, enabling a probabilistic approach to price forecasting. This allows the indicator to not only detect current trends but also project potential trend reversals with greater accuracy.
By applying machine learning to ATR estimation, the ML Supertrend dynamically adjusts its thresholds based on predicted values rather than a fixed multiplier. This makes the trend signals more responsive to market conditions, reducing false signals and minimizing whipsaws often seen with traditional Supertrend indicators. The upper and lower bands are no longer static but evolve based on the underlying price structure, improving the reliability of trend shifts.
When the price crosses these adaptive levels, the indicator detects a trend change and plots it accordingly. Green signifies a bullish trend, while red indicates a bearish one. Alerts can also be triggered when the trend shifts, allowing traders to react quickly to potential reversals.
What makes this approach powerful is its ability to adapt to different market conditions. Traditional ATR-based methods use fixed parameters that might not always be optimal, whereas this ML-driven Supertrend continuously refines its estimations based on real-time data. The result is a more intelligent, less lagging, and highly adaptive trend-following tool.
This indicator is particularly useful for traders looking to enhance trend-following strategies with AI-driven insights. It reduces noise, improves signal reliability, and even offers a degree of trend forecasting, making it ideal for those who want a more advanced and dynamic alternative to standard Supertrend indicators.
This indicator is provided for educational and informational purposes only. It does not constitute financial advice, and past performance is not indicative of future results. Trading involves risk, and users should conduct their own research and use proper risk management before making investment decisions.
Johnny's Volatility-Driven Trend Identifier w/ Reversal SignalsJohnny's Volatility-Driven Trend Identifier w/ Reversal Signals is designed to identify high-probability trend shifts and reversals by incorporating volatility, momentum, and impulse-based filtering. It is specifically built for traders who want to capture strong trend movements while minimizing false signals caused by low volatility noise.
By leveraging Rate of Change (ROC), Relative Strength Index (RSI), and Average True Range (ATR)-based volatility detection, the indicator dynamically adapts to market conditions. It highlights breakout trends, reversals, and early signs of momentum shifts using strategically placed labels and color-coded trend visualization.
Inspiration taken from Top G indicator .
What This Indicator Does
The Volatility-Driven Trend Identifier works by:
Measuring Market Extremes & Momentum:
Uses ROC normalization with standard deviation to identify impulse moves in price action.
Implements RSI filtering to determine overbought/oversold conditions that validate trend strength.
Utilizes ATR-based volatility tracking to ensure signals only appear when meaningful market movements are occurring.
Identifying Key Trend Events:
Power Peak (🔥): Marks a confirmed strong downtrend, ideal for shorting opportunities.
Surge (🚀): Indicates a confirmed strong uptrend, signaling a potential long entry.
Soft Surge (↗): Highlights a mild bullish reentry or early uptrend formation.
Soft Peak (↘): Shows a mild bearish reentry or early downtrend formation.
Providing Adaptive Filtering for Reliable Signals:
Filters out weak trends with a volatility check, ensuring signals appear only in strong market conditions.
Implements multi-level confirmation by combining trend strength metrics, preventing false breakouts.
Uses gradient-based visualization to color-code market sentiment for quick interpretation.
What This Indicator Signals
Breakouts & Impulse Moves: 🚀🔥
The Surge (🚀) and Power Peak (🔥) labels indicate confirmed momentum breakouts, where the trend has been validated by a combination of ROC impulse, RSI confirmation, and ATR volatility filtering.
These signals suggest that the market is entering a strong trend, and traders can align their entries accordingly.
Early Trend Formation & Reentries: ↗ ↘
The Soft Surge (↗) and Soft Peak (↘) labels indicate areas where a trend might be forming, but is not yet fully confirmed.
These signals help traders anticipate potential entries before the trend gains full strength.
Volatility-Adaptive Trend Filtering: 📊
Since the indicator only activates in volatile conditions, it avoids the pitfalls of low-range choppy markets where false signals frequently occur.
ATR-driven adaptive windowing allows the indicator to dynamically adjust its sensitivity based on real-time volatility conditions.
How to Use This Indicator
1. Identifying High-Probability Entries
Bullish Entries (Long Trades)
Look for 🚀 Surge signals in an uptrend.
Confirm with RSI (should be above 50 for momentum).
Ensure volatility is increasing to validate the breakout.
Use ↗ Soft Surge signals for early entries before the trend fully confirms.
Bearish Entries (Short Trades)
Look for 🔥 Power Peak signals in a downtrend.
RSI should be below 50, indicating downward momentum.
Volatility should be rising, ensuring market momentum is strong.
Use ↘ Soft Peak signals for early entries before a full bearish confirmation.
2. Avoiding False Signals
Ignore signals when the market is ranging (low ATR).
Check RSI and ROC alignment to ensure trend confirmation.
Use additional confluences (e.g., price action, support/resistance levels, moving averages) for enhanced accuracy.
3. Trend Confirmation & Filtering
The stronger the trend, the higher the likelihood that Surge (🚀) and Power Peak (🔥) signals will continue in their direction.
Soft Surge (↗) and Soft Peak (↘) act as early warning signals before major breakouts occur.
What Makes This a Machine Learning-Inspired Moving Average?
While this indicator is not a direct implementation of machine learning (as Pine Script lacks AI/ML capabilities), it mimics machine learning principles by adapting dynamically to market conditions using the following techniques:
Adaptive Trend Selection:
It does not rely on fixed moving averages but instead adapts dynamically based on volatility expansion and momentum detection.
ATR-based filtering adjusts the indicator’s sensitivity to real-time conditions.
Multi-Factor Confirmation (Feature Engineering Equivalent in ML):
Combines ROC, RSI, and ATR in a structured way, similar to how ML models use multiple inputs to filter and classify data.
Implements conditional trend recognition, ensuring that only valid signals pass through the filter.
Noise Reduction with Data Smoothing:
The algorithm avoids false signals by incorporating trend intensity thresholds, much like how ML models remove outliers to refine predictions.
Adaptive filtering ensures that low-volatility environments do not produce misleading signals.
Why Use This Indicator?
✔ Reduces False Signals: Multi-factor validation ensures only high-confidence signals are triggered.
✔ Works in All Market Conditions: Volatility-adaptive nature allows the indicator to perform well in both trending and ranging markets.
✔ Great for Swing & Intraday Trading: It helps spot momentum shifts early and allows traders to catch major market moves before they fully develop.
✔ Visually Intuitive: Color-coded trends and clear signal markers make it easy to interpret.