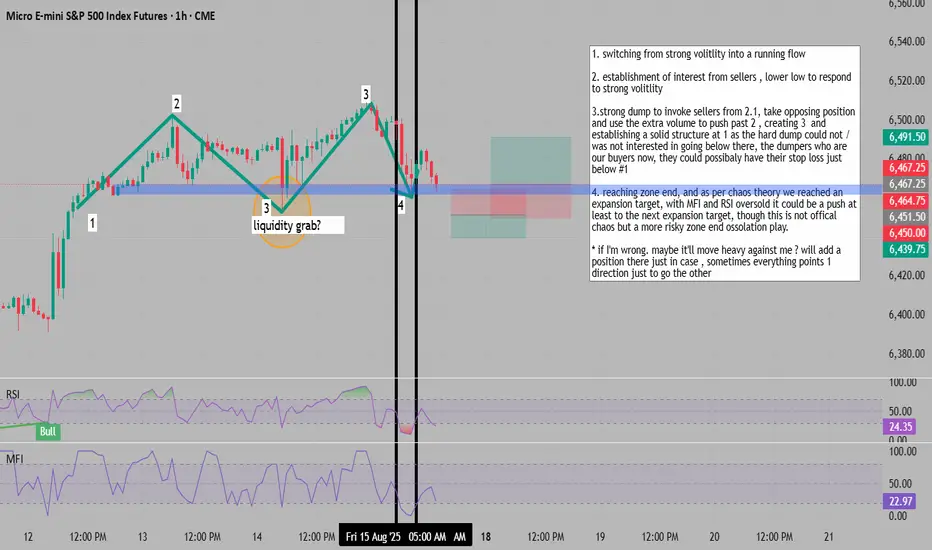
1. **Pattern Recognition**: Identifying a transition from strong volatility into a running flow pattern.
2. **Seller Interest Established**: Lower low formation in response to the initial volatility spike, confirming seller presence at this level.
3. **Liquidity Grab and Reversal**: Strong dump designed to trigger sellers identified in point 2. Take the opposing (long) position here, using the increased volume from triggered sellers to push price past level 2, creating level 3. This establishes solid structure at level 1, as the dump showed no interest in breaking below it. The dumpers (now turned buyers) likely have stop losses positioned just below level 1.
4. **Zone End Target**: Approaching zone end with expansion target reached per chaos theory principles. With both MFI and RSI showing oversold conditions, expecting at minimum a push to the next expansion target. Note: This is an unofficial chaos theory application - a higher risk zone end oscillation play.
**Risk Management Note**: If the analysis is wrong, price may move heavily against the position. Consider adding a hedge position as insurance, as markets sometimes present all signals pointing in one direction only to reverse completely.
for trading mentorship and community, message me on telegram : jacesabr_real
免責聲明
這些資訊和出版物並不意味著也不構成TradingView提供或認可的金融、投資、交易或其他類型的意見或建議。請在使用條款閱讀更多資訊。
for trading mentorship and community, message me on telegram : jacesabr_real
免責聲明
這些資訊和出版物並不意味著也不構成TradingView提供或認可的金融、投資、交易或其他類型的意見或建議。請在使用條款閱讀更多資訊。
