SYNX MASTER**Private Indicator — Invite Only**
**@TrenchFather **
---
## ADD TO CHART (30 SECONDS)
1. Open **TradingView**
2. Search: `Ultimate Easy Trader Pro`
3. Click → **"Add to Chart"**
Done. You’re live.
---
## WHAT YOU SEE
| Signal | Color | Meaning |
|--------|-------|--------|
| **BULL WICKLESS** | Green label ↑ | Strong up candle in trend |
| **BEAR WICKLESS** | Red label ↓ | Strong down candle in trend |
| **BUY (1:1)** | Green label | **ENTER LONG NOW** |
| **SELL (1:1)** | Red label | **ENTER SHORT NOW** |
| **Green Line** | Horizontal | Bull retrace zone |
| **Red Line** | Horizontal | Bear retrace zone |
| **Red Dashed** | Line | **STOP LOSS** |
| **Lime Dashed** | Line | **TAKE PROFIT (1:2 RR)** |
| **Box** | Green/Red | Full trade plan |
---
## YOUR RULES (FOLLOW OR LOSE)
### LONG
1. See **"BULL WICKLESS"** → **Wait**
2. Price drops to **GREEN LINE**
3. See **"BUY (1:1)"** → **ENTER LONG**
4. **SL** = Red dashed
**TP** = Lime dashed
### SHORT
1. See **"BEAR WICKLESS"** → **Wait**
2. Price rises to **RED LINE**
3. See **"SELL (1:1)"** → **ENTER SHORT**
4. **SL** = Red dashed
**TP** = Lime dashed
---
## BEST TIMEFRAMES
| TF | Use |
|----|-----|
| **15m** | Scalp |
| **1H** | Swing *(best)* |
| **4H** | Hold |
---
## BEST PAIRS
- **BTC/USDT**
- **ETH/USDT**
- **EUR/USD**
- **SPX500**
**No shitcoins.**
---
## ALERTS (NEVER MISS)
1. Right-click chart → **"Add Alert"**
2. Pick:
- `LONG ENTRY`
- `SHORT ENTRY`
- `Bull Wickless`
- `Bear Wickless`
3. Enable **Push / Webhook**
---
## SETTINGS (DO NOT TOUCH)
Multitimeframe

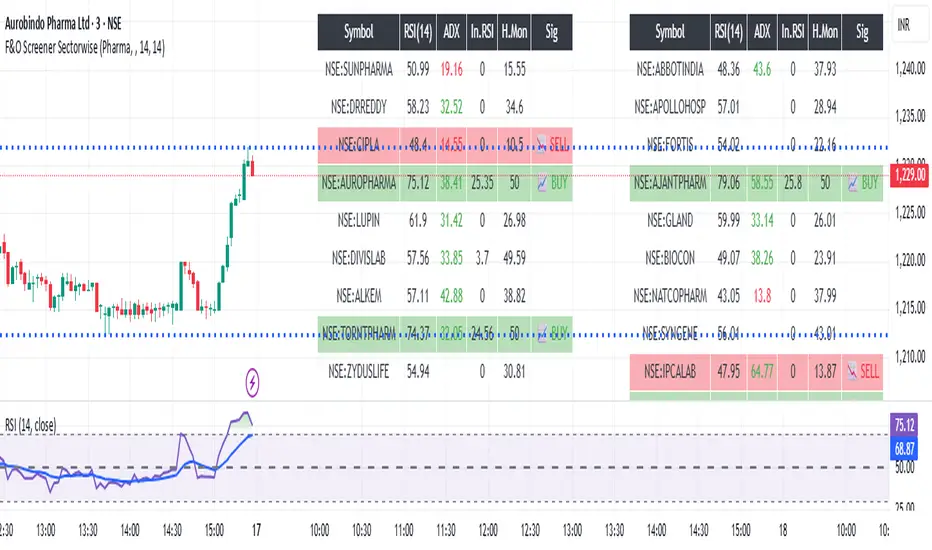
NIFTY FNO STOCK (UPDATED)New latest FNO stock Shown at top of the table in indicator for buy and sell signal in sectorwise stock selection

RSI Maniac
RSI Maniac
A powerful, fully-customizable RSI indicator designed for traders who want deeper insight into momentum across multiple timeframes. This indicator enhances the traditional RSI by adding multi-timeframe analysis, multi-timeframe moving averages, and optional Bollinger Bands applied directly on the RSI curve.
----- Key Features -----
1️⃣ Multi-Timeframe RSI (HTF RSI) : Analyse higher-timeframe momentum while staying on your current chart.
Enable/Disable HTF RSI
Select any timeframe (1m → 1M)
Dedicated RSI length & source for HTF
Great for spotting:
Trend confirmation or divergence between LTF & HTF momentum
2️⃣ Multi-Timeframe Moving Averages : A powerful addition for traders using higher timeframe confirmation.
Enable/Disable HTF MAs
Independent Fast & Slow MA settings
Separate HTF timeframe
Separate MA type for HTF (EMA or HMA)
Great for spotting:
HTF RSI trend direction
HTF momentum overlays on LTF RSI
Cross-timeframe momentum alignment
🎛️ Clean & Organized User Interface : The indicator organizes settings into intuitive groups.
Current Timeframe RSI
Current Timeframe MA
Higher Timeframe RSI
Higher Timeframe MA
Bollinger Bands Settings
Traders can toggle any component independently.
How to trade ?
Based on my approach, I don’t use RSI to catch reversals. Instead, I use it to trade continuations—when the lower timeframe (LTF) RSI aligns with the higher timeframe (HTF) trend. I simply wait for the LTF RSI to move in the same direction as the HTF RSI and then take the continuation trade. Please check the snapshots for a clearer understanding of how these trades work.
Trade less, trade better!

NIFTY FNO Stock Screener Sector-wiseNSE FNO STOCK SCREENER SECTOR WISE. Open indicator and select sector. find which sector is moving upward or downward today. select specific sector and you will see all stock list in selected sector. you will show buy and sell signal in particular sector. open stock which show buy or sell signal and check your requirement for buy or sell . you can also used for options also to buy as per required signal
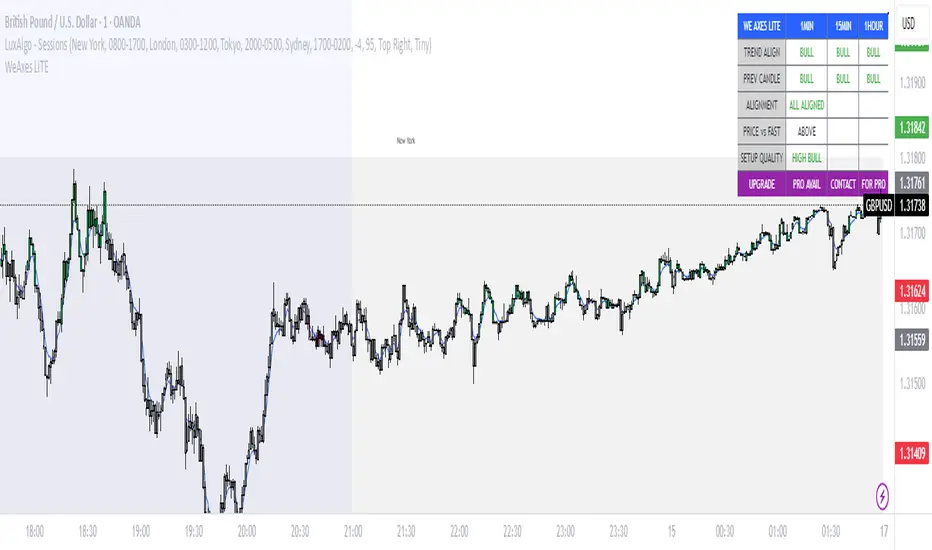
WeAxes MTF Scalper [LITE] WeAxes MTF Scalper
Professional Multi-Timeframe Alignment Tool - LITE Version
What This LITE Version Offers:
3-Timeframe Sync: Monitor 1min, 15min, and 1hr trends simultaneously
Visual Alignment System: Color-coded candles for perfect setups
Quick Setup Recognition: Instant HIGH/MEDIUM/LOW quality ratings
Clean Data Display: Essential alignment information at a glance
Perfect for Scalping:
Green Candles: Perfect bullish alignment across all timeframes
Red Candles: Perfect bearish alignment across all timeframes
Setup Quality: Know immediately if conditions are favorable
Multi-Timeframe Context: Never trade blind again
How to Use:
1. HIGH Quality Setups (Green/Red candles): Highest probability trades
2. MEDIUM Quality: All trends aligned, good for trend following
3. LOW Quality: Mixed signals, better to wait for alignment
PRO Version Includes:
- Advanced volume profiling across all timeframes
- Momentum strength calculations
- Detailed market structure analysis
- Smart Money Concepts integration
- Complete volume analysis
- And much more...
This LITE version gives you a taste of professional multi-timeframe analysis. Contact for PRO version access with full features.
Disclaimer: Use proper risk management. This tool assists analysis but doesn't guarantee profits.
Nifty FNO Stock Screener Sector wise (Protected)NSE FNO STOCK SCREENER SECTOR WISE. Open indicator and select sector. find which sector is moving upward or downward today. select specific sector and you will see all stock list in selected sector. you will show buy and sell signal in particular sector. open stock which show buy or sell signal and check your requirement for buy or sell . you can also used for options also to buy as per required signal

Smart Box Breakout Pro - Swing & ORB System🎯 **SMART BOX BREAKOUT PRO - Professional Trading System**
**Two Powerful Modes in ONE Indicator:**
✅ **SWING BOX MODE** - Automatic consolidation detection based on swing highs/lows
✅ **ORB MODE** - Opening Range Breakout for professional day trading
Stop manually drawing boxes and missing breakouts! This indicator does it ALL automatically.
━━━━━━━━━━━━━━━━━━━━━━━━━━━━━━━━━━━━━━━━━━━
## 🔥 **WHY THIS INDICATOR IS DIFFERENT**
### **1️⃣ SWING BOX MODE** (For All Timeframes)
- Automatically detects swing-based consolidation zones
- Draws perfect boxes around price consolidation
- Identifies breakouts with precision
- Works on ANY timeframe (M5 to Daily)
- Perfect for swing traders and position traders
### **2️⃣ ORB MODE** (For Day Traders) ⭐ UNIQUE FEATURE
- **Opening Range Breakout** system built-in
- Set custom time range (e.g., 09:30-10:00 for first 30 min)
- Works with multiple timezones (NY, London, Tokyo, Chicago)
- Daily auto-reset
- Professional day trading tool
### **3️⃣ 5-STAR SIGNAL QUALITY SYSTEM** 🌟
Every signal is rated 1-5 stars based on:
- ⭐ Box tightness (smaller = better)
- ⭐ Volume confirmation
- ⭐ HTF trend alignment
- ⭐ Clean breakout (no wicks back)
- ⭐ Momentum strength
**Only trade 4-5 star setups for highest probability!**
### **4️⃣ HIGHER TIMEFRAME FILTER**
- Optional HTF trend filter
- Only LONG signals in HTF uptrend
- Only SHORT signals in HTF downtrend
- Significantly improves win rate
### **5️⃣ AUTOMATIC TP/SL CALCULATION**
- Take Profit levels auto-calculated
- Stop Loss based on box structure
- Adjustable percentages
- Visual TP/SL lines on chart
### **6️⃣ PROFESSIONAL DASHBOARD**
- Live signal status
- Active box info
- Signal quality rating
- HTF trend direction
- Current TP/SL levels
━━━━━━━━━━━━━━━━━━━━━━━━━━━━━━━━━━━━━━━━━━━
## 📊 **HOW IT WORKS**
### **SWING BOX MODE:**
1. **Detection**: Indicator finds swing highs and swing lows
2. **Box Formation**: Draws box around consolidation (4 swing points)
3. **Breakout Wait**: Monitors price for breakout
4. **Signal**: When price closes above/below box → SIGNAL
5. **Quality Rating**: Shows 1-5 stars for signal quality
6. **Auto TP/SL**: Displays take profit and stop loss levels
**Perfect for:** Swing trading, position trading, all timeframes
### **ORB MODE (Opening Range Breakout):**
1. **Time Range**: You set the opening range time (e.g., 09:30-10:00)
2. **Range Formation**: Box forms during this time (tracks high/low)
3. **Range Complete**: After time ends, box is complete
4. **Breakout Wait**: Price must break above or below opening range
5. **Signal**: Breakout = entry signal with quality rating
6. **Auto TP/SL**: Professional risk management built-in
**Perfect for:** Day trading stocks, forex, crypto, futures
━━━━━━━━━━━━━━━━━━━━━━━━━━━━━━━━━━━━━━━━━━━━━
## ⚙️ **FEATURES & SETTINGS**
### **Mode Selection:**
- Toggle between Swing Box and ORB mode
- Each mode optimized for different trading styles
### **Swing Box Settings:**
- Swing Length (sensitivity)
- Min distance between boxes
- Max box width (filters out large ranges)
### **ORB Settings:**
- Custom time range (any hours you want)
- Timezone selection (NY, London, Tokyo, Chicago)
- Daily reset option
- Extend box right option
### **Trading Settings:**
- Take Profit % (adjustable)
- Stop Loss offset % (adjustable)
- Minimum signal quality filter (1-5 stars)
### **HTF Filter:**
- Enable/disable higher timeframe trend filter
- Select HTF timeframe
- EMA period for trend determination
### **Visual Customization:**
- Show/hide swing points
- Show/hide TP/SL lines
- Show/hide dashboard
- Custom colors for all elements
- Adjustable line lengths
━━━━━━━━━━━━━━━━━━━━━━━━━━━━━━━━━━━━━━━━━━━
## 🎯 **BEST USE CASES**
### **Swing Box Mode:**
✅ Forex pairs (any timeframe H1-Daily)
✅ Stock swing trading (H4-Daily)
✅ Crypto swing trading (H1-H4)
✅ Index trading (H4-Daily)
✅ Commodity swing trades
### **ORB Mode:**
✅ US Stock day trading (09:30-10:00 EST opening range)
✅ Forex day trading (London open 08:00 GMT)
✅ Crypto day trading (any session)
✅ Futures day trading (08:30-09:00 EST)
✅ Gold/Silver day trading
━━━━━━━━━━━━━━━━━━━━━━━━━━━━━━━━━━━━━━━━━━━
## 📈 **RECOMMENDED SETTINGS**
### **For Forex (Swing Box Mode):**
- Timeframe: H1 or H4
- Swing Length: 5
- Min Signal Quality: 3 stars
- HTF Filter: ON (use H4 or Daily)
### **For Stock Day Trading (ORB Mode):**
- Timeframe: 5min or 15min
- ORB Time: 0930-1000 (EST)
- Timezone: America/New_York
- Min Signal Quality: 4 stars
- HTF Filter: OFF
### **For Crypto (Swing Box Mode):**
- Timeframe: H1 or H4
- Swing Length: 5-7
- Min Signal Quality: 3 stars
- HTF Filter: ON (use H4)
### **For Index Trading (Swing Box Mode):**
- Timeframe: H4 or Daily
- Swing Length: 5
- Min Signal Quality: 4 stars
- HTF Filter: ON (use Daily)
━━━━━━━━━━━━━━━━━━━━━━━━━━━━━━━━━━━━━━━━━━━━━
## 🔔 **ALERTS**
The indicator includes 4 alert types:
1. **🚀 LONG Breakout** - Any long signal
2. **💥 SHORT Breakout** - Any short signal
3. **⭐ 5-STAR LONG** - Perfect 5-star long setup
4. **⭐ 5-STAR SHORT** - Perfect 5-star short setup
**Alert Message Format:**
🚀 LONG BREAKOUT (swing) | Quality: 4/5 | Entry: 1.2345 | TP: 1.2363 | SL: 1.2295
**How to Set Alerts:**
1. Click "Create Alert" button
2. Select alert condition (e.g., "🚀 LONG Breakout")
3. Set alert frequency: "Once Per Bar Close"
4. Name your alert
5. Done! You'll get notified of every signal
━━━━━━━━━━━━━━━━━━━━━━━━━━━━━━━━━━━━━━━━━━━
## 💡 **TRADING TIPS & BEST PRACTICES**
### **✅ DO:**
- Wait for bar close before entering (no repainting!)
- Focus on 4-5 star signals for best results
- Use HTF filter in trending markets
- Respect the auto TP/SL levels
- Trade during high volume sessions
- Use proper position sizing
### **❌ DON'T:**
- Enter before bar close (wait for confirmation)
- Ignore the quality rating (stars matter!)
- Trade against strong HTF trend without filter off
- Move stops closer than indicator suggests
- Overtrade - quality over quantity
- Risk more than 1-2% per trade
### **🎯 PRO TIPS:**
**For Swing Box Mode:**
- Best on trending pairs/stocks
- H1/H4 timeframes work best
- Combine with major support/resistance
- Wait for 4+ star signals in choppy markets
**For ORB Mode:**
- Best on volatile stocks/pairs
- First hour usually defines the day
- Higher volume = better breakouts
- Avoid on low volume days (holidays)
- 5-star ORB breakouts are gold!
━━━━━━━━━━━━━━━━━━━━━━━━━━━━━━━━━━━━━━━━━━━━━
## ❓ **FREQUENTLY ASKED QUESTIONS**
**Q: Does this indicator repaint?**
A: NO! All signals appear on bar close and never disappear or change.
**Q: Can I use this on any market?**
A: YES! Works on Forex, Stocks, Crypto, Futures, Indices, Commodities.
**Q: What's the difference between the two modes?**
A: Swing Box = auto-detects consolidation (any timeframe). ORB = opening range breakout (day trading specific time).
**Q: How accurate are the signals?**
A: Focus on 4-5 star signals with HTF filter for 60-70% win rate potential. Lower star signals = lower probability.
**Q: Can I customize the TP/SL percentages?**
A: YES! Fully adjustable in settings.
**Q: What timeframe works best?**
A: Swing Box: H1-Daily | ORB: M5-M15 (for day trading)
**Q: Do I need to watch the chart all day?**
A: NO! Set up alerts and the indicator notifies you of breakouts.
**Q: Can I backtest this?**
A: YES! All signals are visible on historical bars. Test it yourself on demo first.
**Q: Is the HTF filter necessary?**
A: Optional but recommended in trending markets. Improves win rate significantly.
**Q: How do I set up ORB for US stock trading?**
A: Mode: "ORB", Time: "0930-1000", Timezone: "America/New_York", Timeframe: M5 or M15
━━━━━━━━━━━━━━━━━━━━━━━━━━━━━━━━━━━━━━━━━━━
## 🎓 **WHAT YOU'LL LEARN**
Using this indicator teaches you:
- How to identify consolidation zones
- When breakouts are most likely to succeed
- Quality over quantity in trading
- Importance of HTF trend context
- Professional risk management (TP/SL)
- Opening Range Breakout strategy
- Box breakout methodology
━━━━━━━━━━━━━━━━━━━━━━━━━━━━━━━━━━━━━━━━━━━━━
## 🚀 **WHY TRADERS LOVE THIS INDICATOR**
✅ **Two Systems in One** - Swing Box + ORB = Amazing value
✅ **Quality Rating** - Know which signals to focus on
✅ **No Repainting** - 100% reliable, signals never change
✅ **Auto TP/SL** - Risk management handled for you
✅ **HTF Filter** - Trade with the trend for higher win rate
✅ **Professional Dashboard** - All info at a glance
✅ **Works Everywhere** - Any market, any timeframe
✅ **Clean Design** - Not cluttered, easy to read
✅ **Full Alerts** - Never miss a setup
✅ **Beginner Friendly** - Easy to understand and use
━━━━━━━━━━━━━━━━━━━━━━━━━━━━━━━━━━━━━━━━━━━
## 📊 **TECHNICAL DETAILS**
**Swing Box Detection:**
- Uses pivot high/low logic
- Pattern recognition (4 swing points)
- Filters based on box width and spacing
- Dynamic box sizing
**ORB Detection:**
- Session-based time filtering
- High/low tracking during specified range
- Automatic daily reset
- Timezone-aware calculations
**Signal Quality Algorithm:**
Evaluates 5 factors:
1. Box size (tightness)
2. Volume confirmation
3. HTF trend alignment
4. Breakout cleanliness
5. Momentum strength
**No Repainting:**
- All logic confirmed on bar close
- Variables properly managed with var keyword
- Historical consistency guaranteed
━━━━━━━━━━━━━━━━━━━━━━━━━━━━━━━━━━━━━━━━━━━
## 🎁 **BONUS FEATURES**
- Visual swing point markers (toggle on/off)
- Connection lines showing box formation
- Box extends right for easy viewing
- Color-coded signals (green=long, red=short)
- Quality stars on every signal
- Dashboard shows real-time info
- Multiple timezone support
- Fully customizable colors
━━━━━━━━━━━━━━━━━━━━━━━━━━━━━━━━━━━━━━━━━━━
## 🏆 **PERFECT FOR:**
👉 Day Traders using ORB strategy
👉 Swing Traders looking for breakouts
👉 Forex Traders on H1/H4
👉 Stock Traders (intraday and swing)
👉 Crypto Traders 24/7
👉 Futures Traders
👉 Beginners learning breakout trading
👉 Experienced traders wanting automation
━━━━━━━━━━━━━━━━━━━━━━━━━━━━━━━━━━━━━━━━━━━
## 📖 **STRATEGY GUIDE**
### **Conservative Approach:**
- Only trade 5-star signals
- Use HTF filter ON
- Trade only in direction of HTF trend
- Smaller position sizes
- **Expected Win Rate: 65-75%**
### **Balanced Approach:**
- Trade 4-5 star signals
- Use HTF filter ON
- Respect TP/SL levels
- Standard position sizing
- **Expected Win Rate: 55-65%**
### **Aggressive Approach:**
- Trade 3+ star signals
- HTF filter optional
- Both directions
- Manage trades actively
- **Expected Win Rate: 50-60%**
━━━━━━━━━━━━━━━━━━━━━━━━━━━━━━━━━━━━━━━━━━━
## 💎 **UPGRADE YOUR TRADING TODAY**
Stop missing breakouts. Stop drawing boxes manually. Stop guessing which setups are best.
**Let Smart Box Breakout Pro do the heavy lifting!**
✅ Add to your charts now (it's FREE!)
✅ Set up your alerts
✅ Start catching high-quality breakouts
✅ Trade with confidence
━━━━━━━━━━━━━━━━━━━━━━━━━━━━━━━━━━━━━━━━━━━
## 📞 **SUPPORT & UPDATES**
Questions? Suggestions? Found it useful?
- Drop a comment below
- Follow for updates and new indicators
- Check out my other professional tools
**Created by ThePipsMaker - Professional Trading Indicators**
━━━━━━━━━━━━━━━━━━━━━━━━━━━━━━━━━━━━━━━━━━━
## ⚠️ **DISCLAIMER**
This indicator is for educational purposes. Trading involves risk. Past performance does not guarantee future results. Always practice proper risk management and never risk more than you can afford to lose. Test on demo account first.
━━━━━━━━━━━━━━━━━━━━━━━━━━━━━━━━━━━━━━━━━━━
**📊 Smart Box Breakout Pro - Your Edge in the Markets! 🎯**
**#BoxBreakout #ORB #OpeningRange #SwingTrading #DayTrading #ForexIndicator #TradingViewIndicator #Breakout #SmartMoney**

Supertrend +QQE + DEMASupertrend + QQE + DEMA — Strategy
Inspired by UNITED and my best friend ChatGPT
This strategy combines dual Supertrends, a QQE trend filter, and a 200-period DEMA directional filter to generate structured, trend-aligned entries. It is designed for Heikin Ashi charts , where trend noise is reduced and swing structure becomes clearer.
How It Works
The system fires a trade only when all conditions agree:
1. Both Supertrends flip in the same direction
This identifies strong directional shifts and removes weak reversals.
2. QQE Trend Confirmation
QQE acts as a momentum filter, requiring either a green (bullish) or red (bearish) state with optional consecutive-bar confirmation.
3. 200 DEMA Filter
Only longs above the DEMA and only shorts below the DEMA.
This keeps trades aligned with the higher-timeframe trend.
Because each component filters the other, signals are high-quality, controlled, and structured rather than frequent or reactive.
Expected Performance
Based on the design and typical market testing, this combination yields a 50–70% win rate, depending on:
The market (best on indices like NQ/MNQ, ES/MES, DAX, etc.)
Volatility conditions
Whether used on Heikin Ashi , which increases trend-cleanliness and reduces chop
Timeframe (1m–5m often optimal for intraday)
The system avoids rapid flip-flopping by using “arm → confirm → fire once” logic, which further improves win consistency and reduces whipsaw losses.
How to Properly Use It (IMPORTANT)
This strategy is meant to be run on a Heikin Ashi chart.
Why?
Heikin Ashi smooths candles, giving clearer:
Trend transitions
Pullbacks
Momentum continuation
Supertrend reliability
Running this on normal candles will still work, but the win rate and smoothness drop significantly because Supertrend + QQE respond more cleanly to HA structure.
Trade Behavior
Longs trigger when both Supertrends flip up, QQE is bullish, and price is above DEMA.
Shorts trigger when both Supertrends flip down, QQE is bearish, and price is below DEMA.
Strategy closes when the opposite Supertrend flip occurs.
Alerts fire automatically for buy/sell confirmations.
Best Use Cases
Intraday trend trading
Momentum continuation after a confirmed reversal
Avoiding chop with multi-layer confirmation
Backtesting rule-based execution

Sessions (NY • London • Asia)This tool highlights the London, New York, and Asia sessions on your chart. You can change the session times to whatever you want, making it easy to see which session the market is in.

Simple HEMAs Color(MTF)Simple HEMAs, MTF for both fast and slow HEMA and color selection for multimple use.

EMA 9×20 Multi-TF Scanner — M/W/DThis scrip will facilitate for swing trade based on momentum achieved in monthly weekly and daily

Futures EMA 9×20 Scanner (Daily + 4H + 15m)This script is to facilitate the swing trading in 15min TF using the Daily and 4H.

CTS Dashmatrix MTF by Tony-TechCTS Dashmatrix MTF by Tony-Tech
The CTS Dashmatrix MTF is a multi-timeframe trend and swing-structure dashboard designed to give traders a fast, accurate view of market conditions across key timeframes. It combines ADX trend direction and pivot-based swing analysis into a compact visual matrix that updates in real time.
This tool helps traders quickly identify:
Overall trend direction (Bullish or Bearish)
Swing structure shifts (Higher Lows, Lower Highs, reversals)
Multi-TF alignment from D1 → H4 → H1 → M15 → M5
Trend strength & directional confluence
The dashboard uses simple color logic:
Green = Bullish bias
Red = Bearish bias
Silver = Neutral swing
Whether you trade intraday or swing, the CTS Dashmatrix gives instant clarity on market bias at a glance. It is best used with price action, smart money concepts, or trend-following strategies.

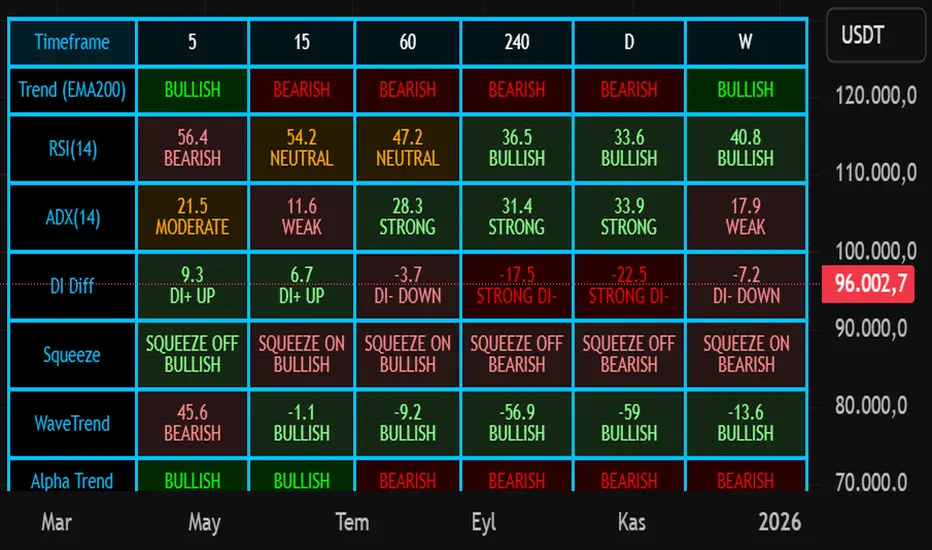
Nuh's Multi-Timeframe DashboardAll 10 indicators (EMA, RSI, ADX, RI, Squeezee, WaveTrend, Alpha Trend, SuperTrend, Stoch RSI, Vix Fix) across 7 time frames (5m, 15m, 1h, 2h, 4h, 1D, 1W) consolidated into a single table.
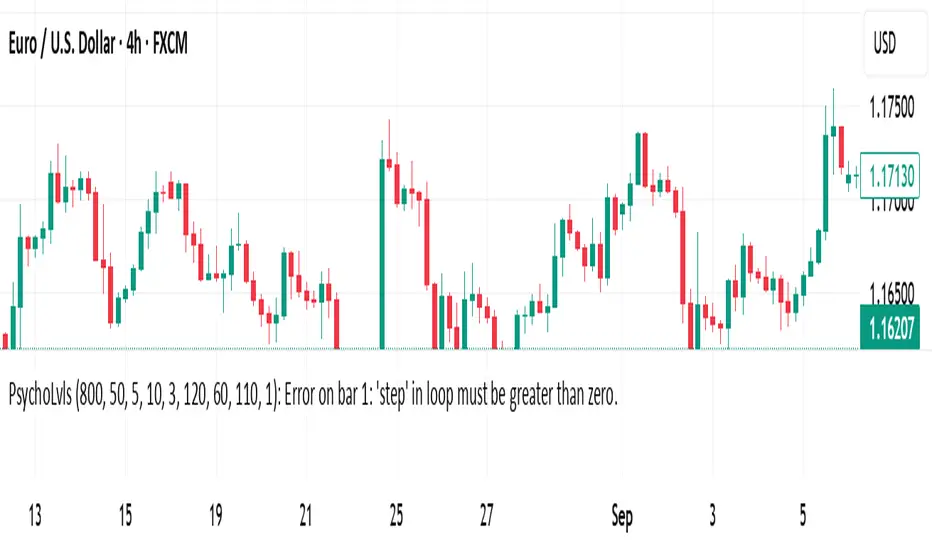
Psychological Levels (Zones + Alerts) - StableThis technical indicator plot support and resistance levels based on the psychological numbers
MTF Candle Countdown — HUD V1 (By Price-Action-Art)
MTF Candle Countdown — HUD V1 (By Price-Action-Art)
A clean, lightweight HUD that shows you exactly how much time is left in multiple higher-timeframe candles — all in one place.
This tool is designed for traders who rely on multi-timeframe precision.
Instead of constantly switching charts or checking timers, the HUD gives you a real-time countdown for up to six timeframes (Daily, 4H, 1H, 30m, 15m, 5m by default).
You can fully customize the timeframes, text size, and HUD position on your chart.
Perfect for:
Intraday and scalping timing
Swing traders waiting for HTF candle closes
ICT / SMC structure-based traders
Anyone who needs exact candle close timing without distractions
Features:
Real-time multi-timeframe candle countdown
Fully adjustable HUD placement (all corners)
Customizable timeframes and text size
Clean, minimal, and non-intrusive design
Updates only on the last bar for performance efficiency
Optional border for a sharper HUD look
Whether you’re waiting for a Daily close to confirm structure or timing your entries around 5m/15m candles, this HUD keeps everything visible and precise at a glance.
If you find this tool helpful, feel free to like, comment, and follow — it motivates me to keep releasing more tools for the community.
🎯 Wyckoff Scalping Pro V2🎯 Wyckoff Scalping Pro V2
Short Description:
Advanced Wyckoff methodology combined with order flow, liquidity analysis, and multi-factor scoring system. Professional-grade scalping and day trading tool with 10-point signal strength rating.
Full Description:
Wyckoff Scalping Pro V2 is a comprehensive trading system that combines classical Wyckoff methodology with modern Smart Money Concepts for precision entries in any timeframe.
🎯 What Makes This System Unique?
Unlike basic indicators that just show patterns, this system uses a 10-Point Scoring System to rate every potential trade:
Signal Strength Components:
✅ Wyckoff Patterns (3 points) - Spring, Upthrust, SOS, SOW
✅ Liquidity Grabs (2 points) - Smart Money stop hunts
✅ Trend Alignment (2 points) - Current timeframe trend
✅ HTF Alignment (2 points) - Higher timeframe confirmation
✅ Volume Confirmation (1 point) - Extreme volume spikes
Only signals with 5+ points are displayed, ensuring you only see high-probability setups!
🔥 Core Features
📊 1. Wyckoff Methodology
Four classic accumulation/distribution patterns:
SPRING (Bullish Reversal)
Price breaks below swing low
Quick recovery with volume
Stop losses swept → reversal up
3-point signal component
UPTHRUST (Bearish Reversal)
Price breaks above swing high
Quick rejection with volume
Bull trap → reversal down
3-point signal component
SOS (Sign of Strength)
Strong bullish candle after accumulation
Breakout with volume
Trend initiation signal
SOW (Sign of Weakness)
Strong bearish candle after distribution
Breakdown with volume
Downtrend initiation signal
💹 2. Order Flow Analysis
Order Blocks
Institutional buying/selling zones
Automatic detection based on strong moves
Limited to 10 zones for clean charts
Transparent boxes for minimal clutter
Fair Value Gaps (FVG)
Price imbalances likely to be filled
Minimum size filter (customizable)
Blue (bullish) and purple (bearish)
Maximum 8 gaps shown
Supply & Demand Zones (Optional)
Classic S/D methodology
Fresh zones only
Toggle on/off for preferences
Professional zone labeling
💧 3. Liquidity Analysis
Liquidity Grabs Detection
Identifies sweep of swing highs/lows
Confirms with volume and candle structure
Yellow labels for visibility
Only major liquidity events shown
Why This Matters:
Smart money often "hunts stops" by sweeping liquidity before reversing. These grabs are powerful reversal signals.
📈 4. Multi-Timeframe Trend Analysis
Current Timeframe:
Fast EMA (default: 9)
Slow EMA (default: 21)
Major trend EMA (default: 200)
Higher Timeframe:
Customizable HTF (default: 15min)
Automatic alignment check
Background tint shows HTF trend
Can require HTF confirmation for signals
🎯 5. Two Trading Modes
STRICT MODE (Default - Recommended)
Requires trend alignment
HTF must confirm
Minimum 5/10 strength
Higher win rate, fewer signals
Best for beginners
FAST MODE
No trend requirements
HTF optional
Minimum 5/10 strength
More signals, lower win rate
For experienced scalpers
📊 6. Live Dashboard
Real-time information panel showing:
Current TF trend (Bull/Bear)
HTF trend status
Volume analysis (Normal/High/Extreme)
Major trend (Above/Below 200 EMA)
Active signal (LONG/SHORT/WAIT)
Signal strength (X/10 points)
Operating mode (Strict/Fast)
⚙️ Customization
Signal Filter Settings:
Min Signal Strength: 3-9 (default: 5)
→ Higher = fewer but better signals
Signal Cooldown: 1-20 bars (default: 5)
→ Prevents signal spam
Strict Mode: ON/OFF
→ Requires trend + HTF alignment
Wyckoff Settings:
Wyckoff Period: 10+ (default: 20)
→ Lookback for pattern detection
Volume Threshold: 1.5+ (default: 2.0)
→ How much above average for confirmation
Order Flow:
Order Blocks: Toggle ON/OFF
Liquidity Grabs: Toggle ON/OFF
Fair Value Gaps: Toggle ON/OFF
FVG Min Size: 0.2-5% (default: 0.5%)
Supply/Demand Zones: Toggle ON/OFF (default: OFF)
Trend Filter:
Fast EMA: Default 9
Slow EMA: Default 21
Major EMA: Default 200
Use 200 EMA Filter: Toggle
Multi-Timeframe:
HTF Timeframe: Any (default: 15min)
Require HTF Alignment: Toggle
💡 How To Use
For Scalping (M1-M5):
Set HTF to M15
Use Strict Mode
Min Signal Strength: 6
Focus on liquidity grabs
Quick in and out
For Day Trading (M15-H1):
Set HTF to H1 or H4
Use Strict Mode
Min Signal Strength: 5
Watch all components
Swing for larger moves
For Swing Trading (H4-D1):
Set HTF to Daily or Weekly
Use Strict Mode
Min Signal Strength: 7
Disable S/D zones (less clutter)
Hold for days
🎯 Entry Rules
LONG Entry:
Required:
Green triangle appears below bar
Label shows "LONG"
Strength ≥ 5/10 in dashboard
Optional (for higher probability):
Strength 7+/10
Spring or SOS pattern present
Liquidity grab occurred
HTF shows green trend
Above 200 EMA
Stop Loss:
Below order block or swing low
10-20 pips buffer
Take Profit:
Next supply zone or opposite order block
Minimum 1:2 RRR
SHORT Entry:
Required:
Red triangle appears above bar
Label shows "SHORT"
Strength ≥ 5/10 in dashboard
Optional (for higher probability):
Strength 7+/10
Upthrust or SOW pattern present
Liquidity grab occurred
HTF shows red trend
Below 200 EMA
Stop Loss:
Above order block or swing high
10-20 pips buffer
Take Profit:
Next demand zone or opposite order block
Minimum 1:2 RRR
📊 Best Markets & Timeframes
✅ Forex
All major pairs (EUR/USD, GBP/USD, etc.)
Best on M5-H1
High liquidity = cleaner signals
✅ Gold (XAUUSD)
Excellent for scalping
M5-M15 optimal
Strong liquidity events
✅ Crypto
Bitcoin, Ethereum
M15-H1 recommended
Volatile = more opportunities
✅ Indices
S&P 500, NASDAQ, etc.
M15-H4 optimal
Clear trends
✅ Stocks
Large cap only
Day trading timeframes
Sufficient volume required
🔔 Alert System
Available Alerts:
🟢 LONG Entry Signal
🔴 SHORT Entry Signal
🟡 Bullish Liquidity Grab
🟡 Bearish Liquidity Grab
🔵 Spring Pattern
🔴 Upthrust Pattern
Alert Messages Include:
Ticker symbol
Current price
Signal strength (X/10)
Pattern type
Recommended Setup:
Enable LONG and SHORT entry alerts
Set to "Once Per Bar Close"
Notification to mobile app
📈 Performance Expectations
Realistic Win Rates:
Strict Mode (5/10 min, with trend):
Win Rate: 65-75%
Signals: 3-8 per day (M15)
Best for: Most traders
Strict Mode (7/10 min, HTF aligned):
Win Rate: 75-85%
Signals: 1-3 per day (M15)
Best for: Conservative traders
Fast Mode (5/10 min, no filters):
Win Rate: 55-65%
Signals: 10-20 per day (M15)
Best for: Experienced scalpers
With Liquidity Grabs:
Win Rate: +10-15% increase
Reversal probability very high
Combine with Wyckoff for best results
💎 Pro Tips
Tip #1: Combine Patterns
Best Setup = Liquidity Grab + Spring/Upthrust
→ 80%+ win rate
→ Smart money confirmed on both sides
Tip #2: Use Signal Strength
5-6 points = OK to trade
7-8 points = Excellent trade
9-10 points = Rare, perfect setup
Tip #3: HTF Alignment
When HTF agrees with signal:
→ Larger position size allowed
→ Wider profit targets
→ Higher probability
Tip #4: Volume Matters
"EXTREME" volume in dashboard:
→ Institutional activity confirmed
→ Higher confidence in setup
→ Stronger moves expected
Tip #5: Clean Charts
Turn OFF S/D zones for day trading
Keep only Order Blocks + FVG
Less clutter = better focus
Tip #6: Signal Cooldown
Increase cooldown during:
→ Low volatility periods
→ Range-bound markets
→ To avoid overtrading
Decrease cooldown during:
→ High volatility
→ Trending markets
→ Major news events
🎨 Visual Design
Clean & Professional:
Minimal chart clutter
Only essential information
Transparent zones (92-95%)
Clear signal markers
Professional color scheme
Information Hierarchy:
Entry signals = LARGEST (impossible to miss)
Liquidity grabs = Medium (yellow labels)
Wyckoff patterns = Small (diamonds)
Zones = Transparent backgrounds
🆚 Comparison to Other Indicators
vs. Basic Order Block Indicators:
✅ Multi-factor scoring system
✅ Wyckoff patterns included
✅ Liquidity analysis built-in
✅ HTF confirmation
✅ Volume analysis vs. Simple Wyckoff Indicators:
✅ Order flow integration
✅ Fair value gaps
✅ Signal strength rating
✅ Multi-timeframe analysis
✅ Professional dashboard vs. Complex "All-in-One" Tools:
✅ Not overwhelming
✅ Focused on what matters
✅ Clean visual design
✅ Fast calculations
✅ Beginner-friendly with pro features
🎯 Who Is This For?
✅ Perfect For:
Scalpers (M1-M5)
Day traders (M15-H1)
Swing traders (H4-D1)
Traders learning Wyckoff
Anyone wanting quality over quantity
Traders seeking multi-confirmation
⚠️ Not Ideal For:
Complete beginners (learn basics first)
"Signal chasers" wanting 50+ signals/day
Traders who don't use stop losses
Very long-term investors
📚 Educational Value
This indicator teaches you:
Classical Wyckoff methodology
How institutions hunt liquidity
Order flow analysis
Multi-timeframe confluence
Volume analysis importance
Risk management through scoring
Learn while you trade!
⚡ Technical Specifications
Pine Script v5
Optimized for speed
No repainting
Real-time calculations
Maximum 200 boxes (clean limits)
Maximum 200 lines
Efficient array management
Works on all liquid markets
🚀 Getting Started (Quick Guide)
Add to Chart
Apply to your favorite pair
Default settings work well
Choose Your Mode
Strict Mode: ON (recommended)
HTF: Set to 15min (or higher for H1+ charts)
Set Alerts
LONG Entry Signal
SHORT Entry Signal
Start Small
Demo trade first
Watch signal strength
Learn the patterns
Scale Up
Once comfortable
Increase position size
Focus on 7+ strength signals
🎯 Final Thoughts
Wyckoff Scalping Pro V2 is not just an indicator - it's a complete trading system that respects your screen space while giving you professional-grade analysis.
The 10-point scoring system ensures you're never guessing about signal quality. You always know exactly how strong a setup is before entering.
Quality over quantity - This system prioritizes high-probability setups over signal spam. You might see 3-8 signals per day on M15, and that's exactly the point. Each one is carefully filtered.
📞 Support & Feedback
Questions? Drop a comment below!
Found this useful? Hit that ⭐ button!
Have suggestions? I'm listening!
Happy Trading! 🚀📈

🎯 Wyckoff Order Block Entry System🎯 Wyckoff Order Block Entry System
📝 INDICATOR DESCRIPTION
🎯 Wyckoff Order Block Entry System Short Description:
Professional institutional zone trading combined with Wyckoff methodology. Identifies high-probability entries where smart money meets classic price action patterns.
Full Description:
Wyckoff Order Block Entry System is a precision trading tool that combines two powerful concepts:
Order Blocks - Institutional zones where large players place their orders
Wyckoff Method - Classic price action patterns revealing smart money behavior
🎯 What Makes This Different?
Unlike traditional indicators that flood your chart with signals, this system only triggers entries when BOTH conditions are met:
Price enters an institutional Order Block zone (current timeframe OR higher timeframe)
A Wyckoff pattern occurs (Spring, SOS, Upthrust, or SOW)
This dual-confirmation approach ensures you're trading with institutional flow at optimal entry points.
📊 Key Features:
✅ Order Block Detection
Automatically identifies institutional buying/selling zones
Current timeframe order blocks (solid lines)
Higher timeframe order blocks (dashed lines) for stronger zones
Customizable strength and extension settings
✅ 4 Wyckoff Entry Patterns
SPRING (Bullish Reversal): Fake breakdown below support → Quick recovery
SOS (Sign of Strength): Strong bullish candle after accumulation
UPTHRUST (Bearish Reversal): Fake breakout above resistance → Quick rejection
SOW (Sign of Weakness): Strong bearish candle after distribution
✅ Clean Visual Design
Minimalist approach - only essential information
Color-coded zones (Green = Bullish, Red = Bearish, Cyan/Magenta = HTF)
Clear entry signals with pattern type labels
No chart clutter - focus on what matters
✅ Multi-Timeframe Analysis
Integrates higher timeframe order blocks
HTF signals marked with "+HTF" tag for extra confidence
Fully customizable HTF selection (H1, H4, Daily, etc.)
✅ Smart Alerts
Entry signal alerts (Long/Short)
Order block formation alerts
HTF order block alerts
Customizable alert messages
💡 How To Use:
Setup: Add indicator to your chart, configure HTF timeframe (default H1)
Wait: Let order blocks form (green/red boxes appear)
Watch: Price returns to order block zone
Entry: Signal appears when Wyckoff pattern confirms
Trade: Enter with the signal, stop below/above order block
📈 Best For:
Forex pairs (all majors and crosses)
Gold (XAUUSD)
Crypto (BTC, ETH, etc.)
Indices (SPX, NAS100, etc.)
Stocks
Commodities
⏱️ Recommended Timeframes:
M15 for scalping
M30 for day trading
H1 for swing trading
H4 for position trading
🎯 Win Rate Expectations:
Current TF signals: 60-70%
HTF signals (+HTF tag): 70-80%
Spring/Upthrust patterns: Highest probability
Works on ALL liquid markets
⚙️ Customizable Settings:
Order block detection parameters
HTF timeframe selection
Wyckoff sensitivity (swing length, volume threshold)
Zone extension duration
Color schemes
📚 Trading Strategy:
This indicator works best when:
Trading in the direction of higher timeframe trend
Using proper risk management (1-2% per trade)
Placing stops just outside order block zones
Taking profits at opposite order blocks
Focusing on HTF signals for higher quality
🔒 Risk Management:
Always use stop losses! Recommended placement:
LONG: 10-20 pips below order block
SHORT: 10-20 pips above order block
Target: Minimum 1:2 risk/reward ratio
💎 Why Traders Love This System:
"Finally, an indicator that doesn't spam my chart with useless signals!" - The quality-over-quantity approach means you only get high-probability setups.
"The HTF order blocks changed my trading!" - Multi-timeframe analysis built-in removes the need for manual higher timeframe checks.
"Wyckoff + Order Blocks = Perfect combination!" - Two proven concepts working together create powerful confluence.
📊 Universal Application:
This system works on ANY liquid market with sufficient volume:
✅ Forex (EUR/USD, GBP/USD, USD/JPY, etc.)
✅ Commodities (Gold, Silver, Oil, etc.)
✅ Indices (S&P 500, NASDAQ, DAX, etc.)
✅ Cryptocurrencies (Bitcoin, Ethereum, etc.)
✅ Stocks (Large cap with good liquidity)
🎓 Educational Value:
Beyond just signals, this indicator teaches you:
How institutional traders think
Where smart money places orders
Classic Wyckoff accumulation/distribution patterns
Multi-timeframe analysis techniques
⚡ Performance:
Lightning-fast calculations
No repainting
Real-time signal generation
Clean code, optimized for speed
🚀 Get Started:
Add to your favorite chart
Adjust HTF timeframe to match your trading style
Wait for high-quality signals
Trade with confidence
Remember: Quality beats quantity. This system prioritizes precision over frequency. You might see 2-5 signals per day on M30 - and that's exactly the point. Each signal is carefully filtered for maximum probability.
Ready to trade like institutions?
👉 Add this indicator to your chart now
👉 Configure your preferred HTF timeframe
👉 Start catching high-probability setups
👉 Trade smarter, not harder
Questions or feedback? Drop a comment below!
Found this useful? Hit that ⭐ button and share with fellow traders!
Happy Trading! 🚀📈

MTF-CPR TableTable gives you CPR values based on Camarilla calculation with S&R 3 & 4 Levels...
Highlights the cell green when Price is in range and marks the Pivot Red when we have a Narrow CPR range...
Enjoy!!

Street Sweeper ProThis was Made by The Boripips himself to Help Traders Spot The Liquidity Sweeps, if your part of the community then you know to use this with your eyes closed.

EMA Crossover with Supertrend + Ribbon + Multi TFThis is a multi indicator all in one, incorporates several indicators in one. Stay on the right side of the trend with this indicator, has customizable everything, a fast and slow ema ribbon, a second ema ribbon for longer ema lengths, a customizable multi time frame trend table, a customizable supertrend, the vwap, 2 background trend color changes , one for the ema's and one for the supertrend, daily support and resistance lines, follow up bearish or bullish signals on every candle. I am sure you will be able to find this multi indicator very useful!

Qullamagi EMA Breakout Autotrade (Crypto Futures L+S)Title: Qullamagi EMA Breakout – Crypto Autotrade
Overview
A crypto-focused, Qullamagi-style EMA breakout strategy built for autotrading on futures and perpetual swaps.
It combines a 5-MA trend stack (EMA 10/20, SMA 50/100/200), volatility contraction boxes, volume spikes and an optional higher-timeframe 200-MA filter. The script supports both long and short trades, partial take profit, trailing MA exits and percent-of-equity position sizing for automated crypto futures trading.
Key Features (Crypto)
Qullamagi MA Breakout Engine – trades only when price is aligned with a strong EMA/SMA trend and breaks out of a tight consolidation range. Longs use: Close > EMA10 > EMA20 > SMA50 > SMA100 > SMA200. Shorts are the mirror condition with all MAs sloping in the trend direction.
Strict vs Loose Modes – Strict (Daily) is designed for cleaner swing trades on 1H–4H (full MA stack, box+ATR and volume filters, optional HTF filter). Loose (Intraday) focuses on 10/20/50 alignment with relaxed filters for more frequent 15m–30m signals.
Volatility & Volume Filters for Crypto – ATR-based box height limit to detect volatility contraction, wide-candle filter to avoid chasing exhausted breakouts, and a volume spike condition requiring current volume to exceed an SMA of volume.
Higher-Timeframe Trend Filter (Optional) – uses a 200-period SMA on a higher timeframe (default: 1D). Longs only when HTF close is above the HTF 200-SMA, shorts only when it is below, helping avoid trading against dominant crypto trends.
Autotrade-Oriented Trade Management – position size as % of equity, initial stop anchored to a chosen MA (EMA10 / EMA20 / SMA50) with optional buffer, partial take profit at a configurable R-multiple, trailing MA exit for the remainder, and an optional cooldown after a full exit.
Markets & Timeframes
Best suited for BTC, ETH and major altcoin futures/perpetuals (Binance, Bybit, OKX, etc.).
Strict preset: 1H–4H charts for classic Qullamagi-style trend structure and fewer fake breakouts.
Loose preset: 15m–30m charts for higher trade frequency and more active intraday trading.
Always retune ATR length, box length, volume multiplier and position size for each symbol and exchange.
Strategy Logic (Quick Summary)
Long (Strict): MA stack in bullish alignment with all MAs sloping up → tight volatility box (ATR-based) → volume spike above SMA(volume) × multiplier → breakout above box high (close or intrabar) → optional HTF close above 200-SMA.
Short: Mirror logic: bearish MA stack, tight box, volume spike and breakdown below box low with optional HTF downtrend.
Best Practices for Crypto
Backtest on each symbol and timeframe you plan to autotrade, including commissions and slippage.
Start on higher timeframes (1H/4H) to learn the behavior, then move to 15m–30m if you want more signals.
Use the higher-timeframe filter when markets are strongly trending to reduce counter-trend trades.
Keep position-size percentage conservative until you fully understand the drawdowns.
Forward-test / paper trade before connecting to live futures accounts.
Webhook / Autotrade Integration
Designed to work with TradingView webhooks and external crypto trading bots.
Alert messages include structured fields such as: EVENT=ENTRY / SCALE_OUT / EXIT, SIDE=LONG / SHORT, STRATEGY=Qullamagi_MA.
Map each EVENT + SIDE combination to your bot logic (open long/short, partial close, full close, etc.) on your preferred exchange.
Important Notes & Disclaimer
Crypto markets are highly volatile and can change regime quickly. Backtest and forward-test thoroughly before using real capital. Higher timeframes generally produce cleaner MA structures and fewer fake breakouts.
This strategy is for educational and informational purposes only and does not constitute financial advice. Trading leveraged crypto products involves substantial risk of loss. Always do your own research, manage risk carefully, and never trade with money you cannot afford to lose.

RSI Divergence on 15-Minute with 5min & 1min CorrectionUse the 5 minute chart to identify 15 minute rsi divergence, showing the 5 and 1 min rsi levels "participating in" the correction of the 15 minute rsi divergence.
